Having put on hold the work on the master bathroom while I waited for my shower wall tiles to arrive, I shifted my attention to the great room and adjoining areas, as described in the previous post. But now it was time to pick up where I left off in the master bathroom.
The shower wall tiles had been sitting untouched during most of the time I was painting the main areas of the house. However, I took the step of unboxing them as soon as they arrived to make sure they were intact before setting them aside. There were three broken tiles, and I communicated that to the distributor. However, I ordered a sufficient amount that I didn’t think replacements would be needed. Here is one of the pictures I sent to the distributor showing the broken tile, still in the box.
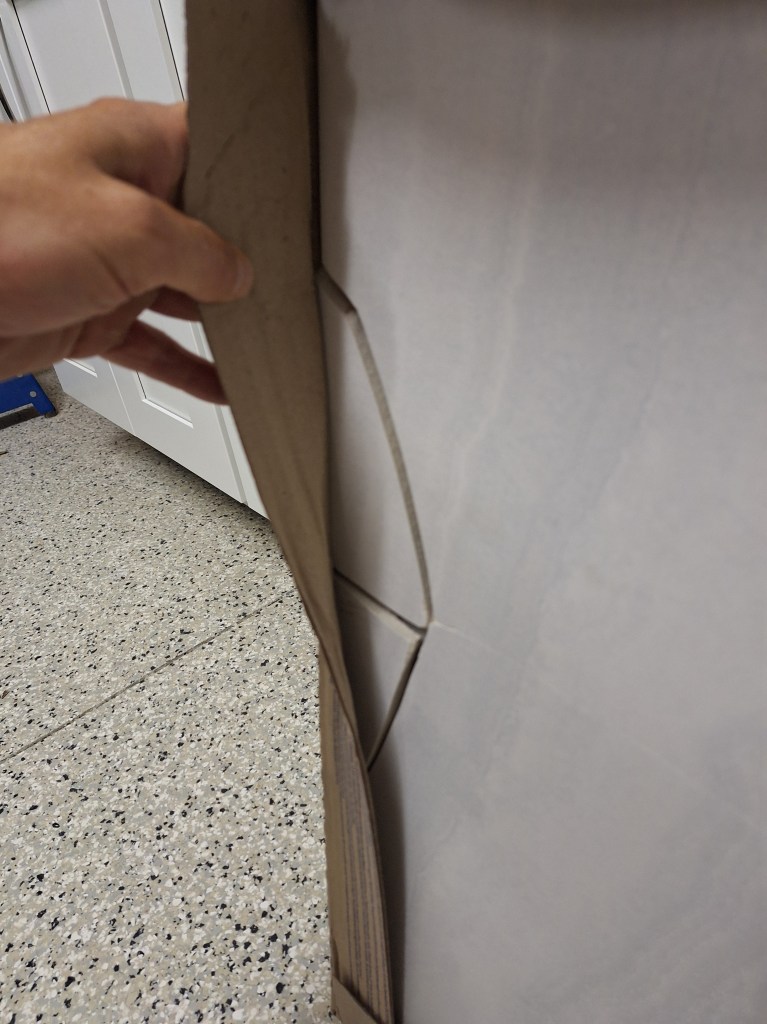
The tiles are 22″ x 11″. To be precise, they are 22 1/4″ x 11 1/8″. The precision is needed when modeling the layout in SketchUp. In the model, I even account for the 1/8″ grout lines. I learned this lesson when I worked on the large floor tiles in the master bathroom, which I described a couple of posts ago.
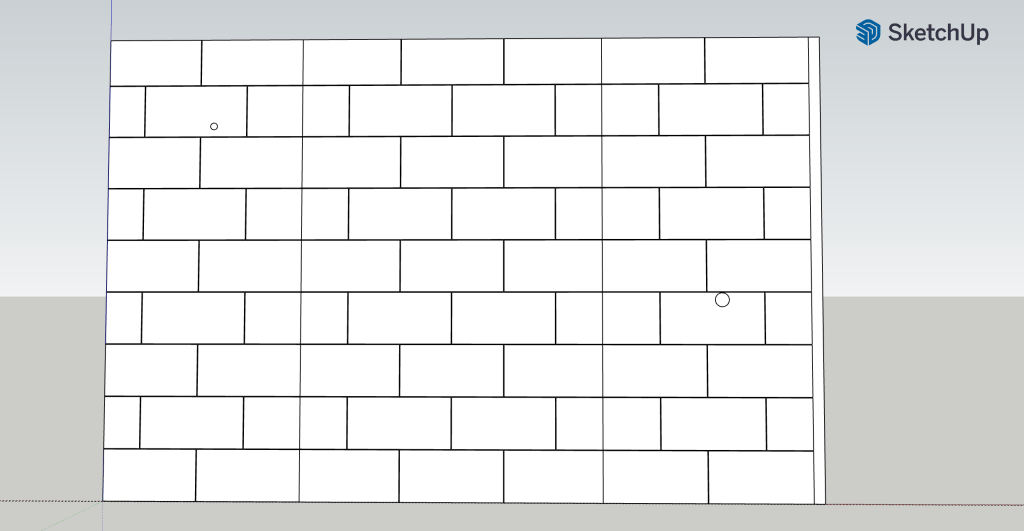
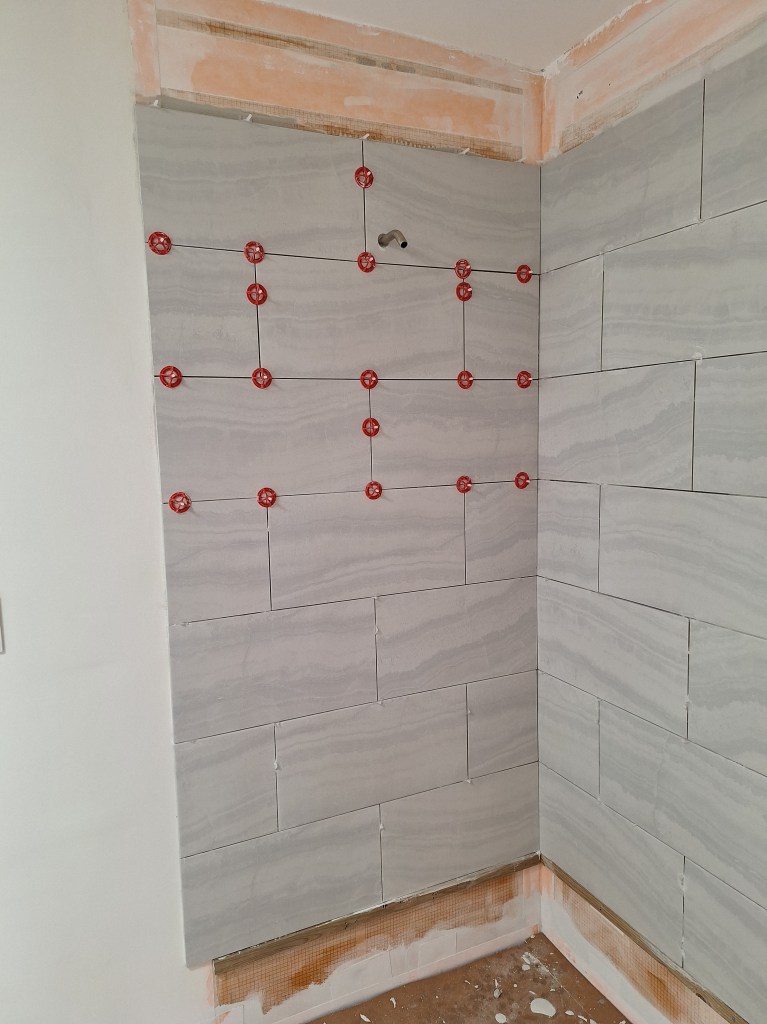
Here is my first attempt at layout. This is a 2-D rendering, so you have to use your imagination.
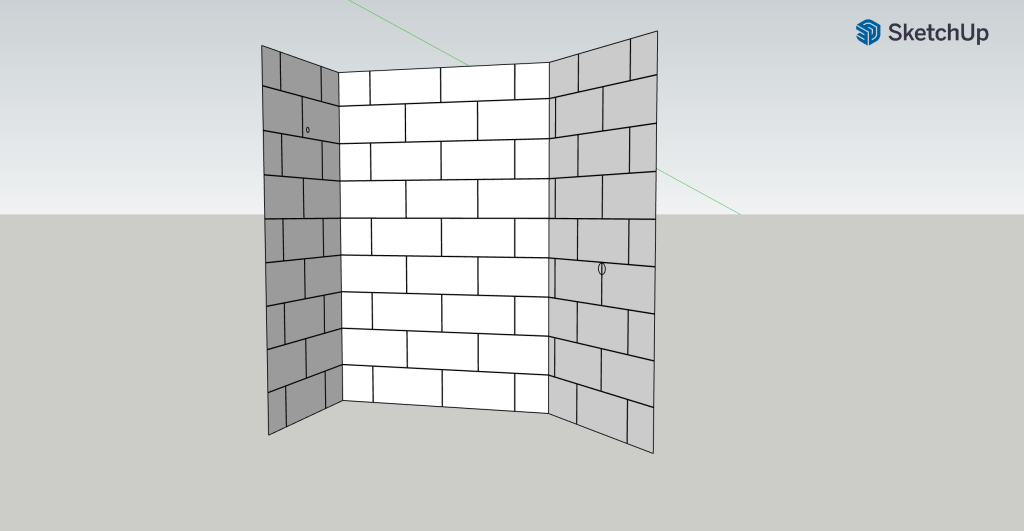
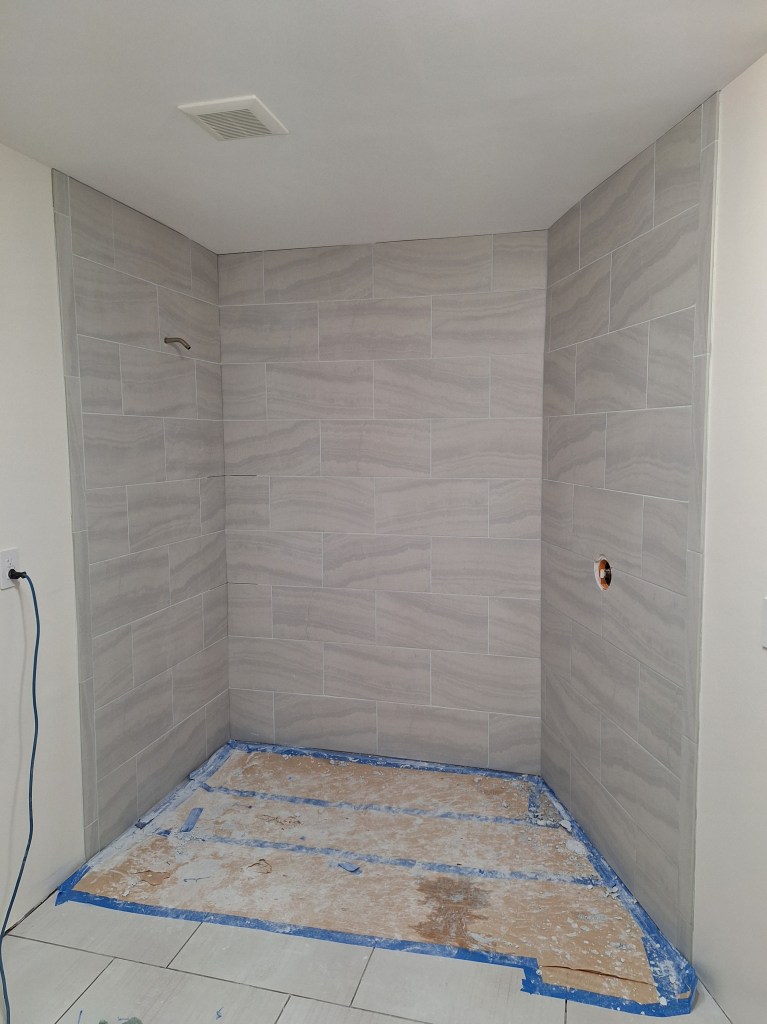
In this image you can see three wall sections. The one on the left represents the wall with the shower head that is 90 degrees to the adjacent back wall. Note the small circle in the top portion of that section. It represents the shower arm that is currently in place. The back wall is the middle section, and the section to the right of it is the angled wall, approximately 45 degrees to the back wall. The rightmost section is where the shower valve control resides, and I’ve represented it with somewhat larger circle, depicting its location on the wall.
In this layout, I simply staggered the tiles, bisecting the ones below. They are centered on the back wall and extend out. What this revealed was that I would be left with a narrow strip on the right side, as you can see above. That won’t do, so I had to try something else.
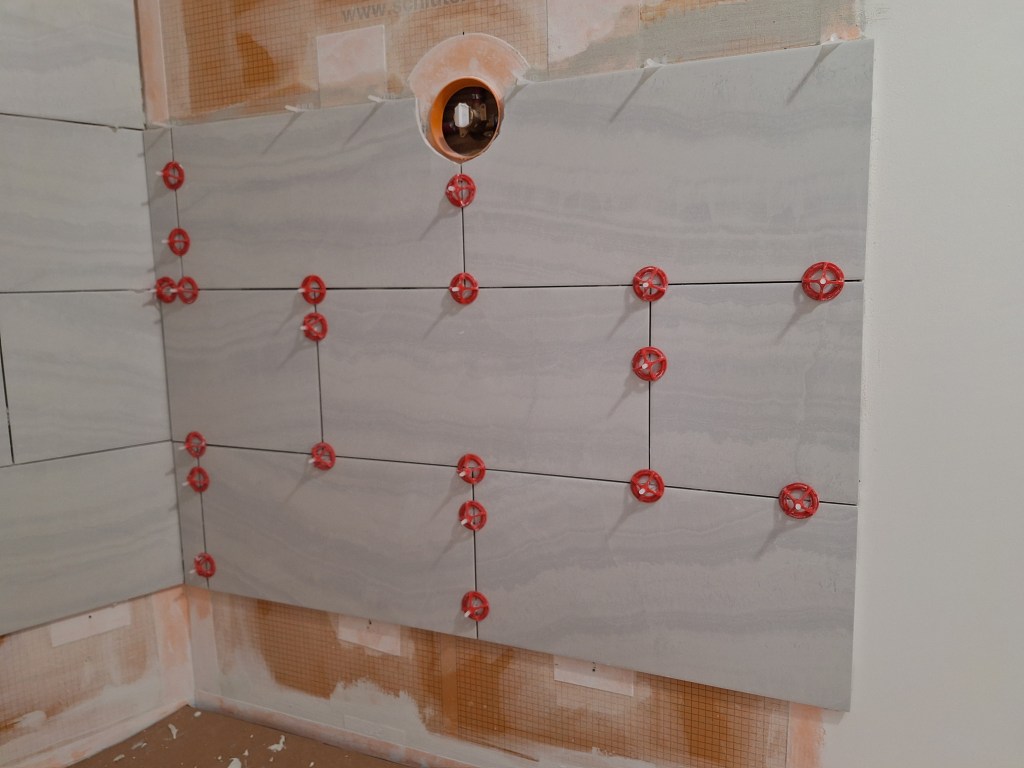
My next attempt brought into consideration the location of the shower arm and the valve. In the first try, I made no attempt to account for them. Although they are close, they are not centered on their respective walls. That is due, somewhat, to the framing, but I was thinking more of utility when placing them. The shower arm is lined up with the drain, which I had no intention of moving, and I located the valve a bit closer to the entrance to make it easier to reach. Given that, I thought I would try laying out the tiles so that they were centered on these things. Here is the result.

In this layout you can see two areas where we have slivers: the right side of both the shower head wall, and the valve wall. Note that I shifted the tiles up a row so that now the bottom row of the back wall starts with four tiles instead of three. I did that in order to reduce the number of slivers from five to four on the adjacent walls. I want to avoid introducing slivers as much as possible.
I can eliminate the slivers on the shower head wall by abandoning the notion of centering the tiles on the shower arm.

This is an improvement with respect to slivers, and I think it looks fine even though the tiles are no longer centered on the shower arm. However, I was unable to come up with a solution for the slivers on the valve wall. That wall is just a bit too wide to avoid them altogether. Below I show it in three dimensions. From this perspective, I feel the slivers become less noticeable since they’re in the corner. Consequently, I decided to go with this layout.
The first step in bringing this to life was to protect the shower floor tiles with a cardboard covering and to install ledger boards above the bottom row of tile to set a reference.

The reason one installs ledger boards is to create a perfectly level reference surface from which to start. I used a laser level to mark the walls before screwing these boards in place. The screws do puncture the waterproof membrane, but once the ledger boards are removed, I will fill them with a product called Kerdi-Fix, which is meant to seal such punctures. Another reason you start putting down the row of tiles above the bottom row, is because the bottom row (and, usually the top row) are unlikely to be perfectly level. When you return to place the bottom row of tiles, they will likely have to be scribed to ensure they fit well with the shower floor tiles.
I began the process by placing tiles on the back row. Here are the first tiles I placed before running out of thin-set.

Good thing I put that cardboard down to protect the shower floor tiles. What a mess I made! Below is a closer look.
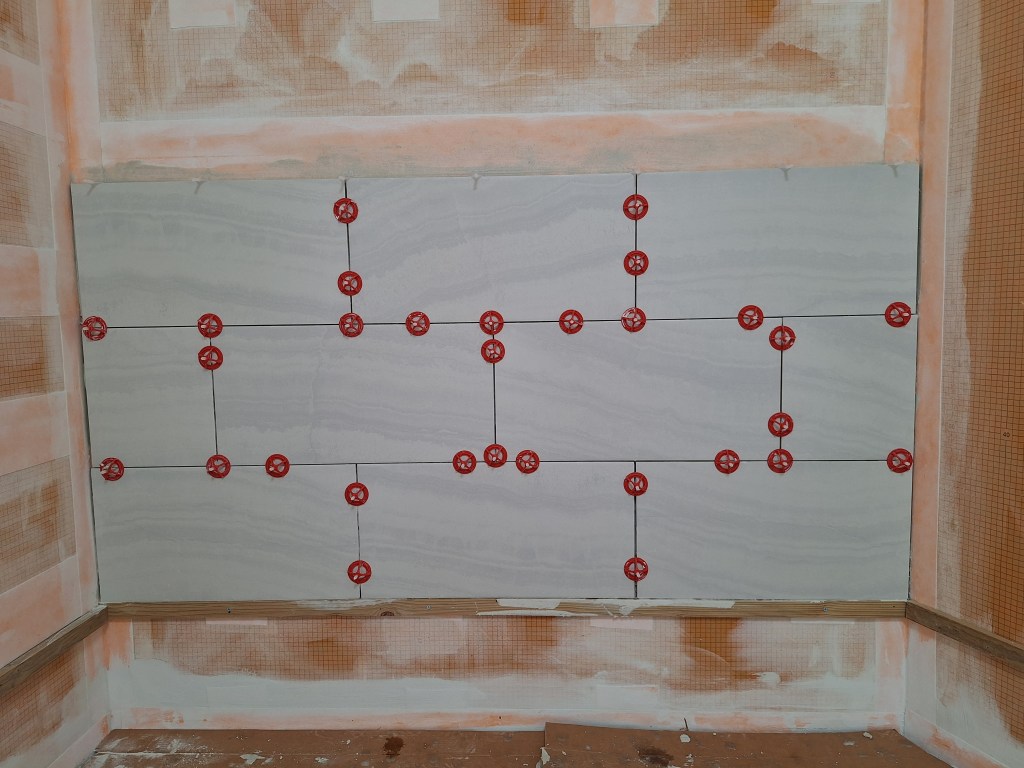
All those red things are tile levelers. They screw onto plastic clips that are placed behind the tiles to pull them to the same level. After the thin-set dries, you knock them off will a rubber mallet and the plastic clips are supposed to break along a perforation. Unfortunately, it often doesn’t break cleanly, so there is usually some tedious cleanup work to remove the bits that remain.
In the closeup above you can see that for the row sitting on the ledger board, there is a wider gap between the center tile and the tile to its right versus that of the one to its left. When placing the tile to the right, I couldn’t figure out why it was not lining up correctly. Something was off. When I pushed it toward the center tile, the gap on the top closed before the bottom. This suggested that the ledger board was not level, even though it sat exactly on the laser line over its entire length when I installed it the day before. Could the tile edge not be flat? I doubt it. Perhaps the wood moved overnight. I brought it in from an unconditioned garage into a conditioned house, which could have resulted in some movement. With the thin-set on the wall, I did not have time to mess with it, so what I ended up doing was opening the gap wider than I wanted in order to make it look as straight as I could. If you look closely, you can see that the bottom is a touch wider than the top. Once the grout is applied, this will be barely noticeable, but I mention it because it was an unexpected anomaly.
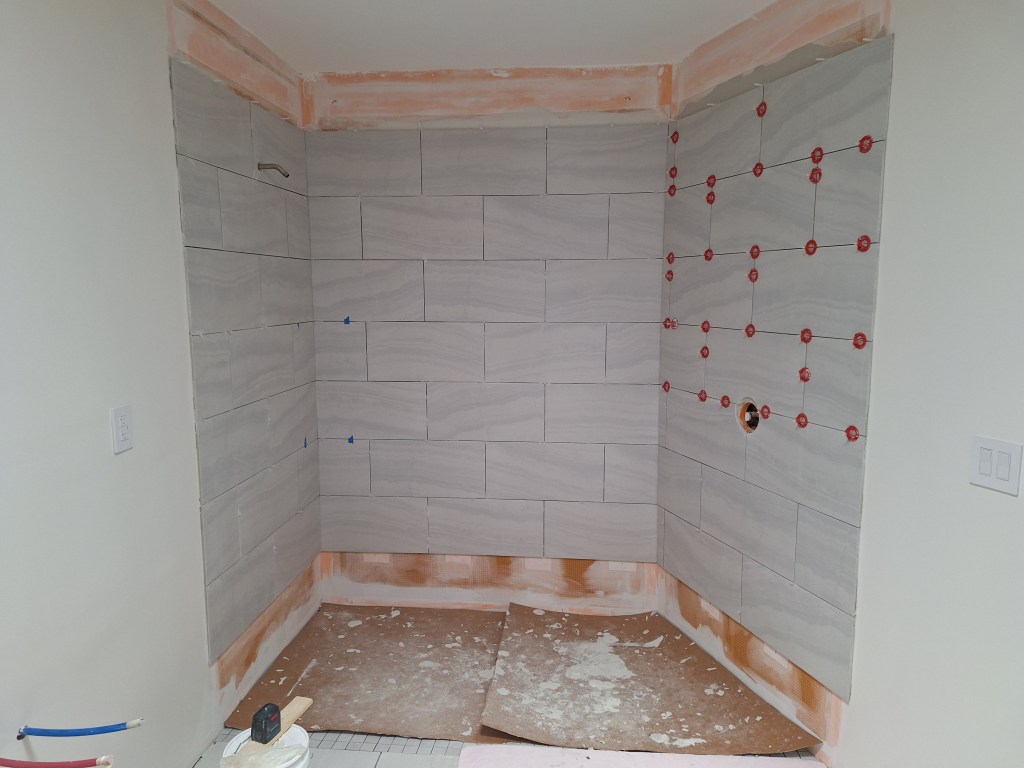
I finished the back wall up to, but not including, the top row, then started on the shower head wall. I will do any scribing (top and bottom) when all the other tiles are in place.

Although I had a ledger board, I still needed some shims to ensure the bottom row aligned perfectly with the row on the adjacent wall. I suspect some thin-set got onto the edge of the ledger board along the back wall, pushing the tiles up just a bit. Not a big deal.
The next few rows on the shower head wall would encounter the shower arm, so I would have to cut a hole for the first time. I picked up a special diamond drill bit for this. The bit I was 1-1/4″ in diameter, and when cutting a hole with such a bit you are supposed to start at about a 45 degree angle then slowly bring the bit to vertical. As usual, I’d never done this before so I practiced on a scrap piece of tile. It was a little awkward, but after trying it out I felt I was ready for the real deal. Of course, it doesn’t matter how well you drill the hole if it isn’t in the right location, so that was another challenge. I was prepared to take more than one shot at it, but fortunately, I got the location right on the first go! However, as you can see below, I messed up a bit when starting the hole.

Look at how well located that hole is. I was very pleased, and surprised. You can see where I messed up, but fortunately, those marks will be easily covered by the escutcheon that will slide over the shower arm to cover the hole. Here is it is zoomed out.
Next, I moved on to the valve wall. Again, I had to cut a circle to accommodate the valve, but this time I would have to make a larger circle consisting a three partial circles. To do this I would use my angle grinder to trace out quarter circles on two separate tiles, followed by a half circle (sort of) on a third tile. This was not very pretty.
As you can see, I went a bit wide. This was not what I wanted but, again, the escutcheon will cover it. For the row above it, I did a better job.

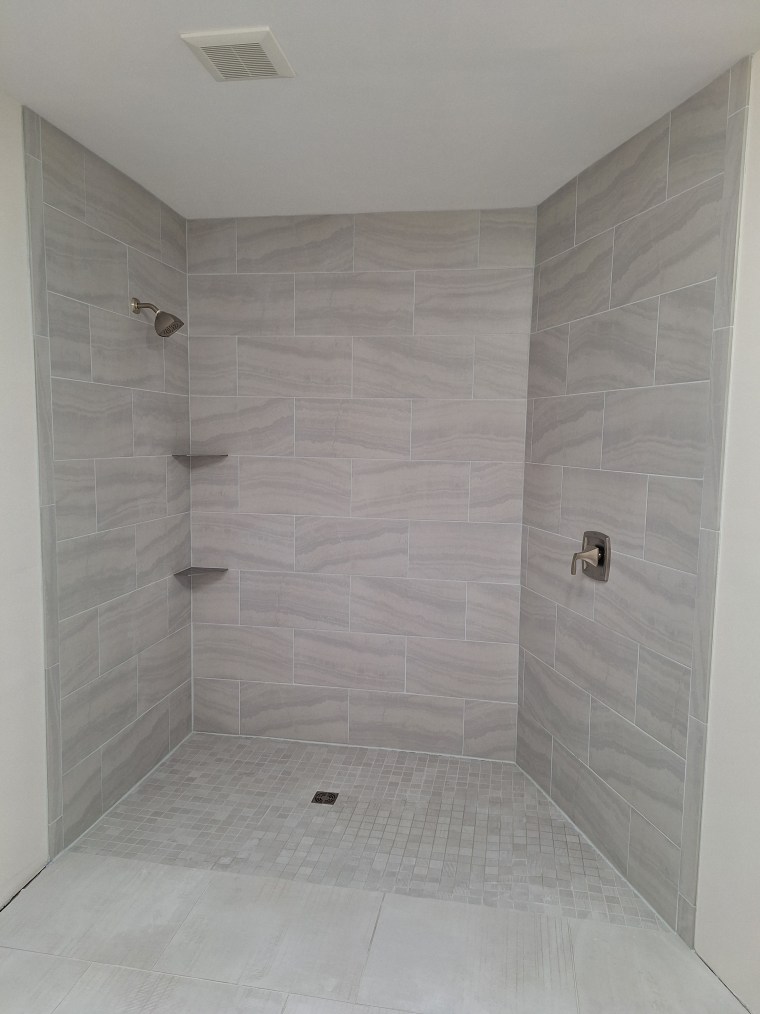
It could still be tighter, but that is more to my liking. I’ll have another opportunity when I work on the guest bathroom, so I hope to improve. In future, anyone other than me who removes the escutcheon will probably have a laugh, as this is pretty ugly. You might also note that in the image above I have removed the ledger boards. Here is a zoomed out shot.
The blue tape you see in the corner between the back wall and shower head wall mark where I will be placing two corner shelves. The areas between the two blue tape markers on adjacent walls must remain grout free. The shelves will insert between the tiles and be secured in place using silicone.
The next step was to place the tiles the meet the floor and ceiling, followed by the bull nose tiles to finish the edges where they meet the finished wall.


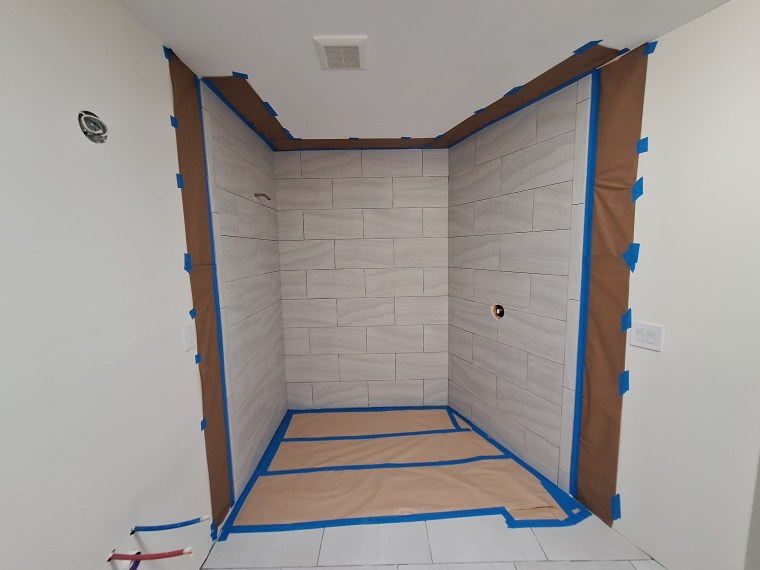
I think it looks pretty good, even before the grout. To prepare for grouting the shower walls, I masked off all adjacent surfaces.
Having never grouted before, I decided to just do the shower head wall and then leave it for the day. If, for some reason, it looked really bad the next day, I’d have just one wall to correct rather than all of them. Here it is just before I left for the day.

You can see where I did not grout between the tiles where the corner shelves will go. Here is a closeup so you can get a better sense of the color.

It looked pretty good, so I didn’t expect to see any major change the next day; perhaps some haze to wipe off. Indeed, it looked just fine the next day, so I pushed on with the other walls. Here are some images after I removed most of the masking.

Before installing the shelves and caulking the corners, I grouted the shower floor.

Then I caulked the seems and installed the shelves and shower hardware.
The caulking was a real nuisance. Because this is a wet area, a silicone based caulk is required. I used one that matched the wall grout color. It was really messy and required I redo the area between the walls and the floor to get it looking decent. Unlike regular caulk you use for dry areas, the silicone stuff is not user friendly.
A glass wall will be installed, but I decided to hire that out. It is a two person job, so I didn’t want to mess with it. Also, from the image above you can see that I grouted the main floor of the bathroom. It, and the shower floor, look a bit hazy in the image. It has since been cleaned up, which you’ll see later.
In addition to ordering the glass wall for the shower, I also ordered the toilet and the light that will go on the ceiling in the shower. Before the toilet goes in, the baseboards need to be in place. I didn’t want to have to do that with a toilet in the way. However, before purchasing the baseboards, I had a bit of a diversion.
When I’ve purchased material that did not fit inside my vehicle, I either rented a truck or arranged for their delivery. To avoid this extra expense and inconvenience, I purchased a couple of crossbars for my existing roof rack and then decided to build some additional things to aid in securing both sheet goods (i.e., plywood or drywall) and long boards (i.e., baseboards). To do this, I recycled the many furring strips I had lying around in the garage, much like I did at the beginning of the year to build the mobile wood storage unit.
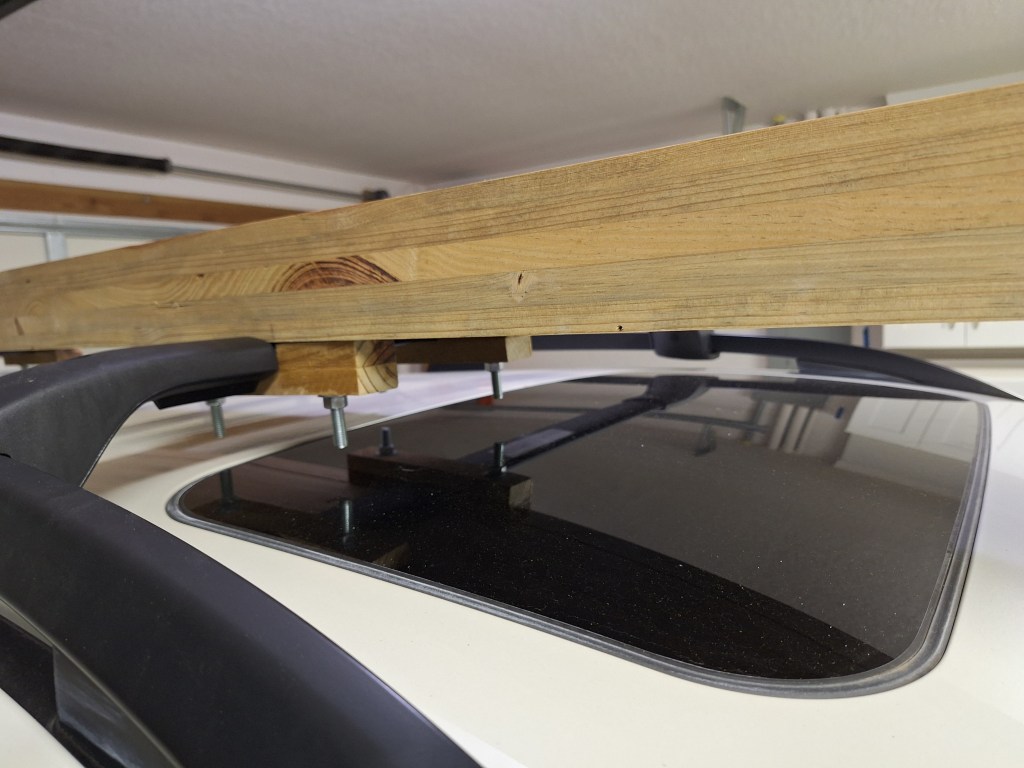
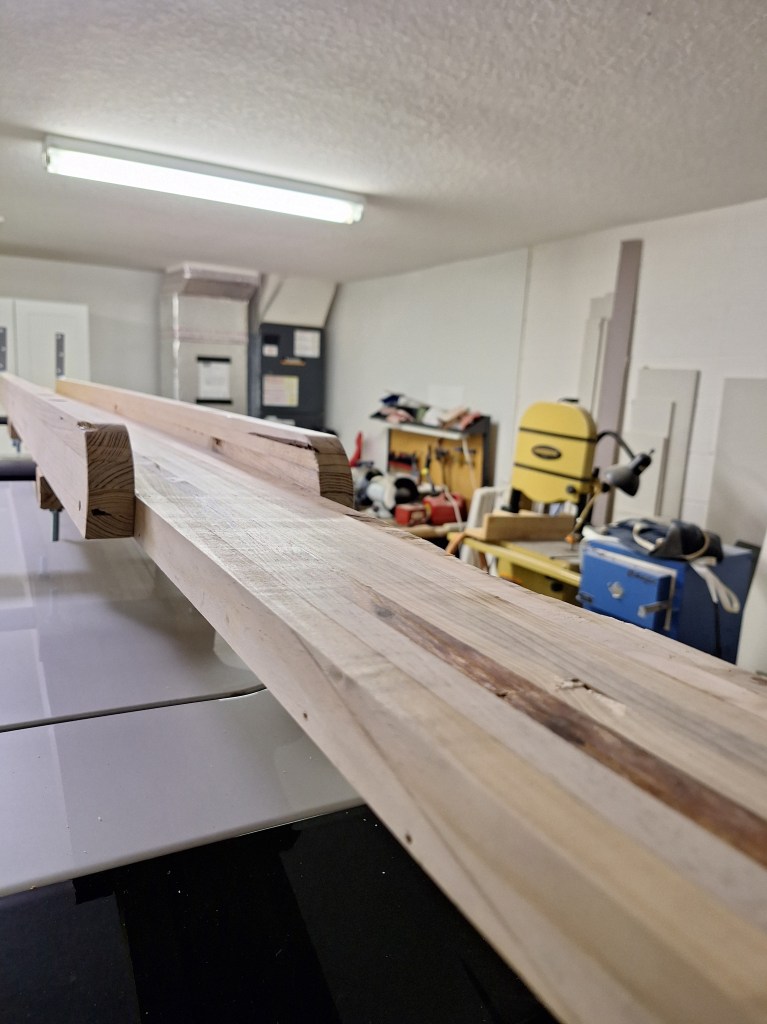
To support sheet goods, I made two rails that would run the length of the car roof and secure to the crossbars. In the image below, you can see one of the rails and the laminated pieces that it’s made of. You can also see the mounting brackets I made to secure it to the front and rear crossbars. BTW, I’ve since replaced the bolts for shorter ones, so they don’t protrude down so far.
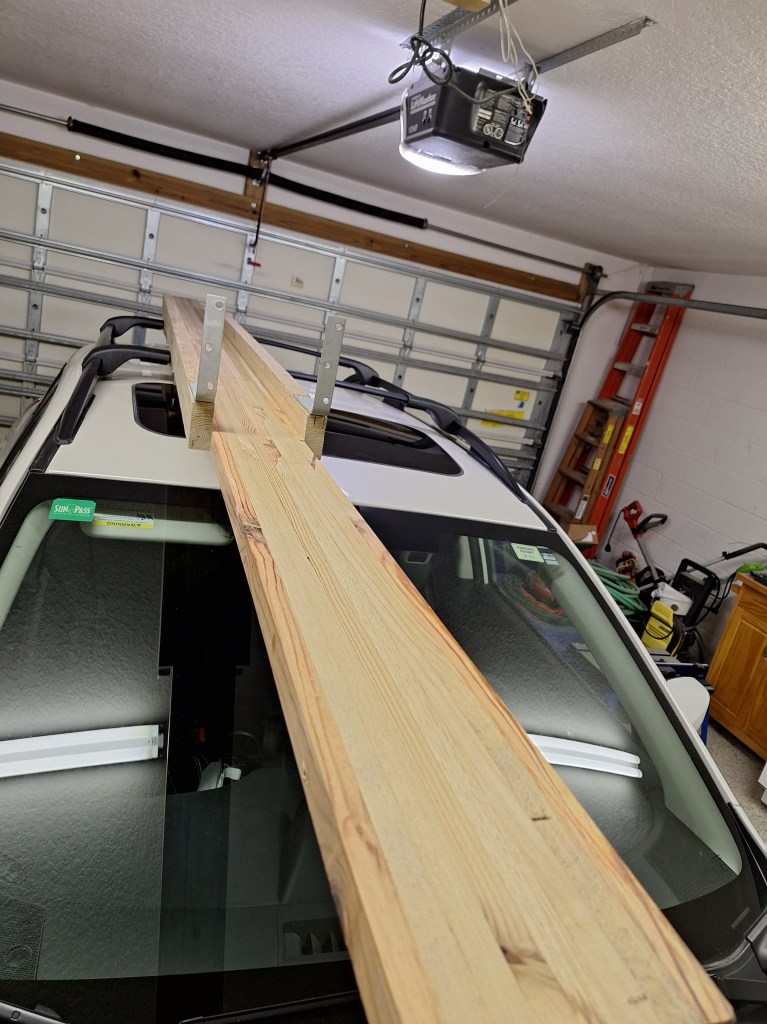
Below you can see that I fastened a metal bar at the front of each rail to prevent sheet goods from shifting forward. Here, the two rails are positioned quite close to each other. For sheet goods, you would spread them further apart, but this configuration was done (with a longer board between them, which I’ll mention in a moment) in preparation for transporting 12′ baseboards.
The back of the boards were rounded to make loading sheet goods easier.
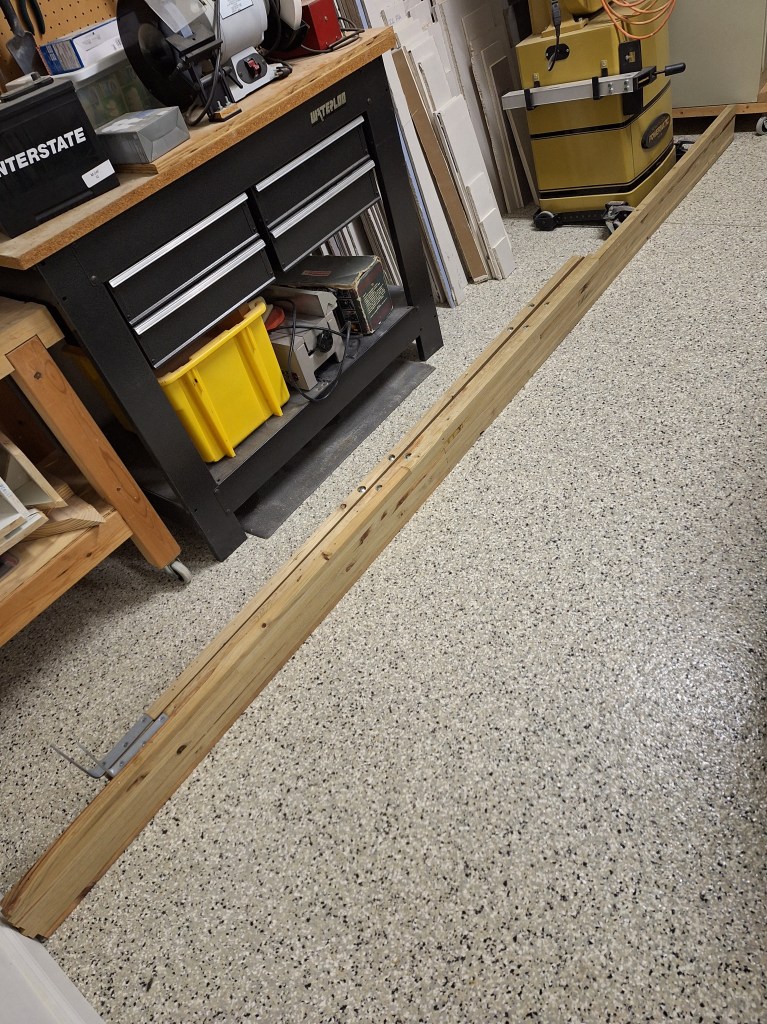
When loading long boards, like the 12′ long baseboards, some additional support is needed so the baseboards don’t flop around during transit. To achieve this, I created an additional board, approximately 12′ in length, again using laminated furring strips. The glue-up is shown below.

This board, like the others, was subsequently run through the thickness planer to clean it up. That is what you see in the images above. Below you can see how well it worked to support the baseboards I purchased.

Once the delivery was complete, I disassembled the entire thing. Here you can see the three pieces on the floor in the garage. I’m pretty pleased with how this turned out, and especially pleased that I was able to recycle the furring strips.
With that little project out of the way, it’s time to discuss the baseboards in more detail. My intention was to purchase relatively beefy baseboards. I wanted them to be about 5″ high and 3/4″ thick. Unfortunately, it was very difficult to find them in the desired thickness. Most were about 9/16″ thick. I left gaps between the tile and wall in the master bathroom that were a bit larger than that, so I needed the 3/4″ thickness. Although baseboards come in thicknesses of 3/4″, I couldn’t find them at the big box stores and it was difficult to get them elsewhere unless I ordered in bulk, and I only needed three 12′ lengths for the master bathroom. After some thought, I came up with what I thought was a clever solution. Historically, trimwork like cornices and even baseboards were made up of multiple pieces. So I decided to do the same and build my baseboards using two pieces. I purchased a 5 1/4″ piece and a 3 1/4″ piece and glued them together, as you can see below.
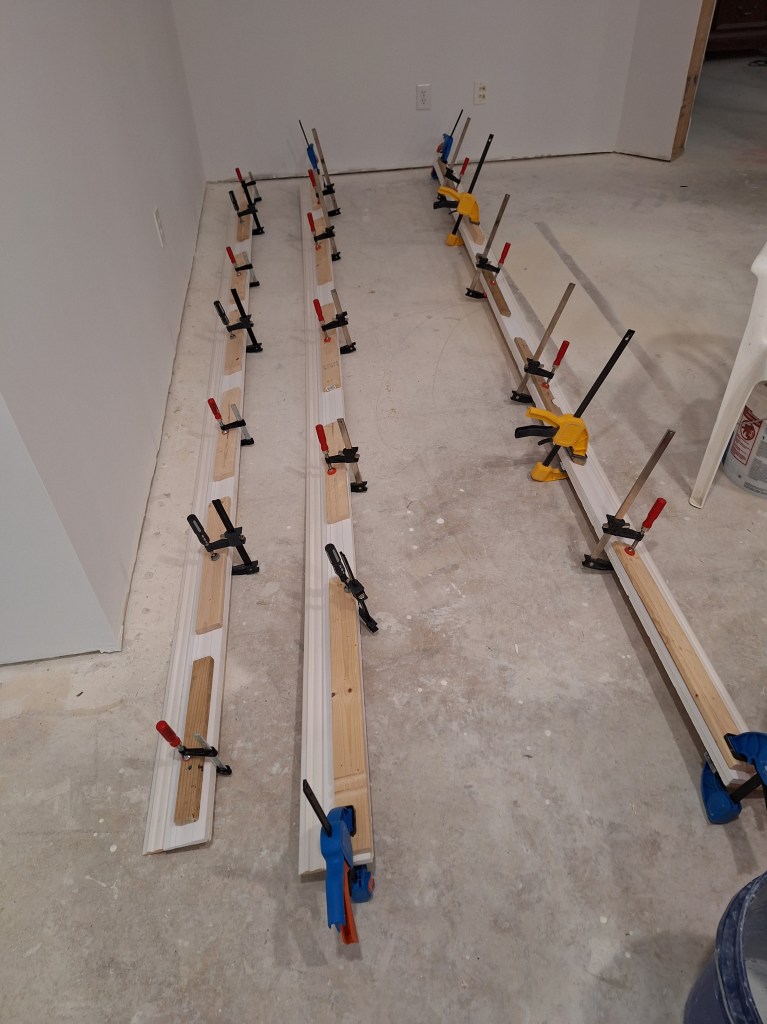
You can see the profile details below. Since this is just for the master bathroom, I figured I could experiment a bit. If I decided I didn’t like the look, it was just one room, and one where the baseboard are isolated from the rest of the house, so they did not have to tie into another scheme.

Here they are painted and ready to be installed.

I purchased lengths of 12′ so that I would not have any joints along the straight runs. The longest run in the master bathroom is just over 11 feet.
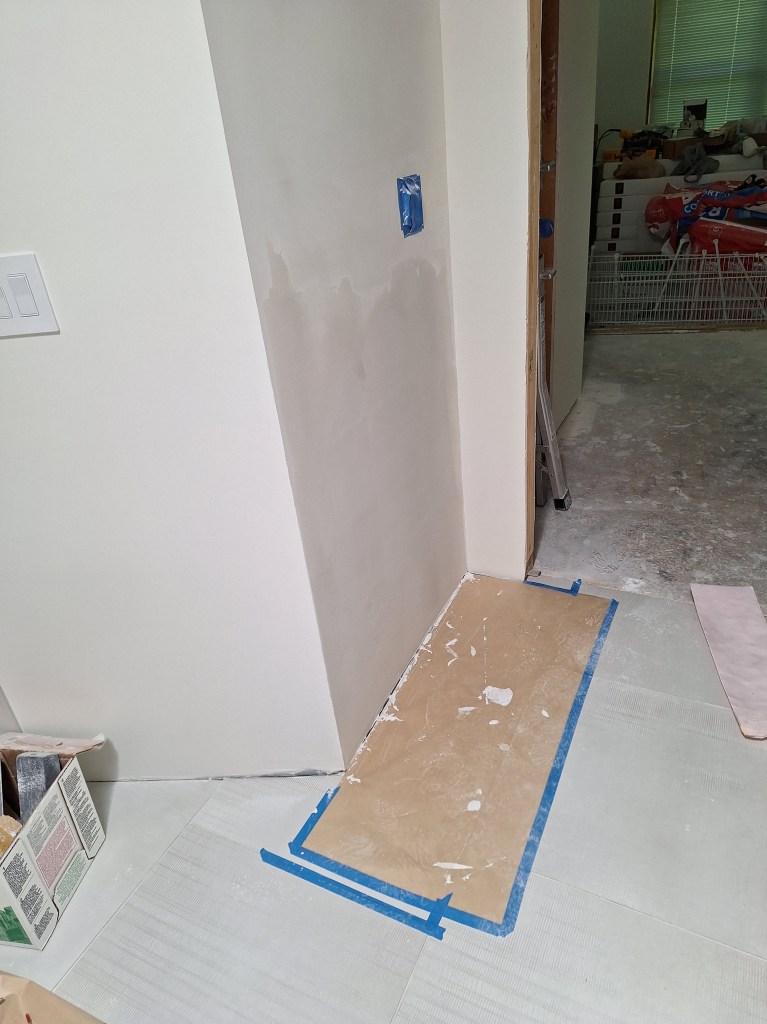
While installing the baseboards, I learned the value of having flat walls and floors. Since my baseboards were made up of two boards glued together, they were particularly stiff. Normally they are somewhat flexible, giving you some wiggle room when it comes to closing gaps between it and the walls, and to some extent that is also true of the floors, although not to the same degree. Since my baseboards were not flexible, any areas where the floor or walls were not flat would be noticeable. One area in particular was the wall to your right when you first enter the master bathroom. When I put down a piece of baseboard to mark it for cutting, I became aware of a significant bow in the wall, which would leave a gap I was not comfortable with. You can get away with small gaps. The caulk will fill them and they will not be very noticeable. But this one was too big for that. So I decided I needed to break out the joint compound and attempt to bring the wall to something much flatter than it was. This was a shame, because that wall was finished. So I got to work building up the area.
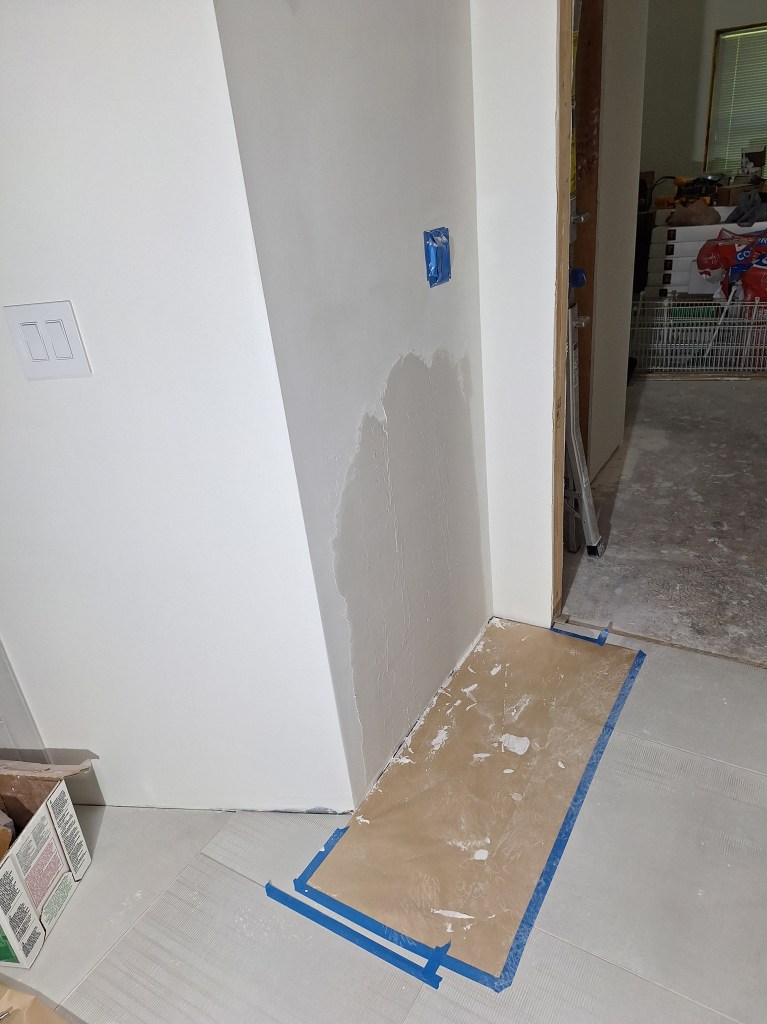
In the image above, you’re actually seeing the second coat of mud I applied. The first coat was very thick and I tapered it to just above the light switches. I didn’t take a picture of that because I was not sure it was going to work, and thought I might have to pull out a section of drywall and replace it (adding shims in the back). The coat you see above is what I applied after sanding the first coat. Here it was starting to look promising, and I was hopeful that I could continue with this approach.
After that section dried, I put a straight edge across it, and it was looking pretty good. So I sanded it and started a skim coat, which you can see below.
I continued to skim coat until it was looking good and I was happy with the level of flatness.
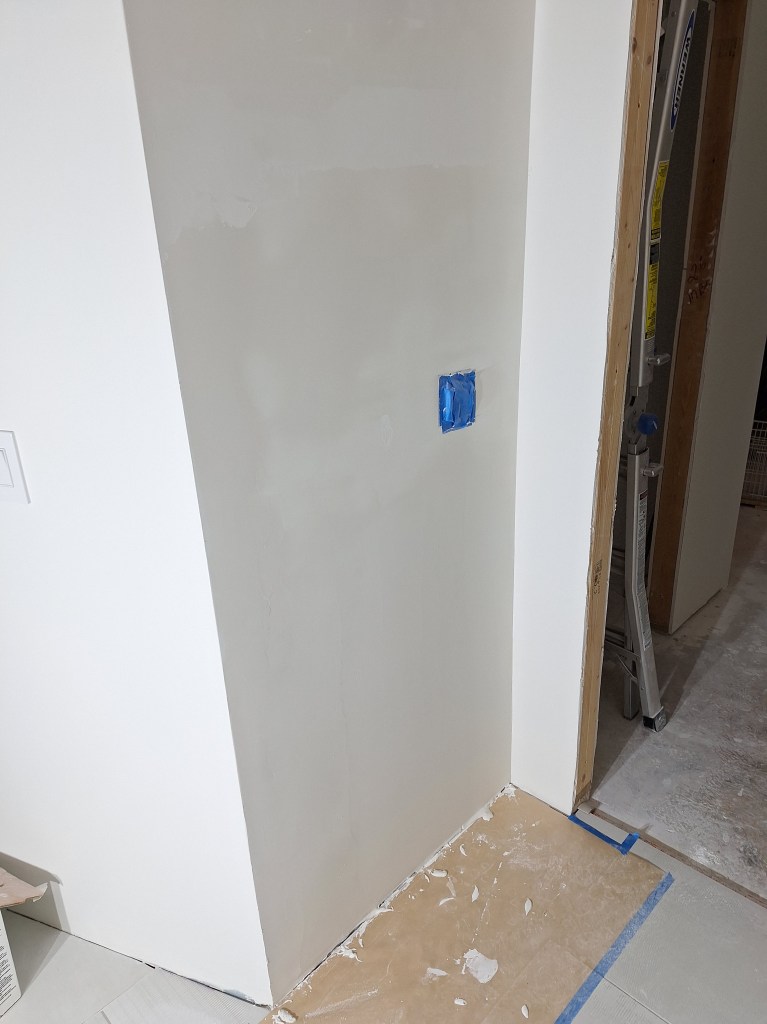
This is now ready for priming and painting. I’m not going to show you that in this post since we’re nearing the end of the month and I’d like to wrap up this post. Instead I’ll show you the result after all the baseboards are down.
While I was attending to this, the glass installers arrived and put in the glass enclosure to the shower. Here it is:
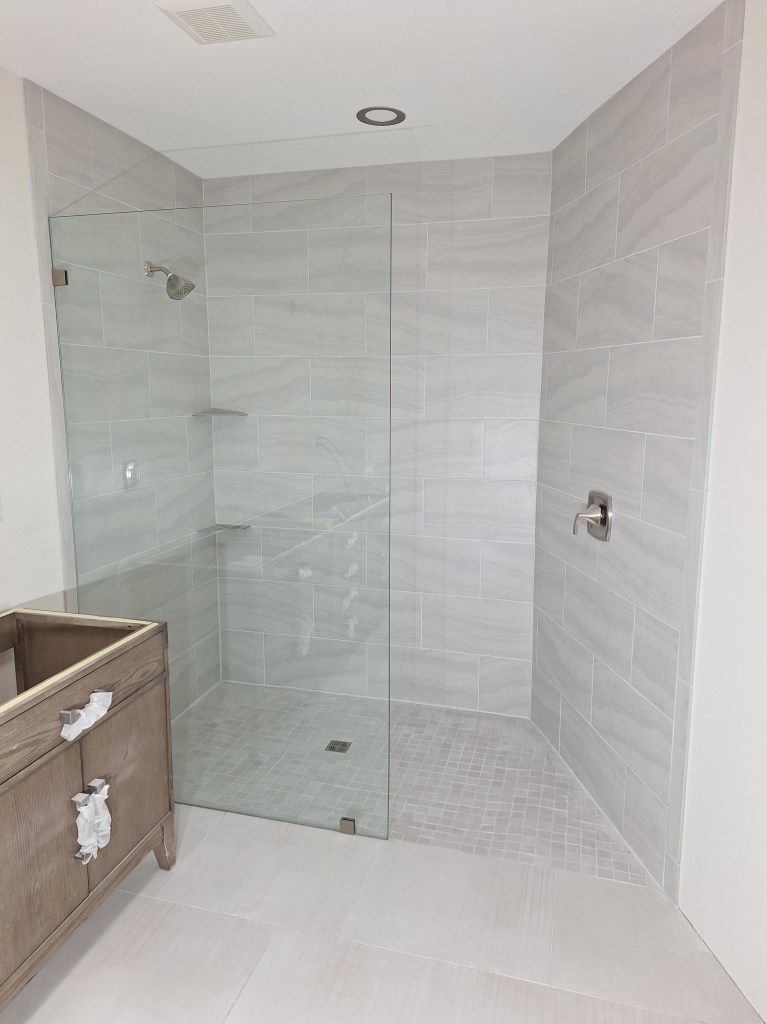
I think it looks pretty good. You’ll also notice that I installed the overhead light, which I show off in the next image.

You’ll notice that the vanity is in place. This is where it will go relative to the shower, but it is only there temporarily, for reasons I’ll discuss in another post when we speak more about the baseboards. It was my intention to finish this post by showing you the glass enclosure and the baseboards in place, but due to the wall repair shown above, the baseboard installation was interrupted. So that will be discussed another time.
Before ending this post, I want to mention a decision I made as a result of what I learned from working on the shower. With the time it took me to get the master bathroom to its current state, it became clear to me that I was not going to be able to get the other bathroom (the “guest bathroom”) done as soon as I had hoped. The lease on my apartment would expire in mid November, and in order to move into the house I needed to have at least one bathroom done, the floors down, and the kitchen installed. All of that was doable, but from my experience with the master bathroom so far, I was not willing to work on the guest bathroom while my finished floors were in place. It is a pretty messy process, and would require that I carry buckets of thin-set mortar, drywall mud, and other such things over my finished floors. I would, of course, cover the floors to avoid any damage, but with all that is involved (not to mention the dust from sanding the drywall in that room), I thought it was better to work on the guest bathroom before the floors go down. Consequently, I was not going to make the November date and decided to renew my lease on the apartment, which I’ve done.
I’ve actually extended my lease for another year, rather than simply going month to month. By doing this, I should be able to make the house far more habitable than what it would be if I were to move in November of this year. So that was a big decision, but one I am comfortable with. When I decided to take this project on by myself, the plan was to treat it as a hobby and a learning experience. I was not willing to sideline my life and devote full days to it. Instead, I only wanted to work on it in the afternoons, and only as much as suits me. Should it become a “job”, it would lose its appeal, and I would look to hire out most of the work. So that is where we are as of the end of August, 2024.
