Final Inspection – July 2025

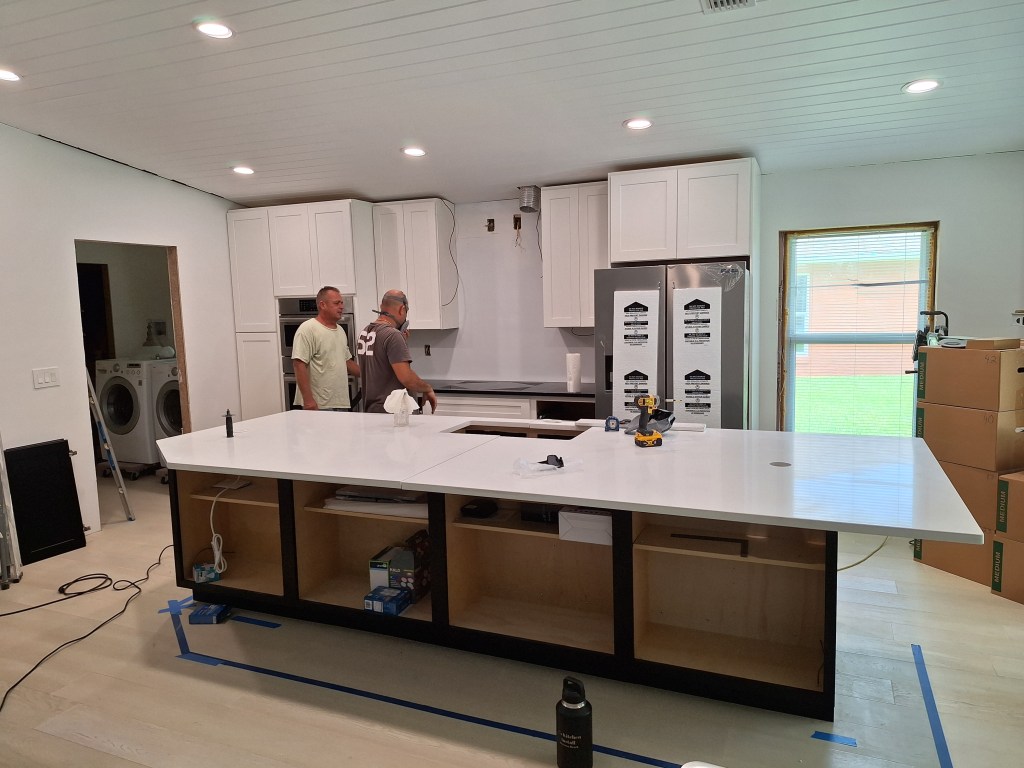
The countertop installers arrived on the first of the month. The started by placing the slabs on the base cabinets. The granite countertop, where the cooktop will be, was delivered with the opening for the cooktop not fully cutout in order to retain its integrity during transport. This can be seen if you look closely at the area the guys are facing in the image below, where they were preparing to cut that bit out to open up the space for the cooktop.

Slabs Placed on Base Cabinets

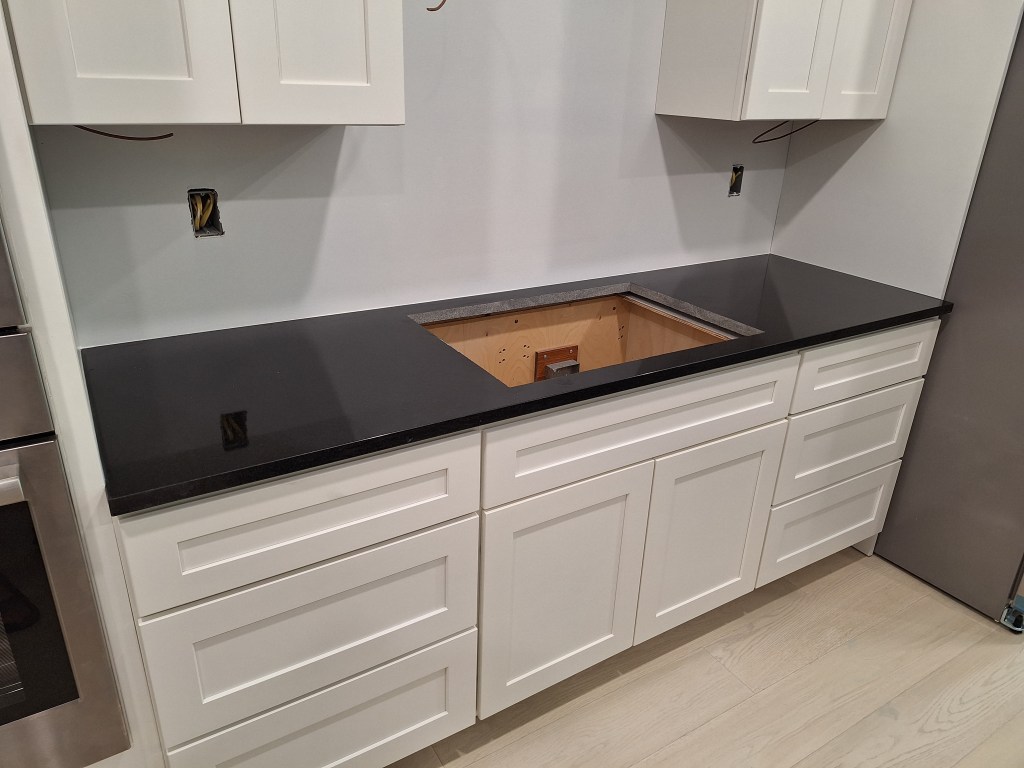
Here it is ready for the cooktop.

“Black Absolute” granite Installed

As for the island, there was a bit of a problem. At either end there is a hole for a 3″ popup outlet, (you can clearly see one of the holes in the first image above). While cutting one of the holes, they slipped, leaving a mark just outside the hole. They were hoping that, once installed, the part of the popup outlet that sits on the countertop would cover it up, but it did not. So this could have been a big deal, meaning the slab would have to be replaced. Before doing that, we decided to order a larger popup outlet (4″), expand the hole, and see if would cover the blemish. I was very skeptical that it would work because below the countertop there was very little room to expand the hole. That is, the hole was very close to the back of one of the cabinets, so I didn’t think there would be enough room to accommodate the collar that screws onto the outlet from below the countertop to secure it. Since the alternative was to scrap the blemished slab, there was no harm in trying. So we ordered a single larger popup outlet and waited for it to arrive.

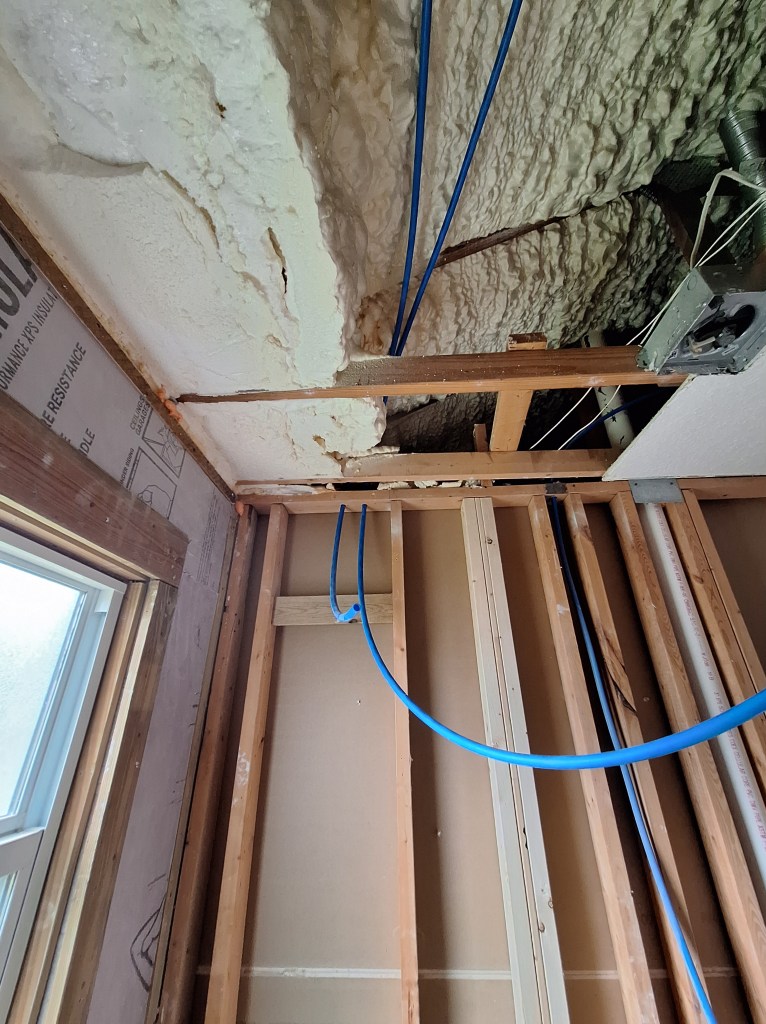
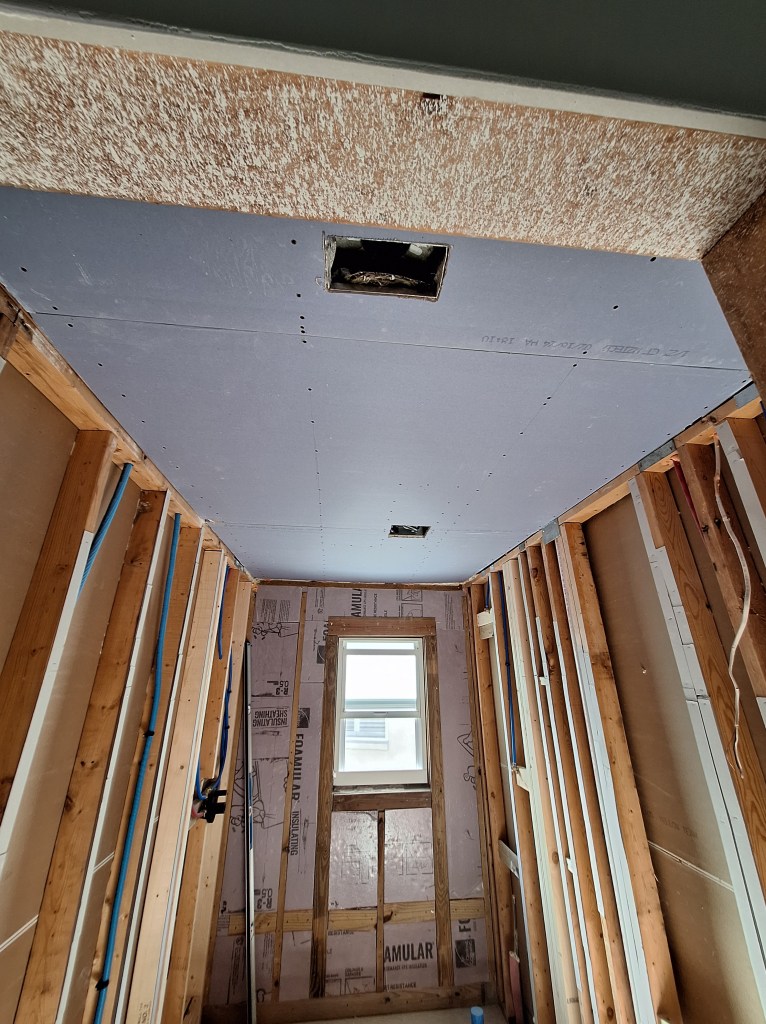
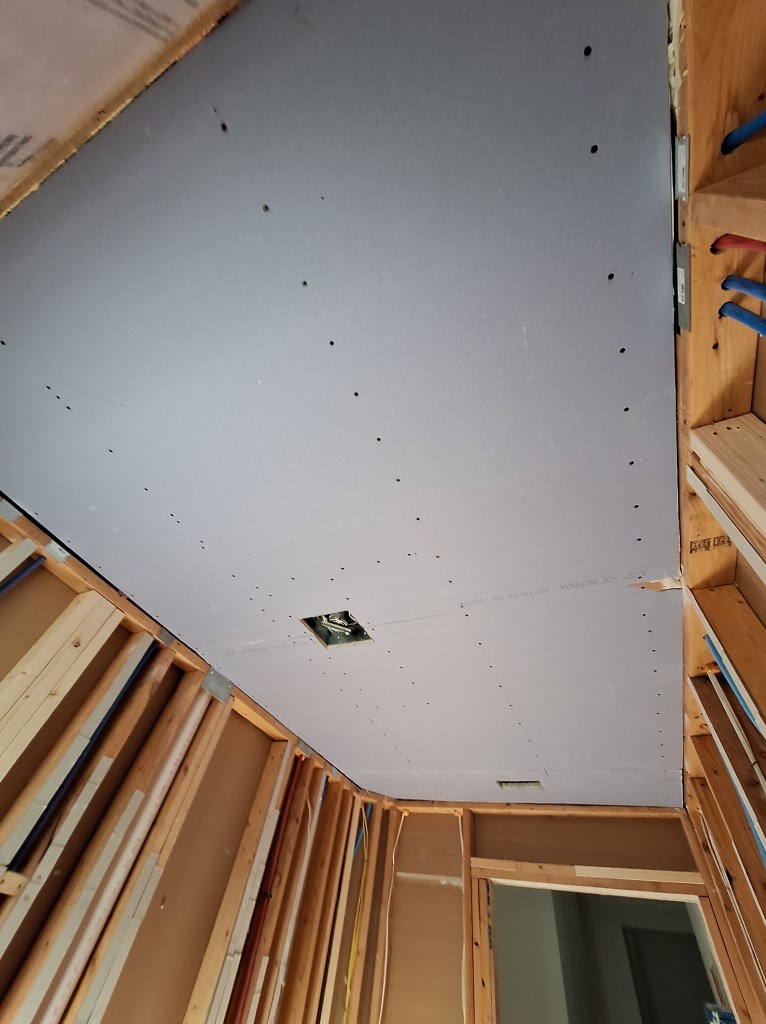
In the meantime, I returned my attention to the ducting that would vent the cooktop exhaust out of the house. In my last post, I had installed the small cabinet above the cooktop and originally planned to use flex pipe to connect it up, as shown below.

Flex Pipe Venting

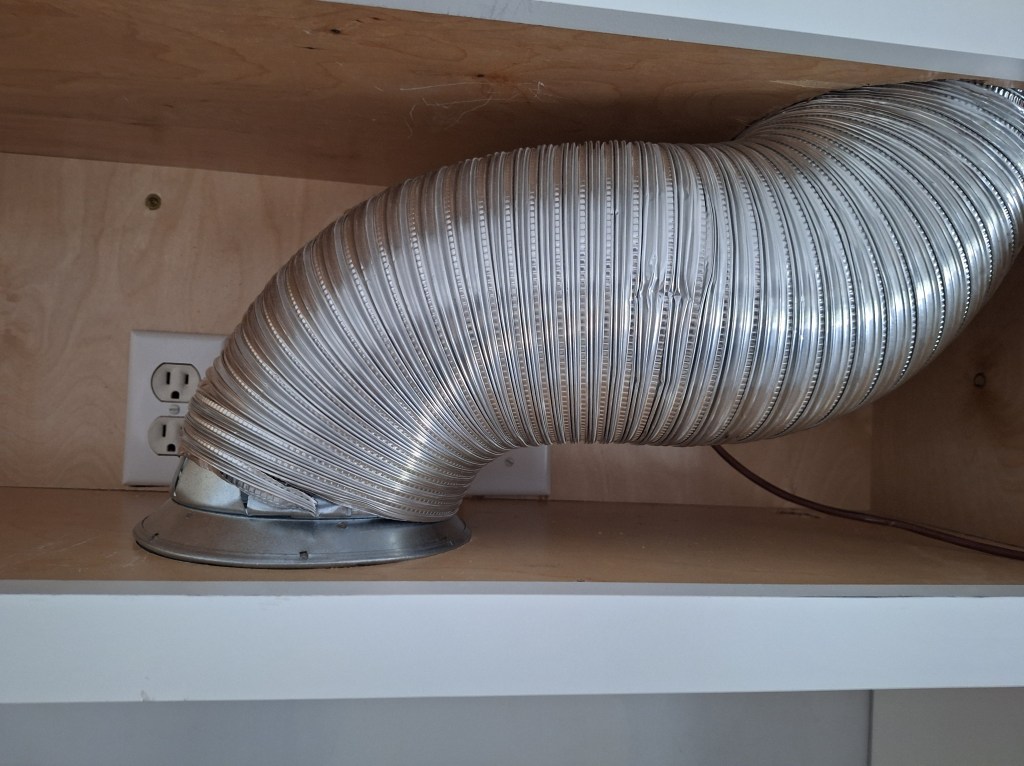
Unfortunately, this wasn’t going to work as you can see from the image. Not only that, but you’re not supposed to use flex pipe in this situation because the ridges in the flex pipe increase resistance to airflow, providing a better opportunity for grease to accumulate. I learned this by accident during a conversation with the guy who installed the wall oven. Given this, I sought to have custom ducting created to replace most of the flex pipe, as mentioned in my last post. I would not be able to replace all of the flex pipe. The portion that is above the cabinet and extends to the roof is no longer accessible, so it would have to remain and the new ducting would have to connect to it at the top of the cabinet. That, I believe, should be fine because the primary area of air flow resistance will be in the bend within the cabinet. Once the air exits the ducting within the cabinet, it is a straight run to the roof and out of the house. Fortunately, the custom vent ducting was completed at the time we placed the order for the new popup outlets, so I could switch over to that task while I waited. Unfortunately it wasn’t quite right, requiring a trip back to the fabricator.

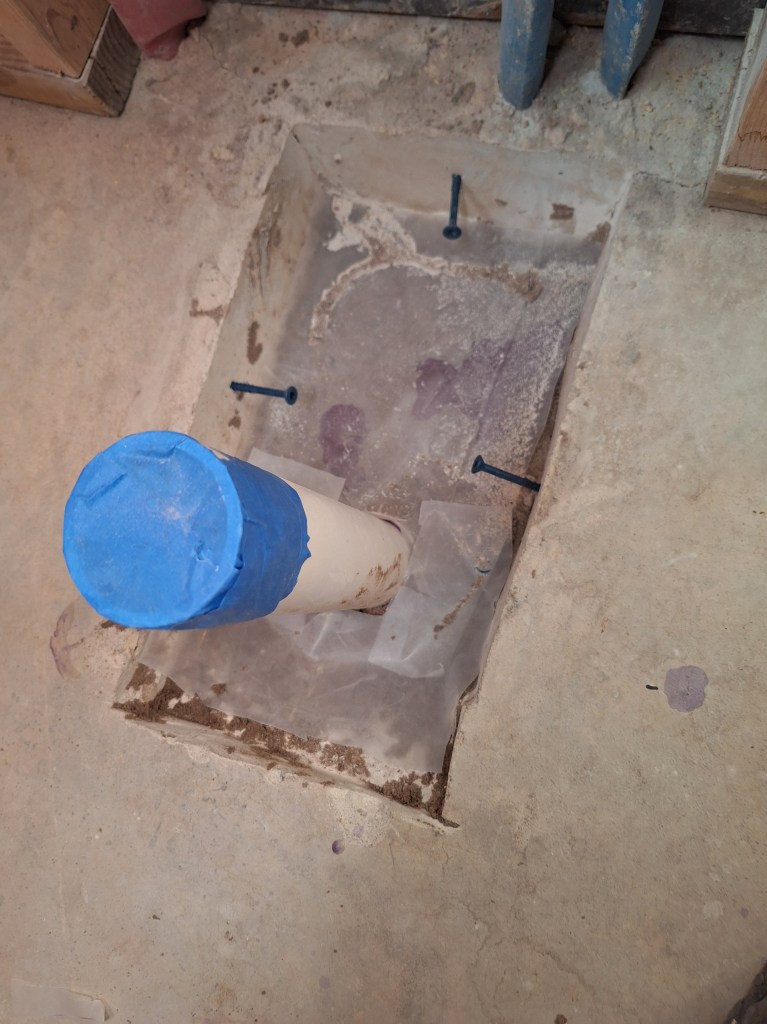
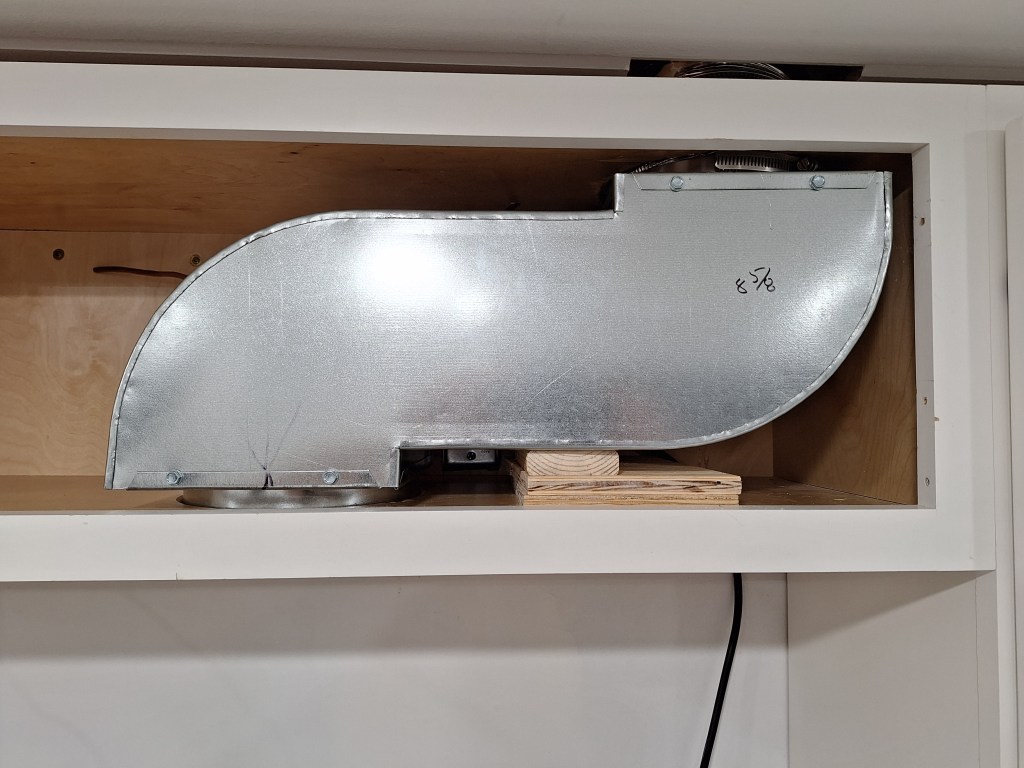
In the first image in this post, notice that there is no longer a cabinet above the cooktop countertop. I removed this because I needed to take it with me when I returned to the fabricator so they could see exactly what the ducting needed to fit into. I should have done this in the first place, but I hated to have to remove the cabinet. In the end, it was the right thing to do, and they got it right when I did.

Exhaust Ducting In Place

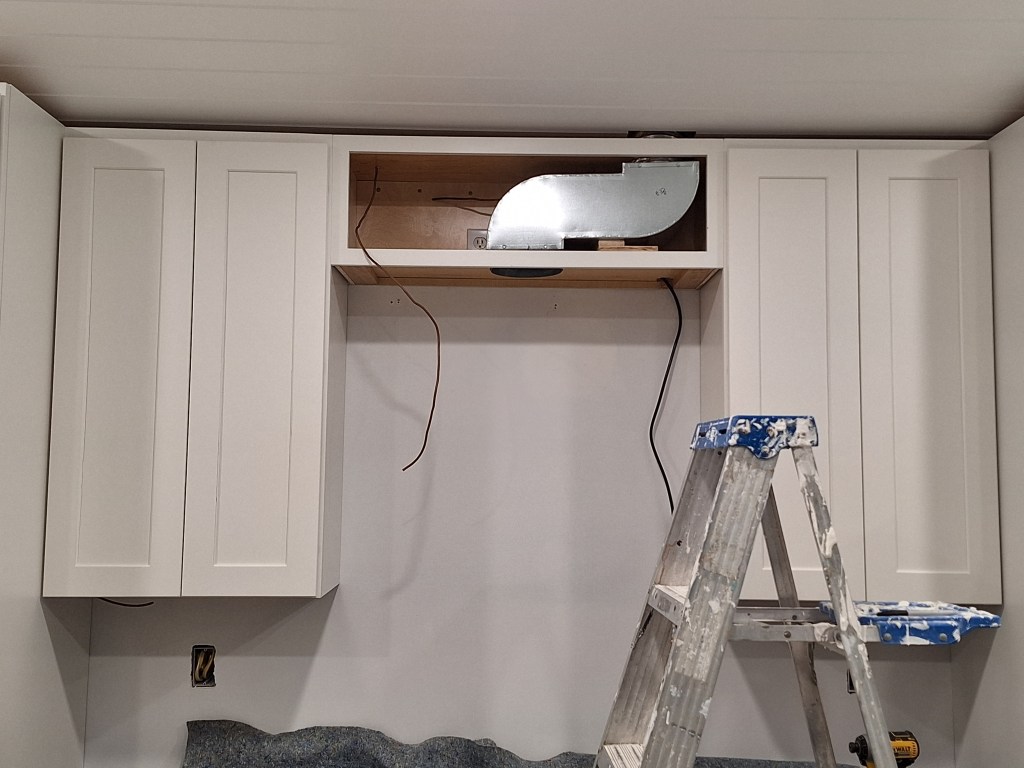
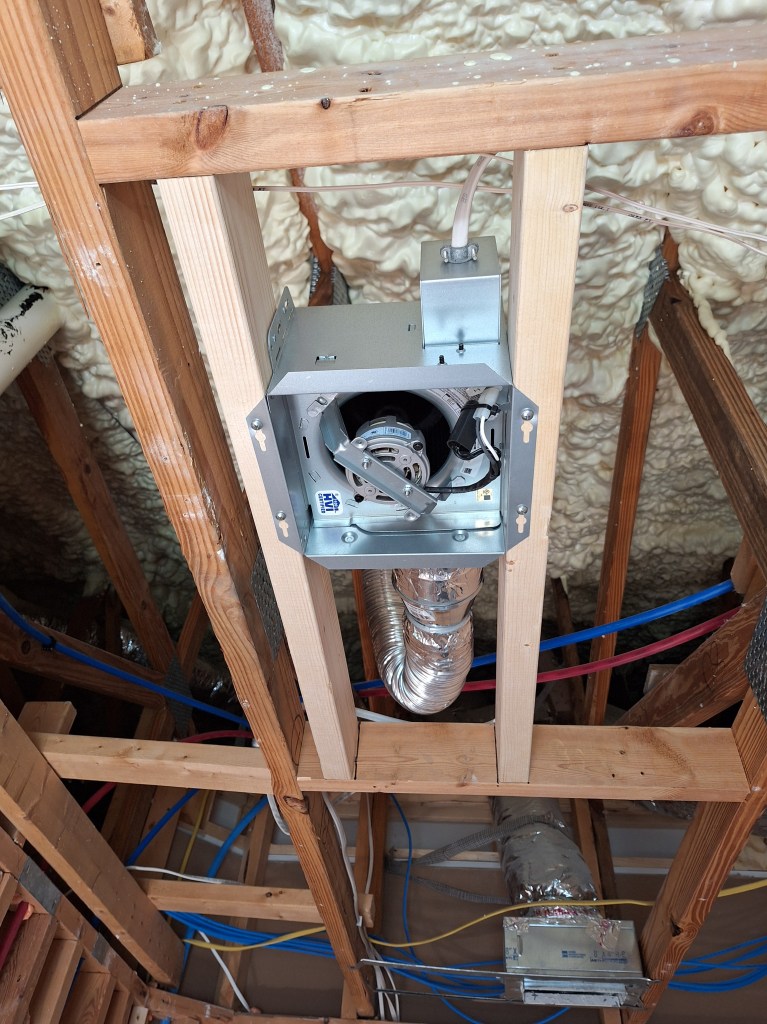
Above you can see the cabinet back in place and the new custom ducting in position. Here it is after I secured it in place.

Exhaust Ducting Secured

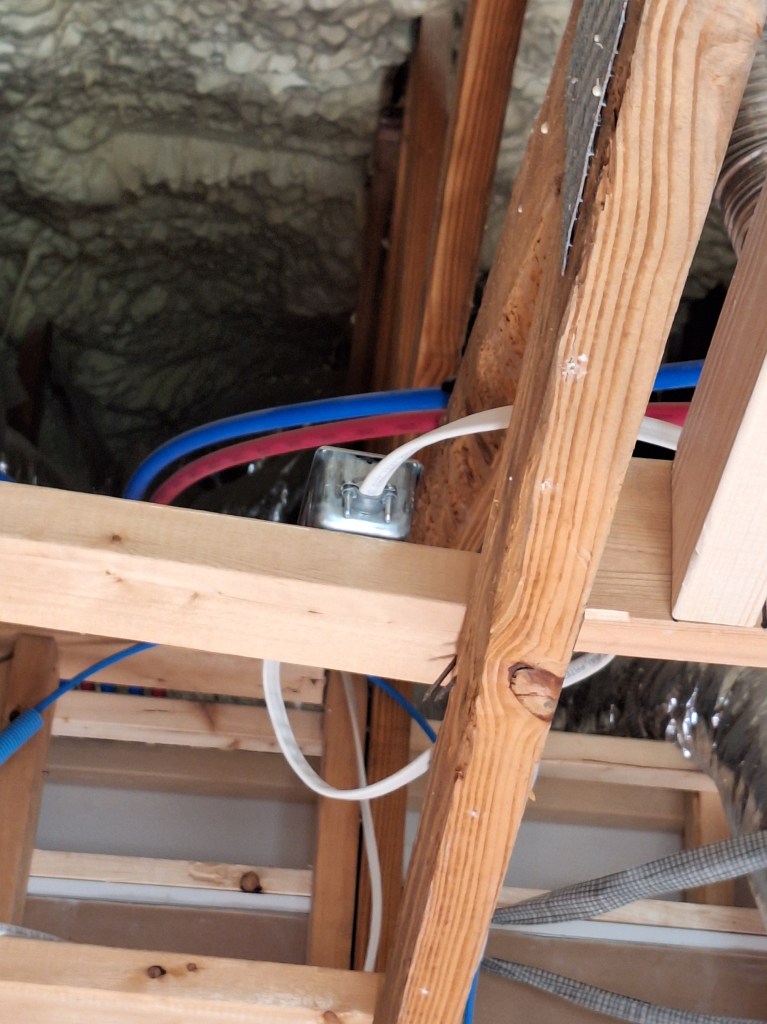
The wood underneath the ducting was placed there just for extra support. The outlet of the ducting is tied to the flexible pipe that extends out the top of the cabinet to the roof. It is secured using a metal hose clamp, as shown below.

Ducting Secured to Flex Pipe with Hose Clamp

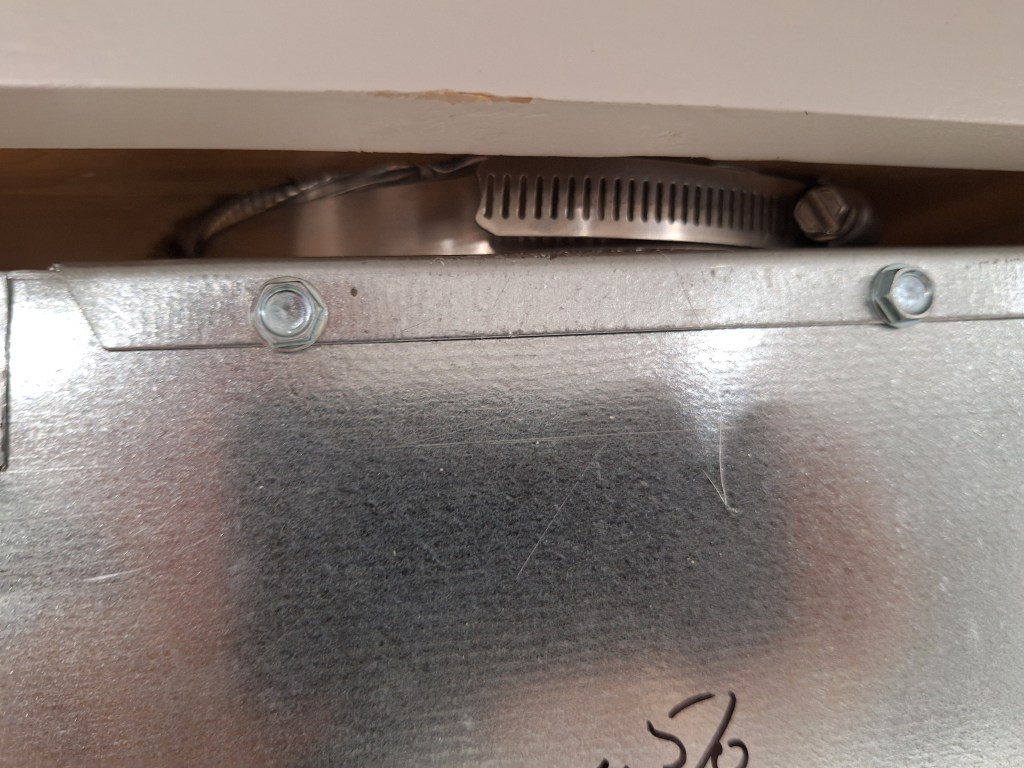
This turned out to be a much bigger challenge than I ever imagined. It was a tight squeeze, so I was very relieved that it worked out.

With the ducting secured, it was time to lift the exhaust vent into place and secure it to the bottom of the cabinet with four screws. I had a couple of friends help with this.

Exhaust Fan Installed
Exhaust Fan Installed and Cabinet Doors put back.

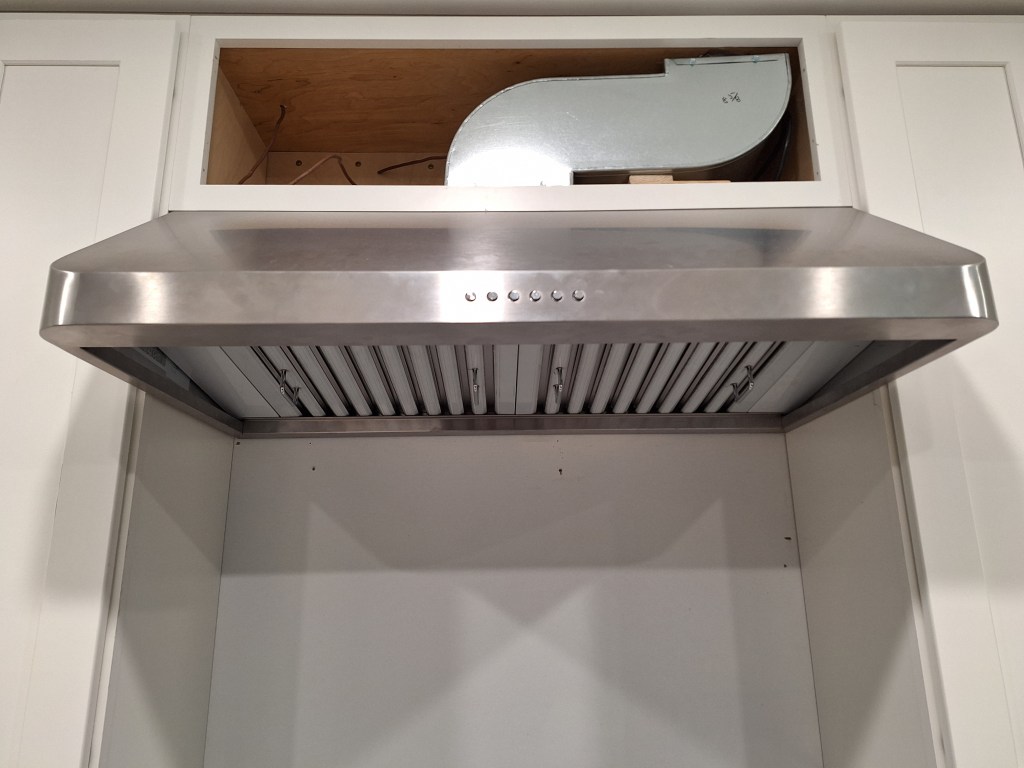
Getting that done was a big deal. I was so happy to have it checked off.

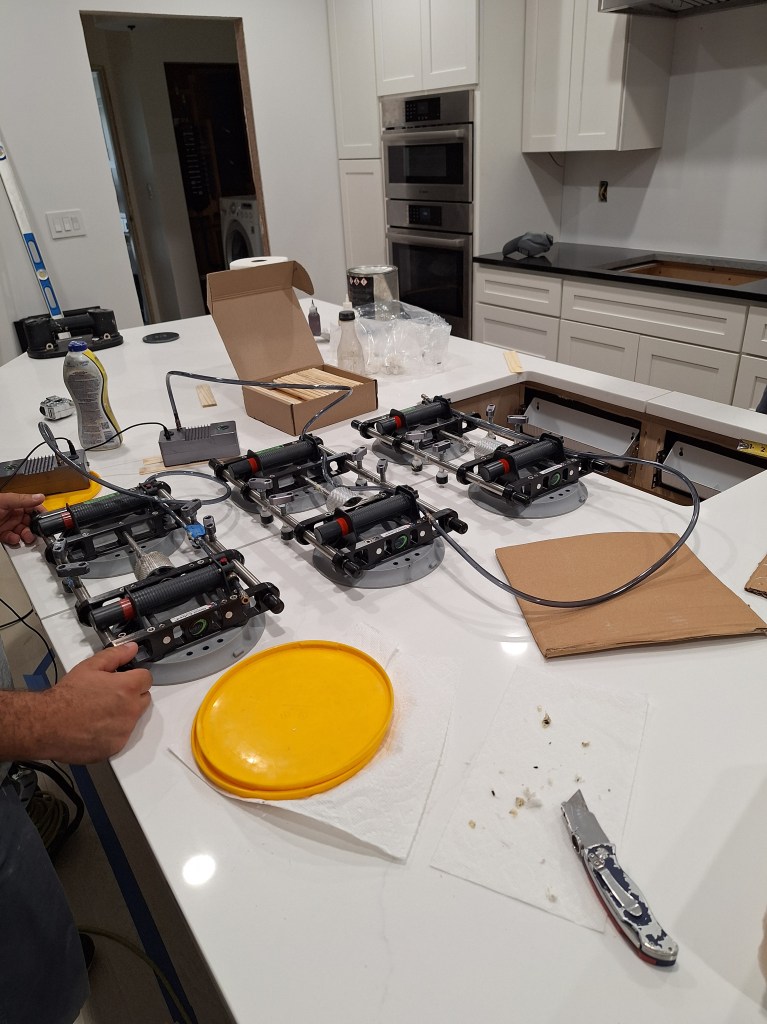
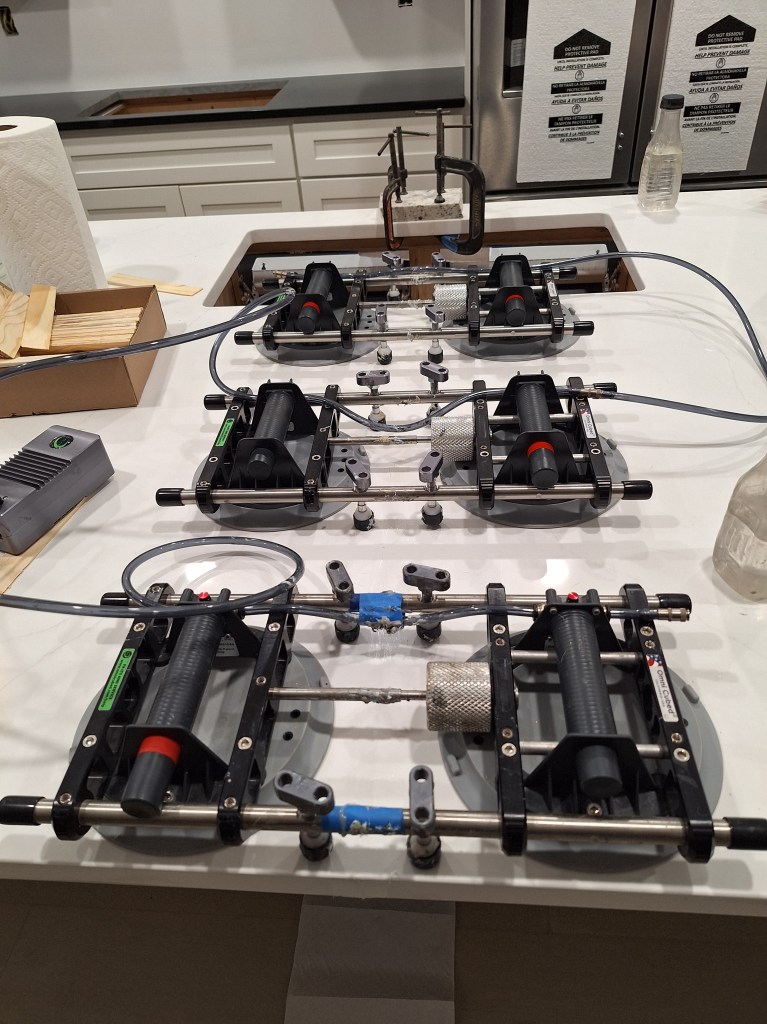
The next day the larger popup outlet arrived. They ordered a gray one because the white color, for some reason, would take longer to arrive. Since this was just to try it out, the color didn’t matter, so they ordered what would get here the fastest. They would return it once we’d determined if it would work. With the wider popup outlet in hand, the guys got to work widening the hole. To my pleasant surprise, it worked, and we did not have to replace the slab. So the guys could start setting the seam between the two slabs. In the image below you can see the equipment used to pull the slabs together. You can also see the gray popup outlet in place at the end of the slab.

Setting the Seam

Once aligned to their satisfaction, glue is applied and the two seams brought together and left overnight (Thursday, July 3rd).

Seam Set

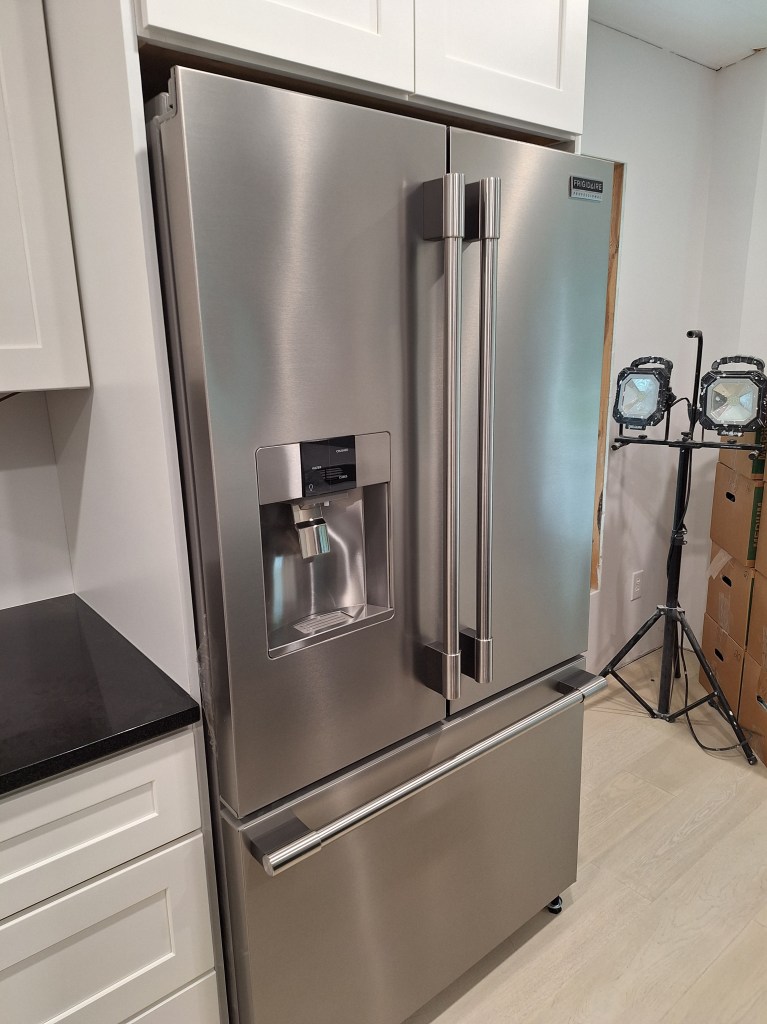
The two white popup outlets were expected to arrive on Saturday, July 5th, so there was a day in between, July 4th, that I used to install the refrigerator before I headed out to celebrate Independence Day.

Refrigerator Installed

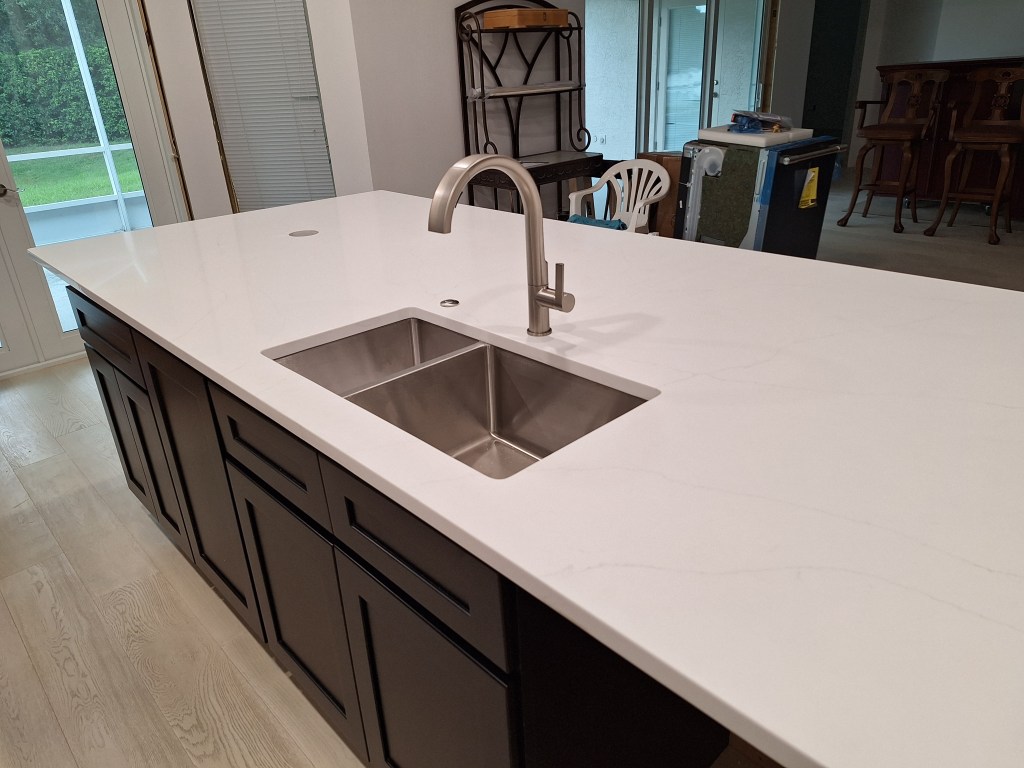
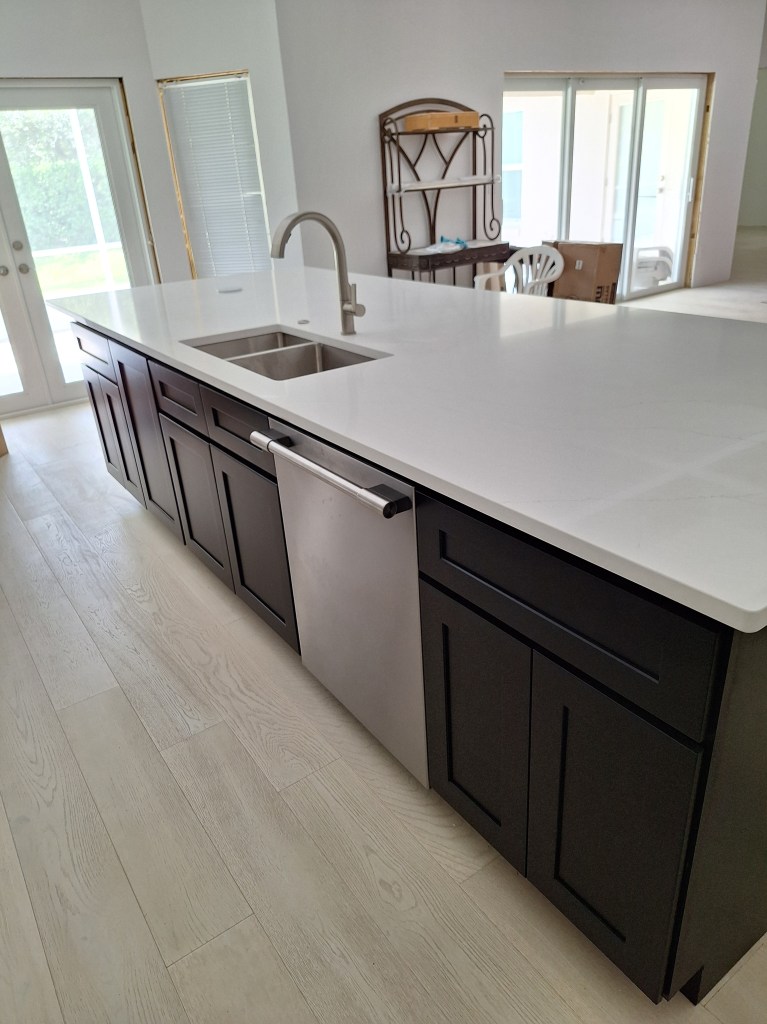
The next day the guys returned to finish the installation, which involved polishing the seams, installing the undermount sink, and cleaning it all up. After they left, I put in the faucet and the pressure switch (to the left of the faucet) that will control the in-sink garbage disposal.

Countertop Installation Complete
Sink, Faucet, and Pressure Switch Installed

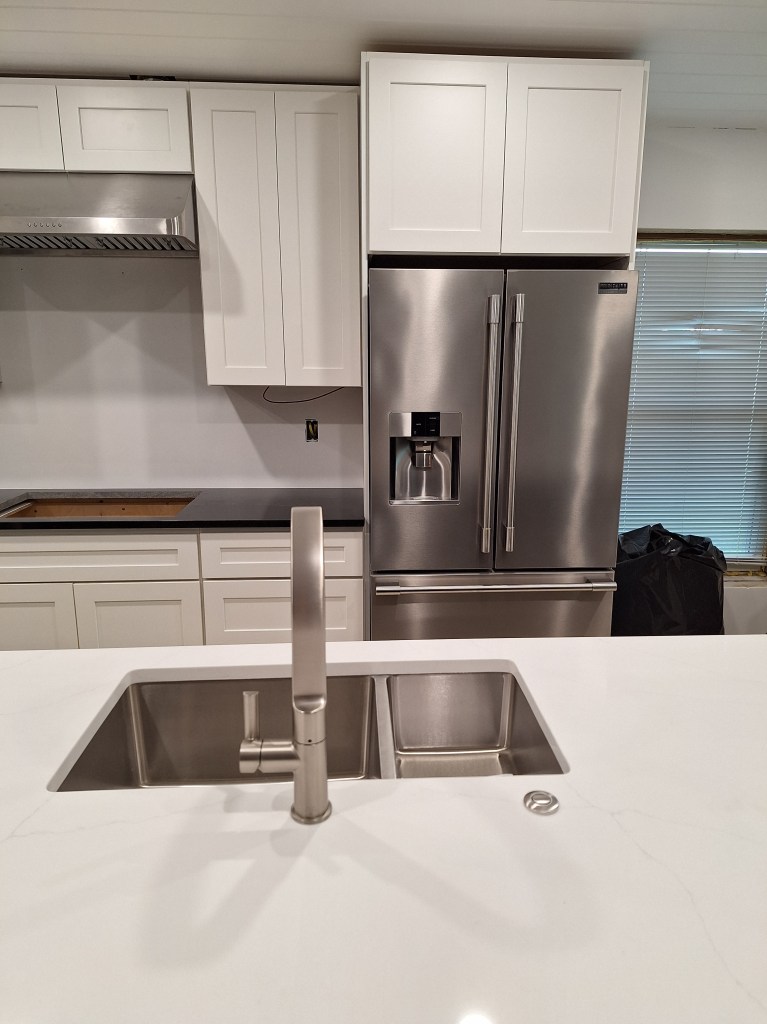
The two white popup outlets arrived the next day and I put them in place and plugged them into the outlets below the cabinets.

Popup Outlets Installed
Popup Outlet popped up

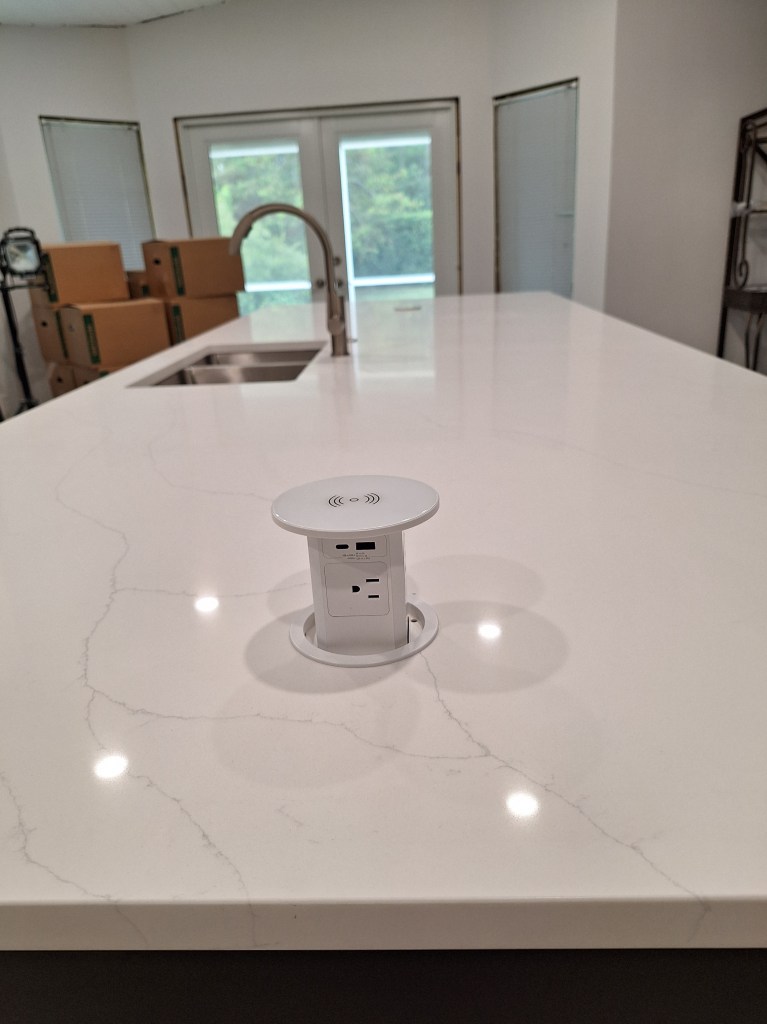
Note that these outlets also provide USB ports and can charge a phone by simply setting the phone on top of the outlet, whether popped up or not.

With the countertops and sink installed, I arranged to have a plumber install the plumbing for the sink and install the dishwasher. I entertained installing this by myself, but it would be a complicated install. As I later discovered, this was a good call, which you’ll see shortly. But before that happened, the mirror for the the master bathroom vanity arrived and was installed.

Vanity Mirror and Lights Installed
Vanity Mirror and Lights Installed – lights on

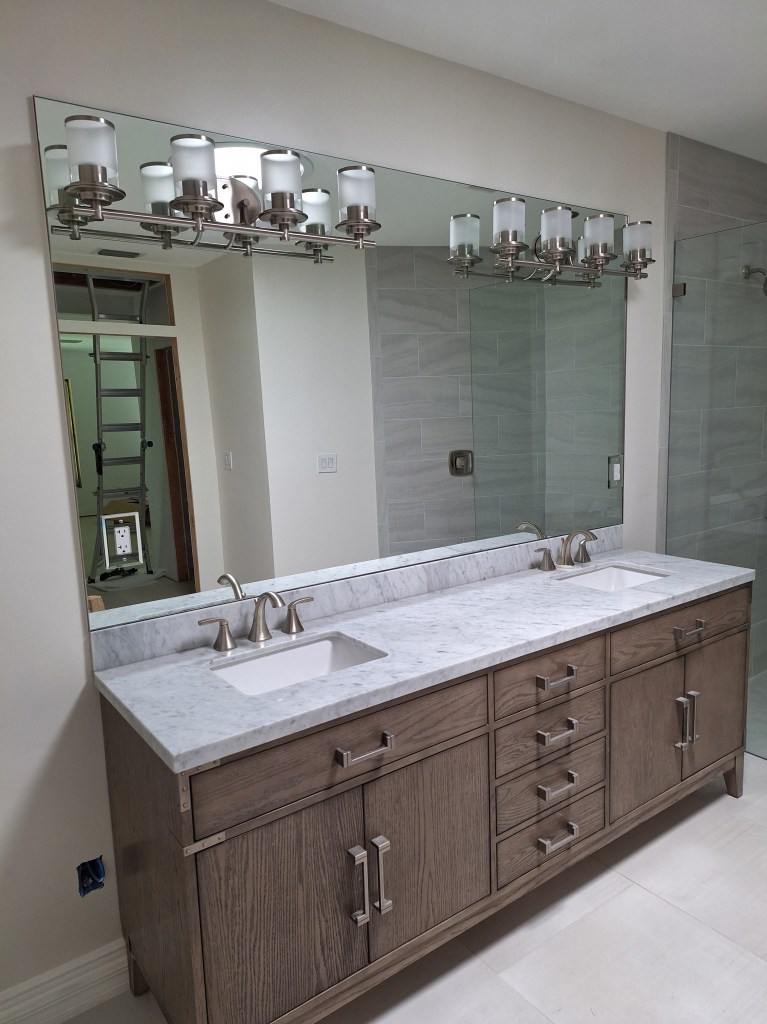
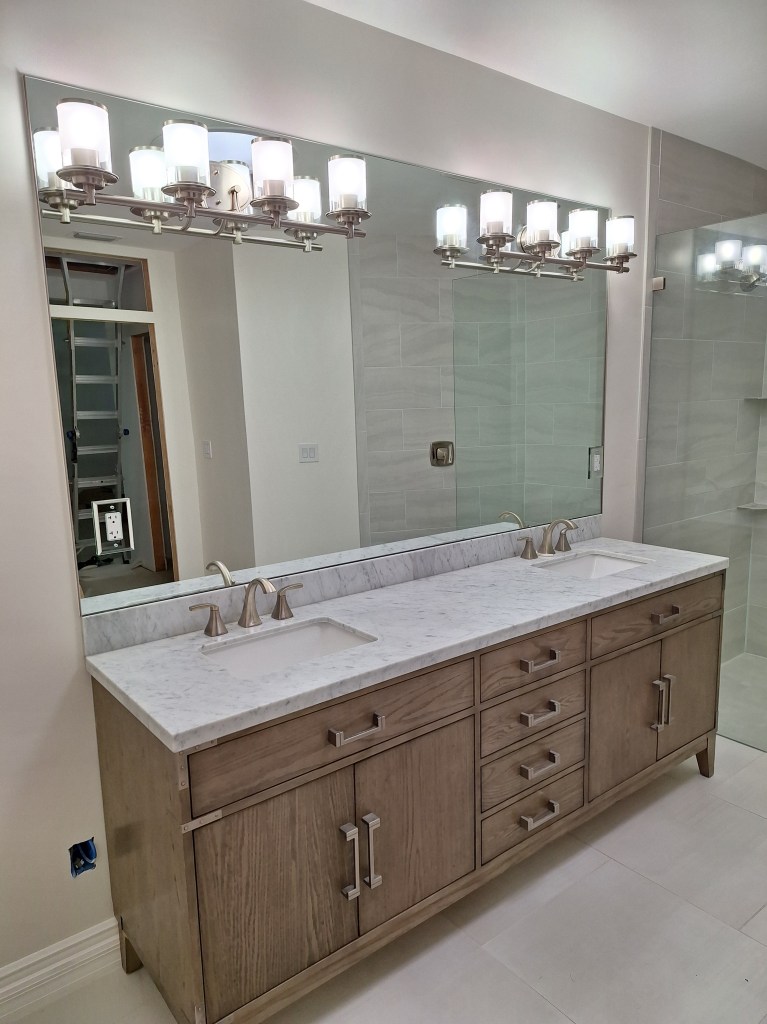
The interesting thing about this installation was that the company insisted that they install the vanity lights. Since the lights are on the mirror, they did not want the customer to mess with it for fear that if they over-tighten them, it could break the mirror. So I was completely hands off for this, which was fine by me. It was a two person job, as you’d expect, and took about two hours. I like it.

A couple of days after the vanity mirror was installed, the plumber arrived and hooked up the supply lines to the sink and dishwasher, the in-sink garbage disposal, and the drains for all of it.

Plumbing Under the Kitchen Sink

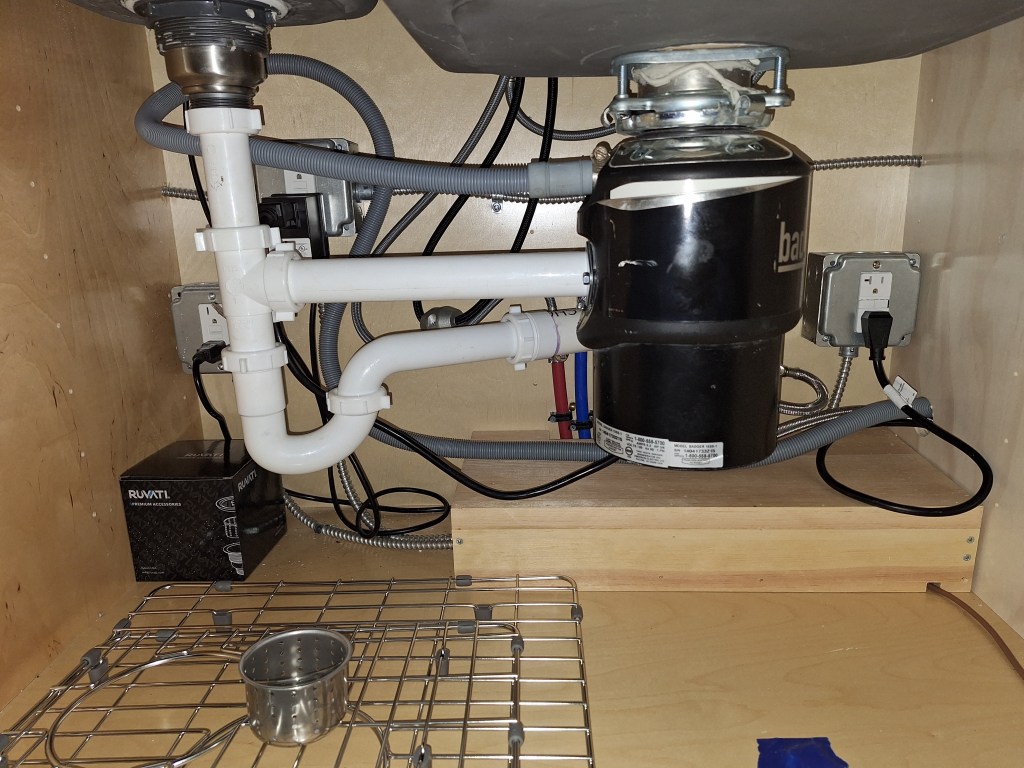
As you can see, there is a lot going on here. We decided to locate the garbage disposal under the large sink because installing it under the smaller one would have meant that the drain from it to the main drain would be too steep a slope. When too steep, the water separates from the solids too quickly, which can result in clogging.

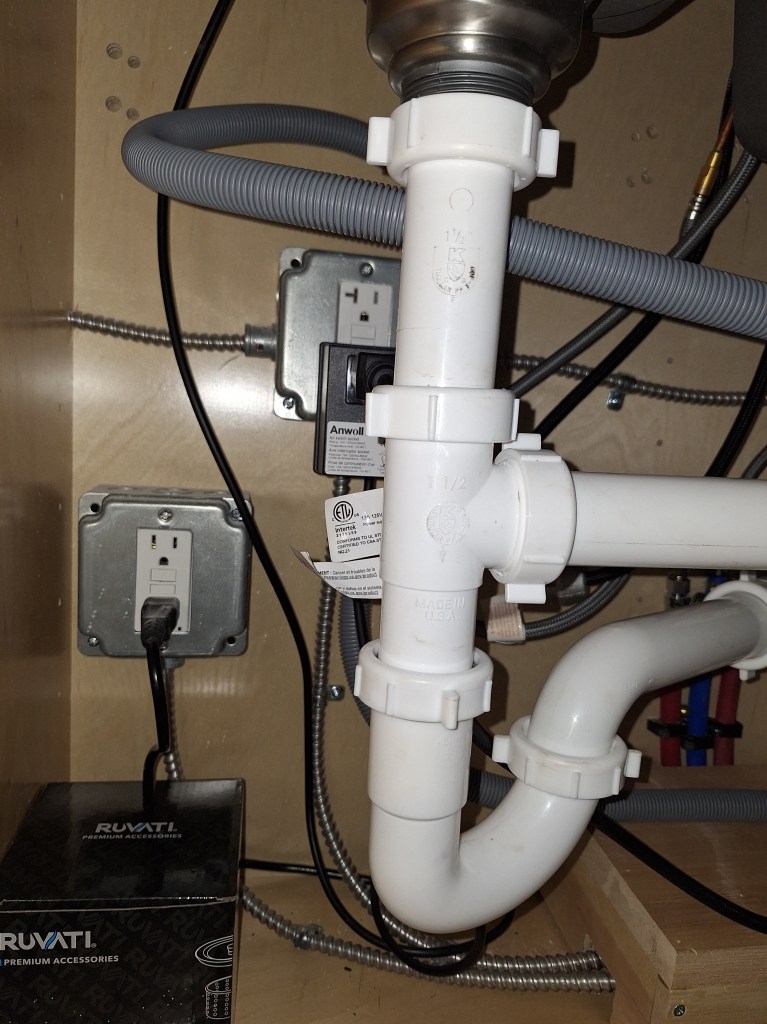
Below I am showing a closeup of the P-trap. The large sink drains through the garbage disposal into the drain under the small sink, where the P-trap resides. The output of the P-trap connects to the main drain that continues under the concrete slab and out to the street sewage system. Behind this you can see a black box plugged into the outlet. Into the black box is plugged the garbage disposal. This black box connects to the pressure switch above the countertop (shown in a previous image above), which, when pressed, switches the garbage disposal on/off. The plug below and to the left is for the kick plate lighting, which was discussed in a previous post.

P-trap Under Small Sink

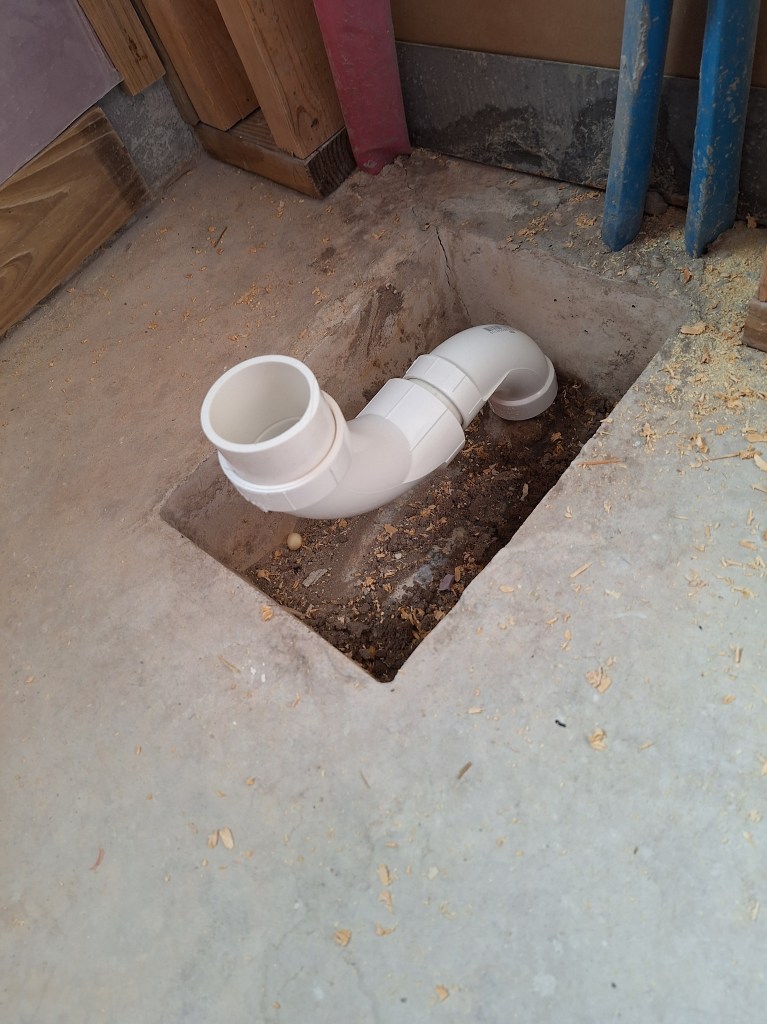
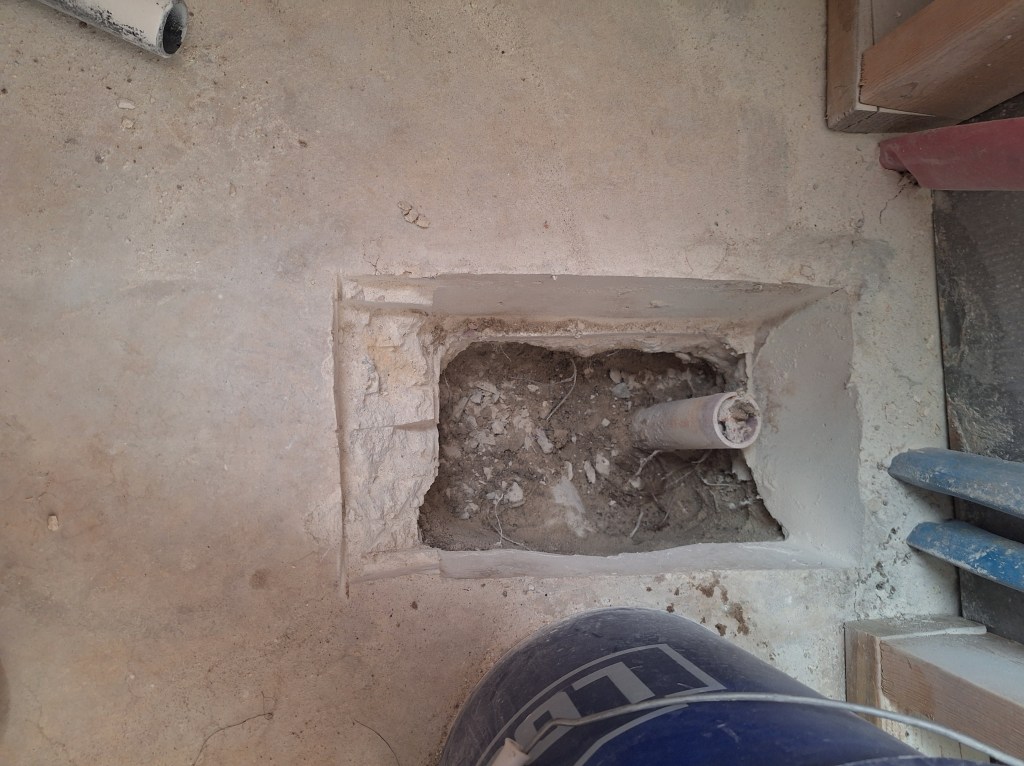
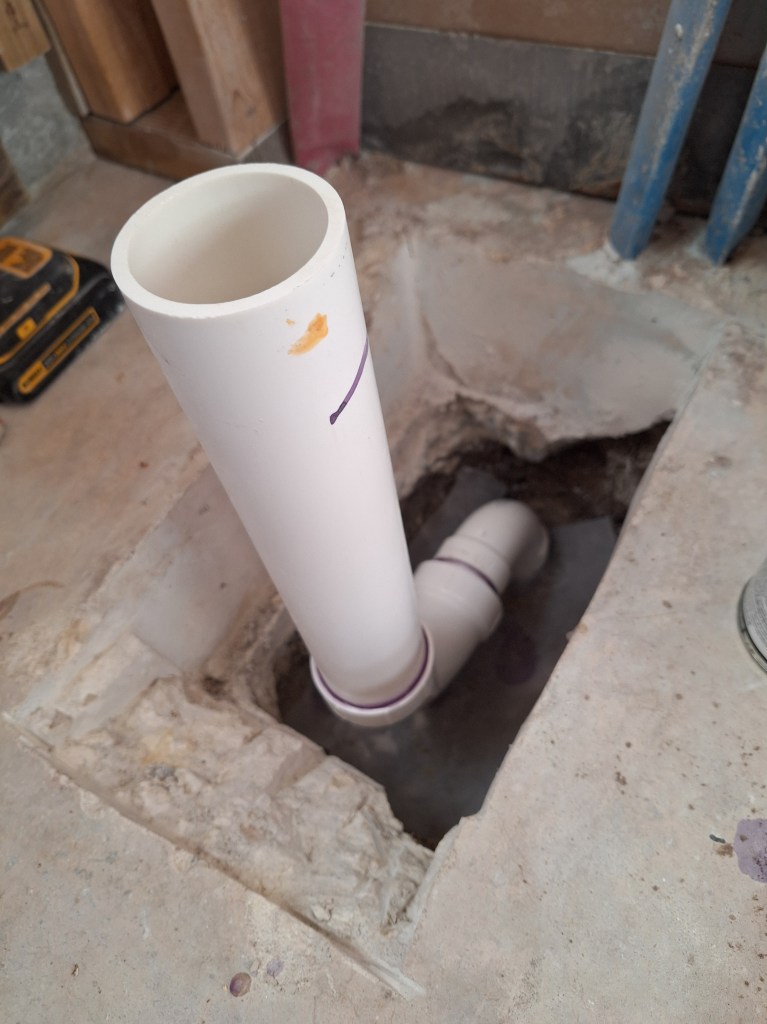
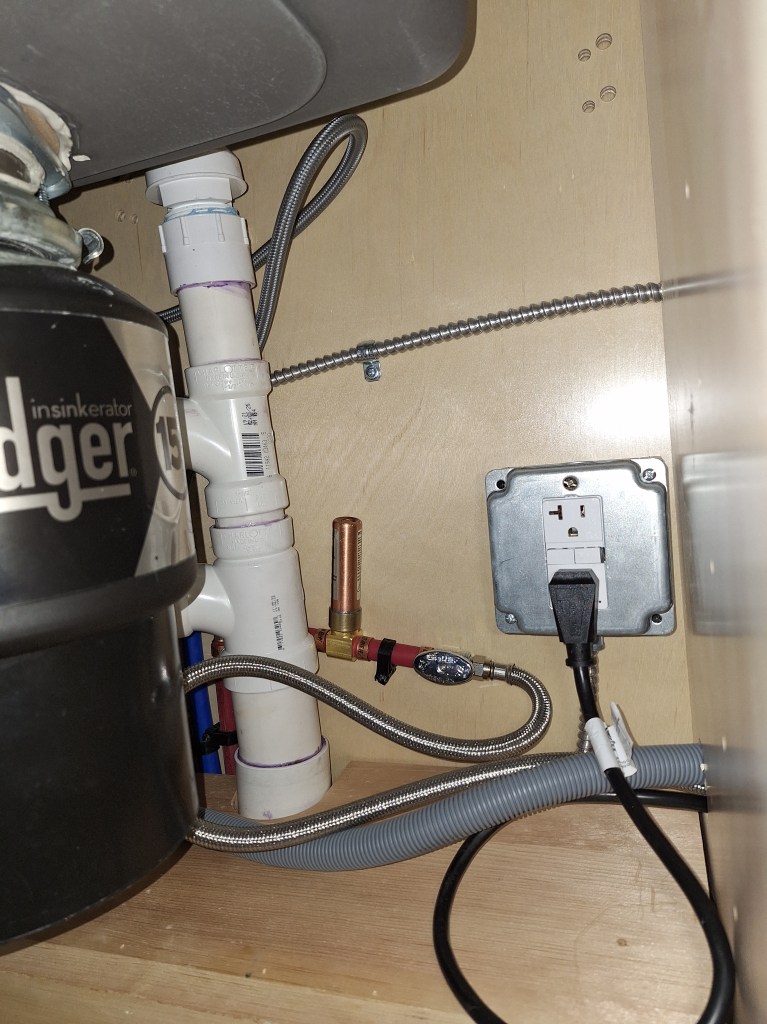
Below you can see the where the drain emerges from below the cabinet. At the top of it is a Studer Vent. Plumbing vents act as pathways for air to enter and exit the drainage system. This helps maintain balanced air pressure, preventing a vacuum from forming that could hinder water flow and cause drainage issues. They are normally inside a wall cavity and extend out through the roof of the house. Since this is not available in an island, the Studor vent comes to the rescue. It provides the venting function while preventing sewer gases from escaping.

You can also see below that a water hammer arrestor (the copper thing) is installed along the water supply like for the dishwasher. This is needed because the dishwasher will turn the water on and off suddenly, which can result in “water hammering”. So this device will prevent that.

Water Supply, Drain, and Power for Dishwasher

Finally, here is the thing everyone sees; the dishwasher.

Dishwasher Installed

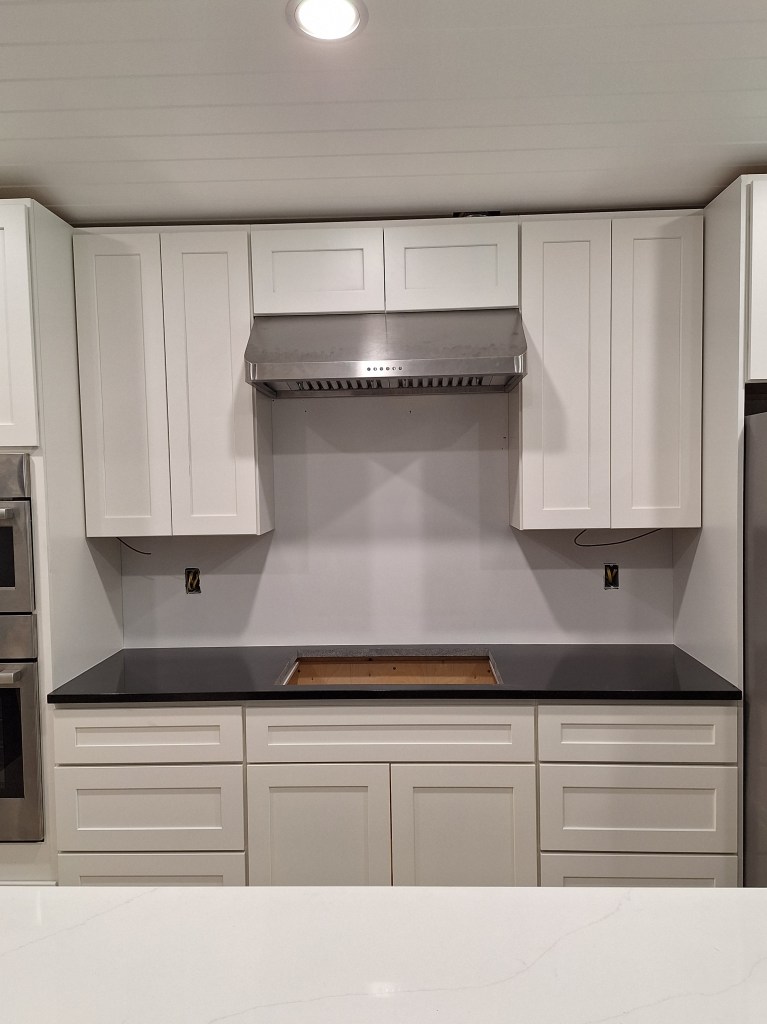
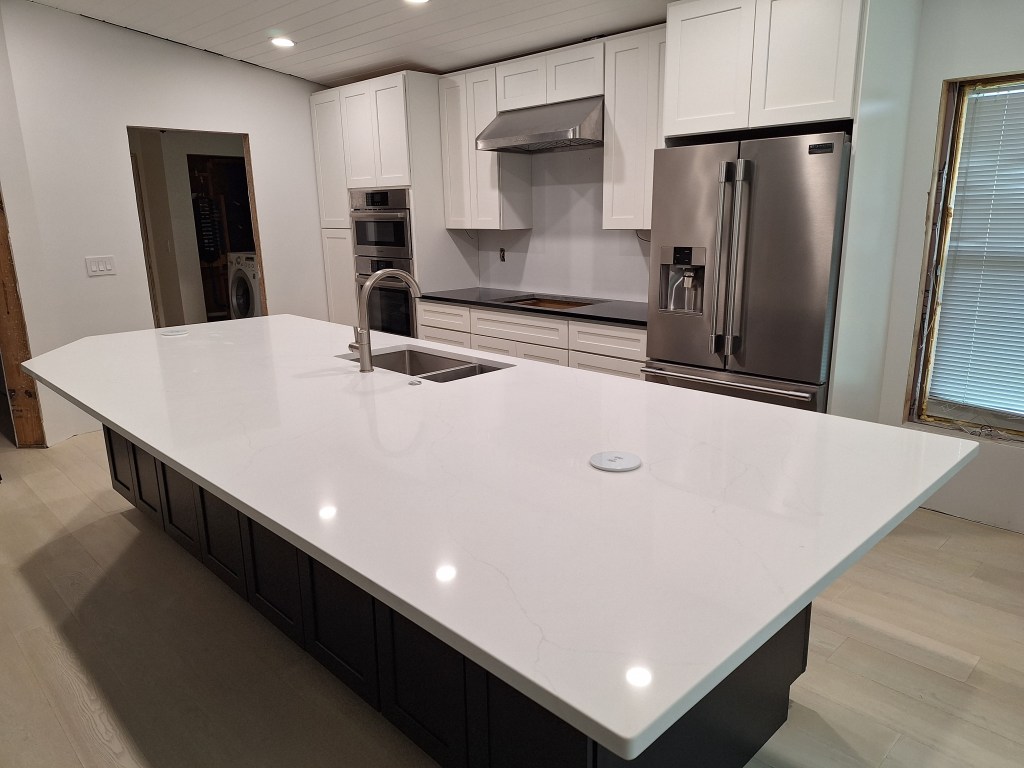
With this done, I have a functioning island. The last thing required to make the kitchen fully functional was the installation of the cooktop. However, before that could be done, I needed to add a backsplash on the wall behind where it will go. I intended to add white tile with black grout to that area, but after a warning from the tile supplier about how difficult it will be to keep clean I decided to abandon that plan and instead extend the black granite up the wall. There is likely to be a lot of splatter on that wall, and granite with no grout lines will be much easier to clean. That decision, however, meant that I would not be installing the backsplash anytime soon. The granite will have to be sourced, and the fabricators will have to do their thing, etc. The backsplash, however, is not something that requires an inspection, so I went ahead and installed the under counter lighting, cooktop, and outlets in that area so that I could schedule an inspection.

Cooktop, Outlets, and U/C Lights Installed.
Closeup of Cooktop

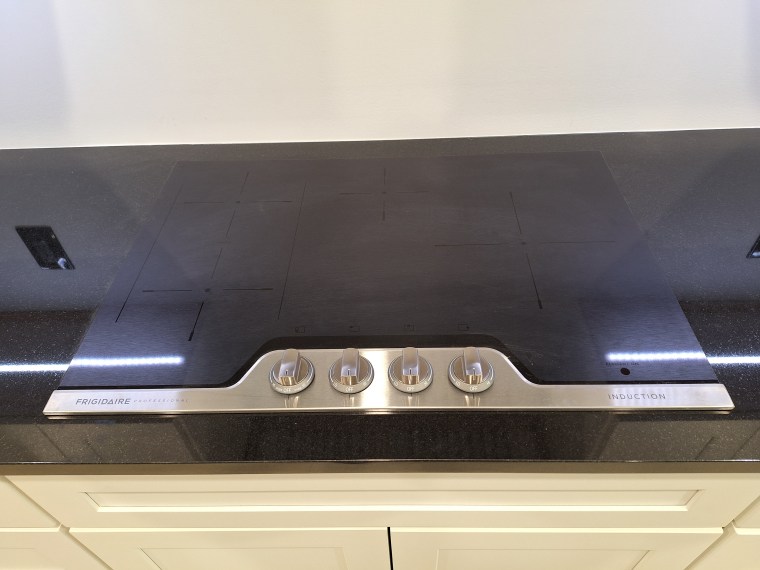
As you can see, the outlets are black, so they will blend in with the black granite once it is placed on that wall.

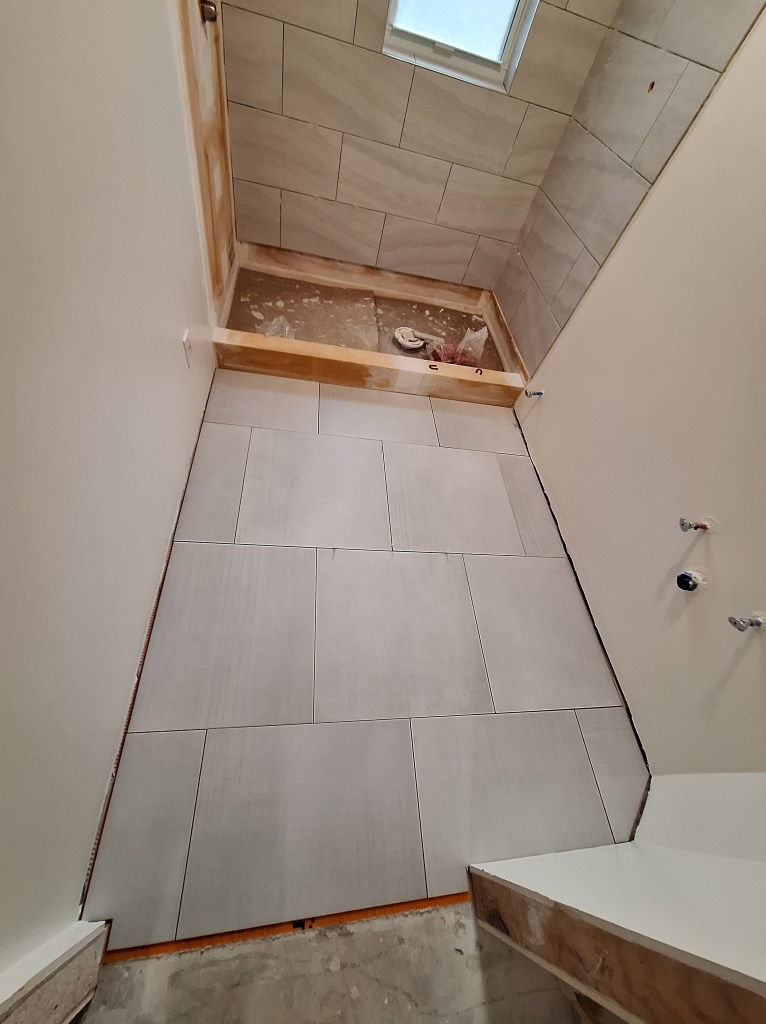
I ordered the cabinet pulls for the kitchen. The ones I liked were surprisingly expensive, but I got them anyway. Apart from installing the backsplash and cabinet pulls, my work in the kitchen was done, for now. My inspection was scheduled for Monday, a few days from now. So I turned my attention to the guest bathroom, installing the shower head and wand.

Shower Head and Wand Installed in Guest Shower

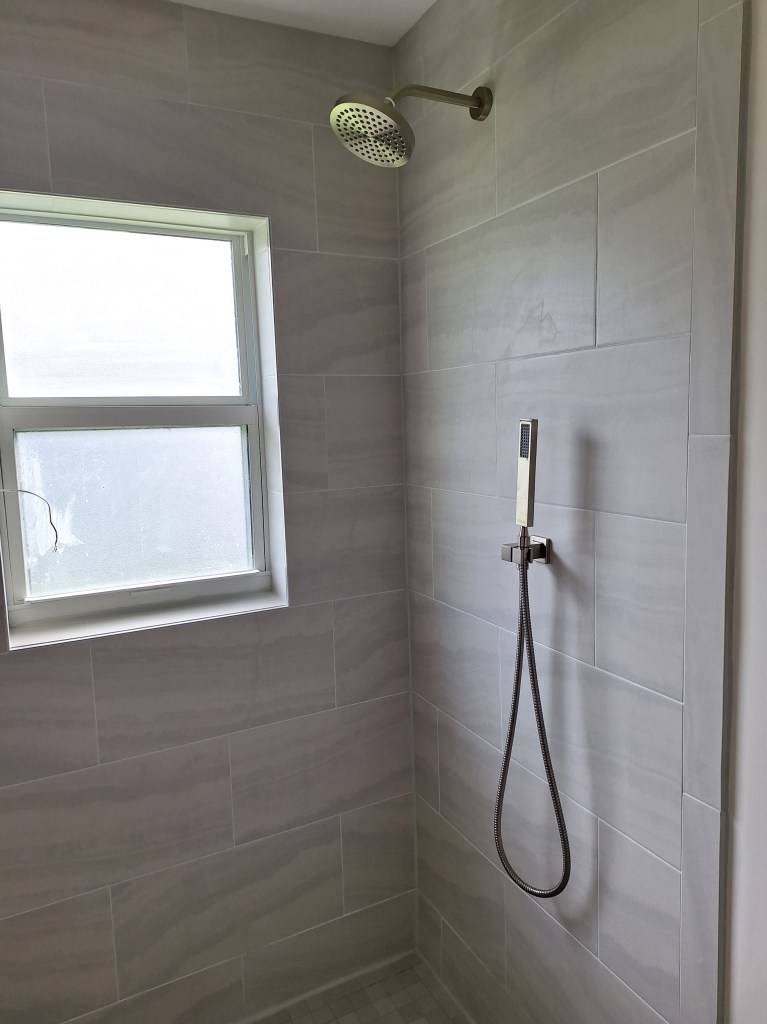
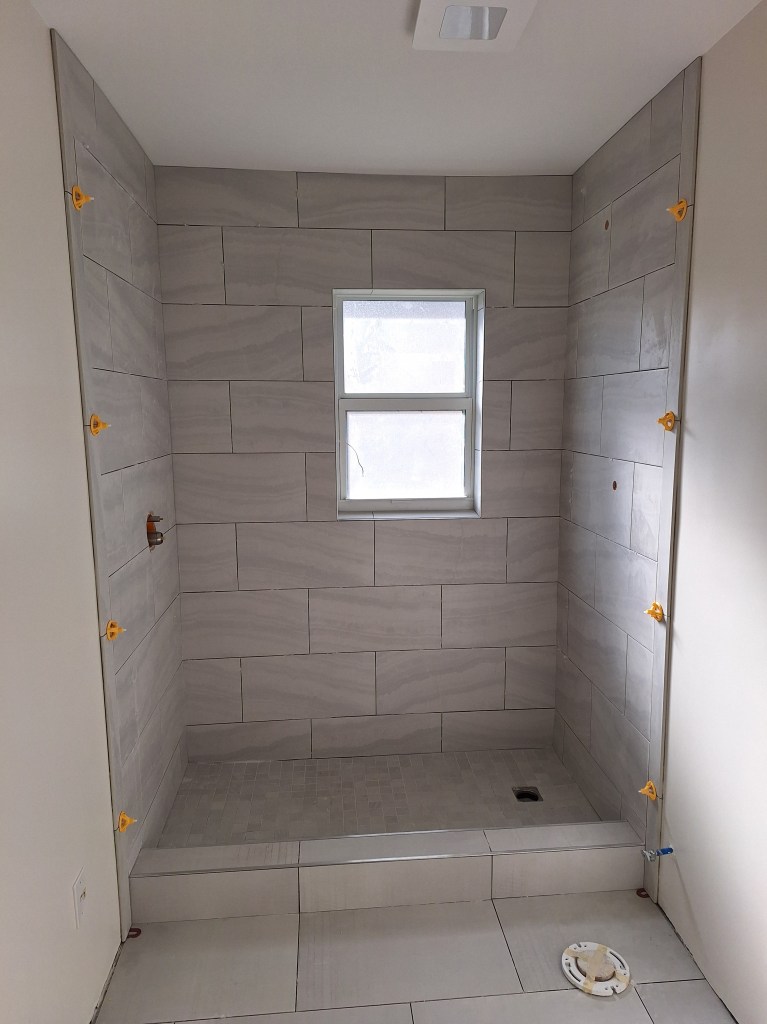
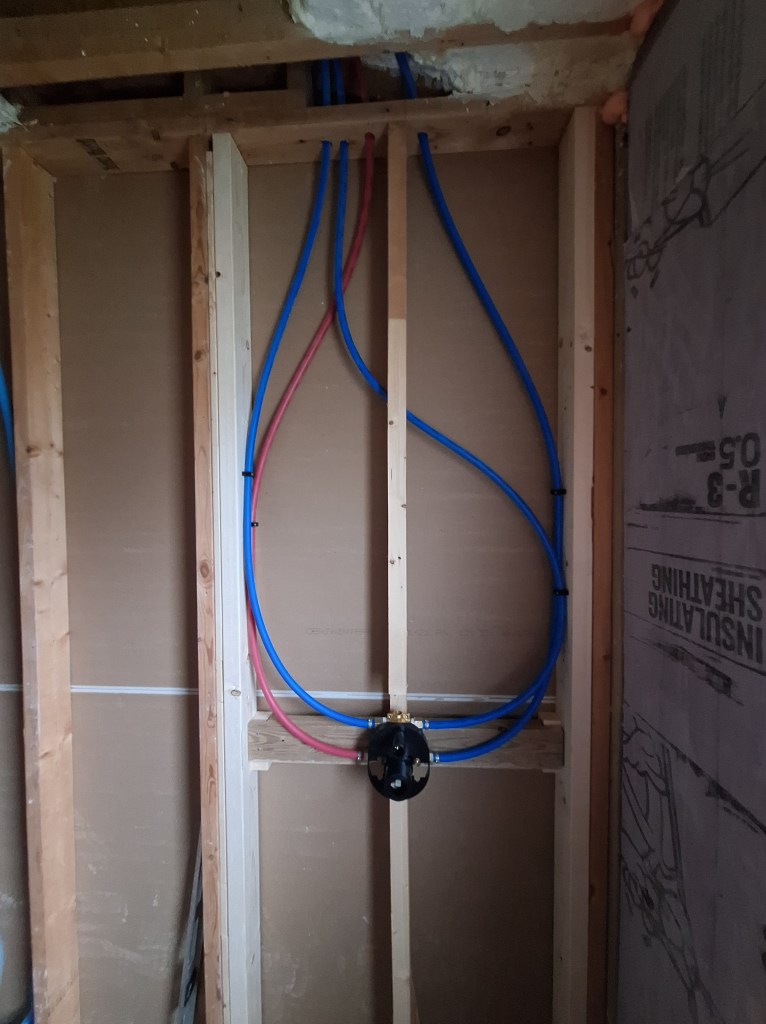
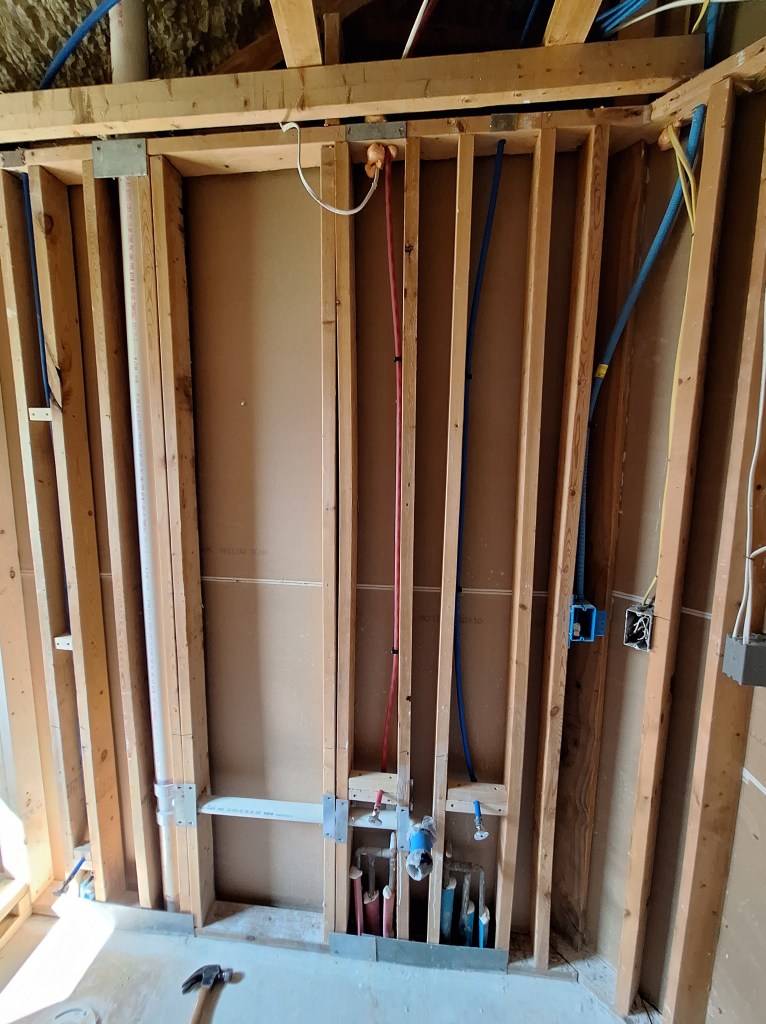
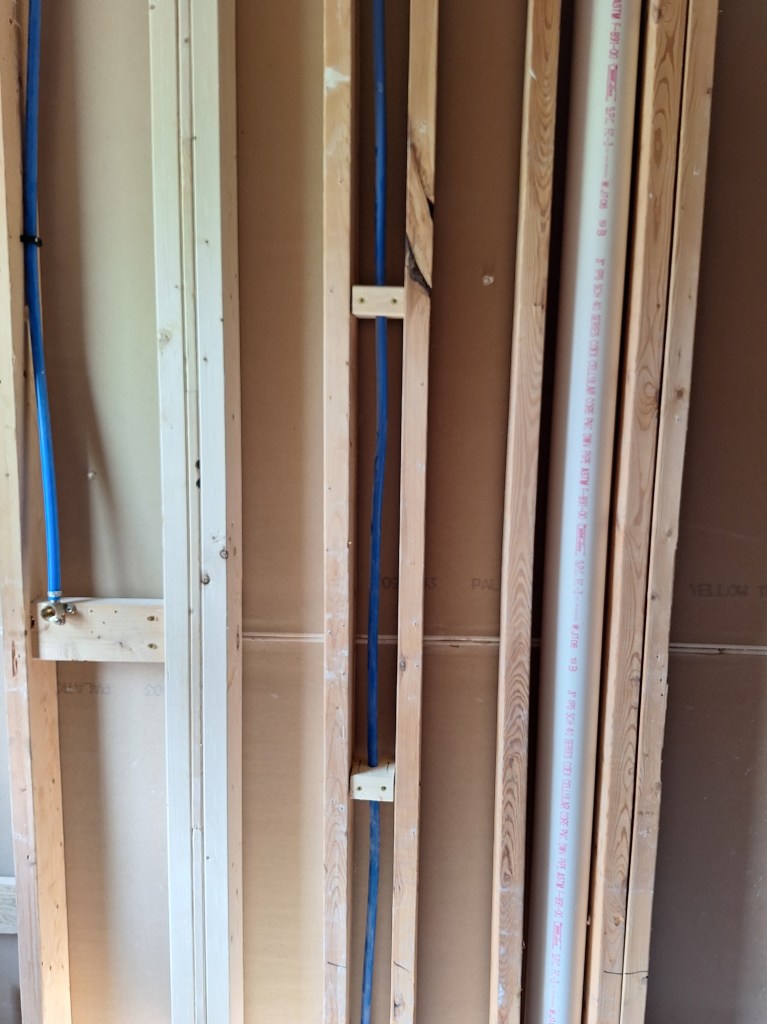
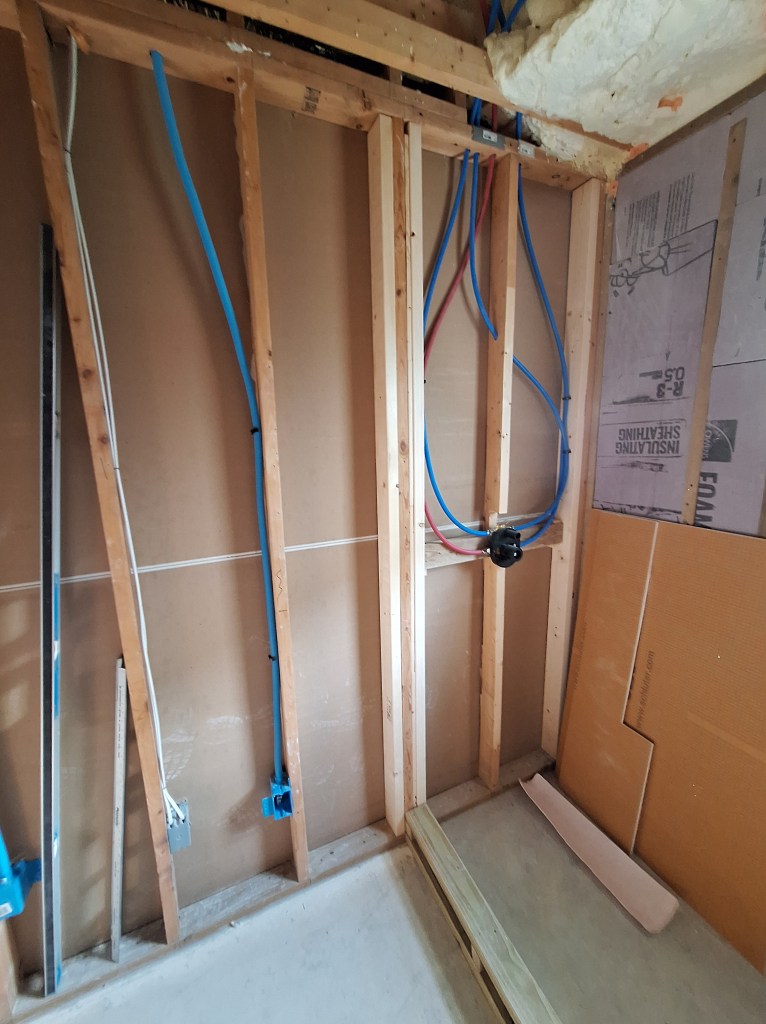
There is a bit of a story with this. Both the shower head and wand have separate water supply lines. Each line connects to a “bent ear elbow” behind the wall. When I positioned the two elbows, I estimated where they should go. Unfortunately, I set them back too far, meaning the threads for both the shower head and wand holder could not reach them. This was not an issue for the shower head because I was not keen on the rain shower head I had purchased. It was kind of fancy and attached to the wall with an extended version of the holder for the shower wand. More than that, though, I wanted a shower head that was not limited to just a rain head. So I decided to replace the one I had with one that had both a rain and a traditional stream (achieved by rotating the shower head). This also came with a traditional shower arm, which meant it would easily reach in and connect to the recessed elbow. It was not a perfect color match, but close enough.

Shower Head

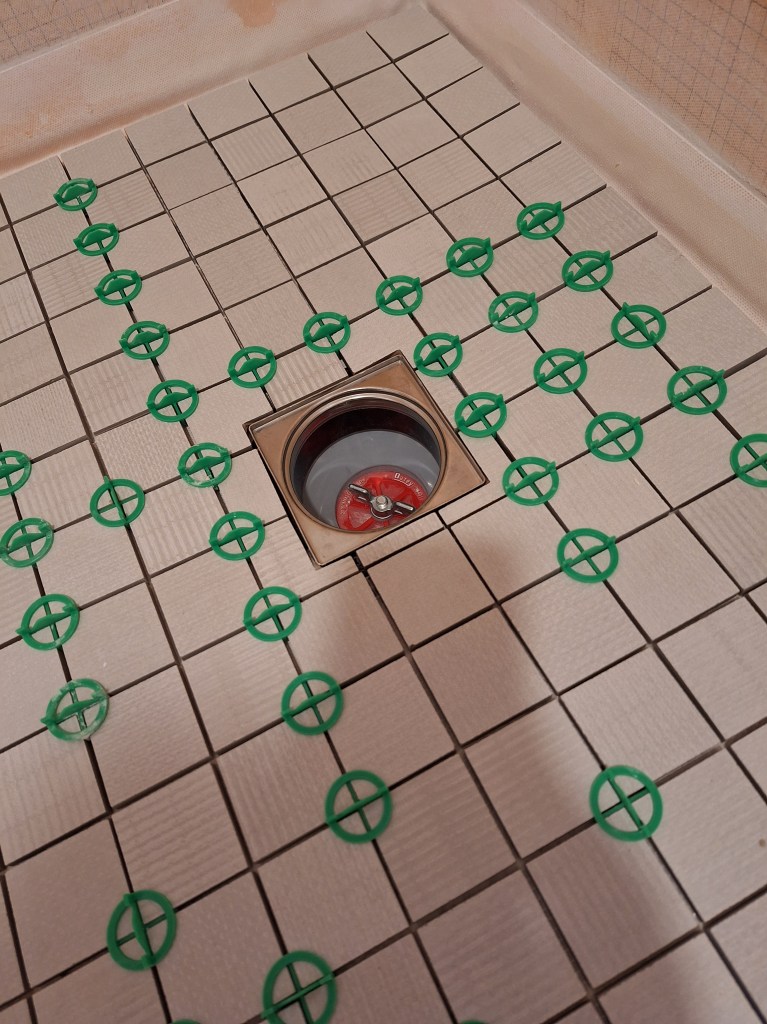
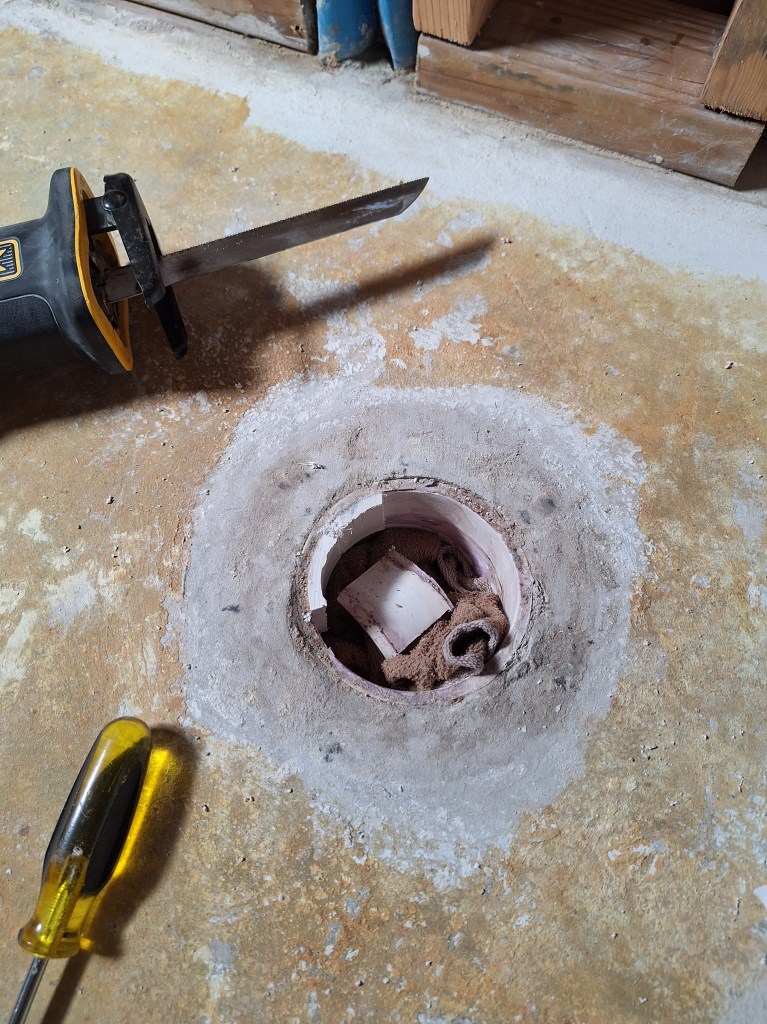
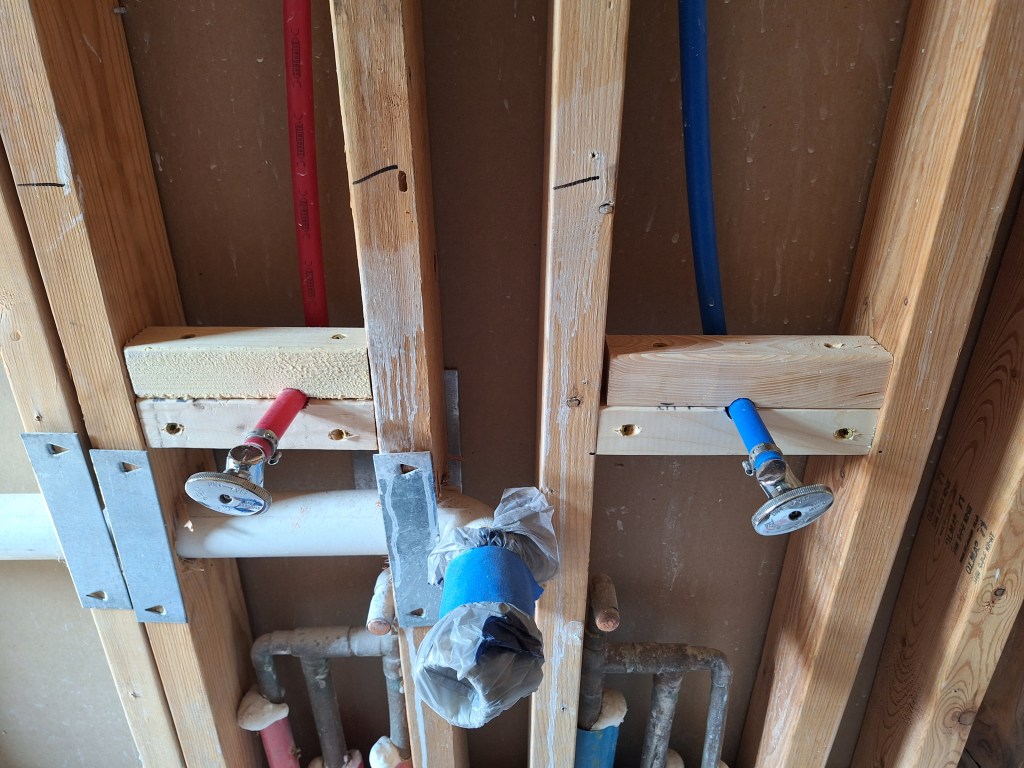
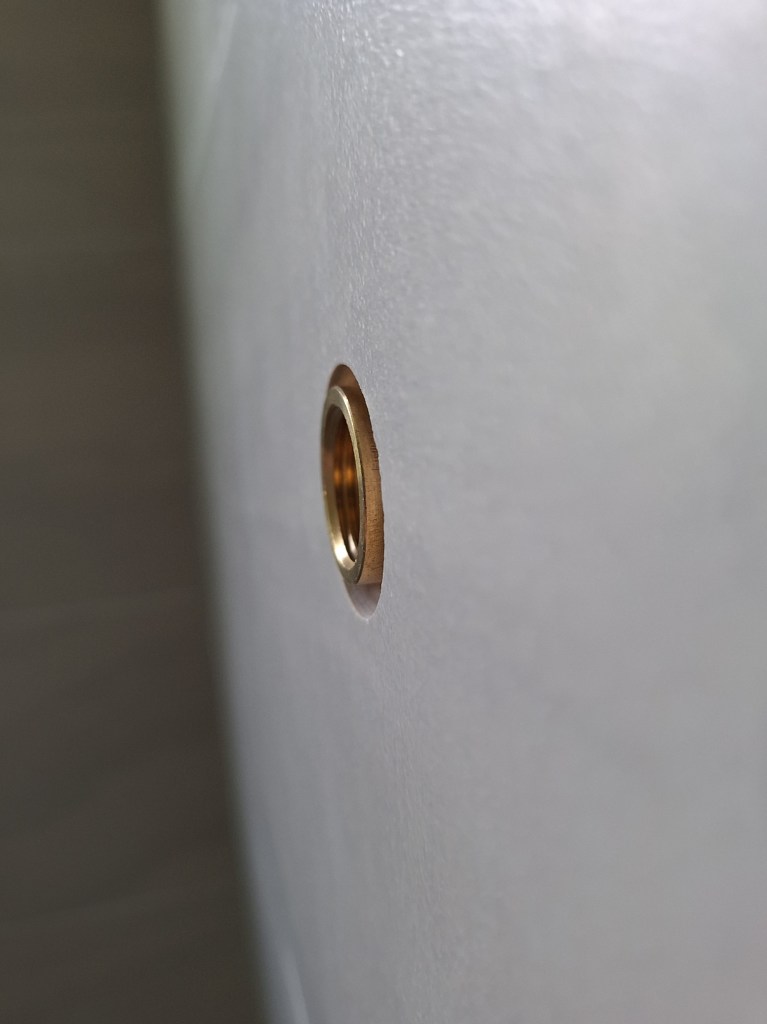
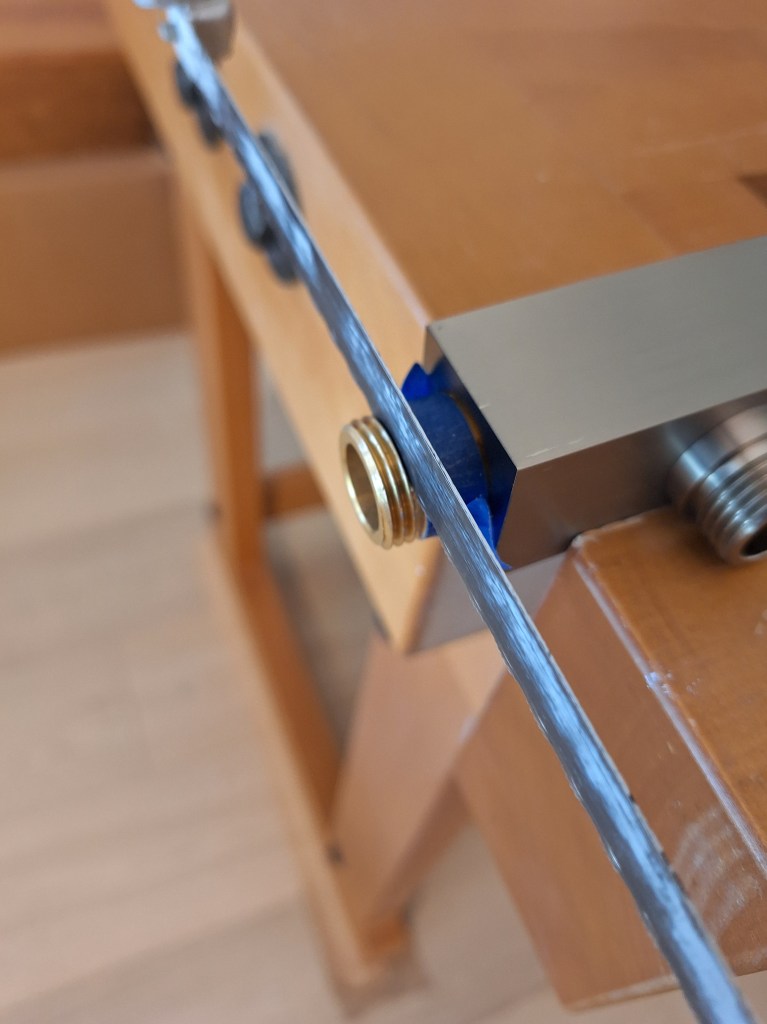
However, there was no such option for the wand. The threads of the wand holder were not long enough to reach the threads you see in the image below.

Drop Ear Elbow Recessed behind the Tile

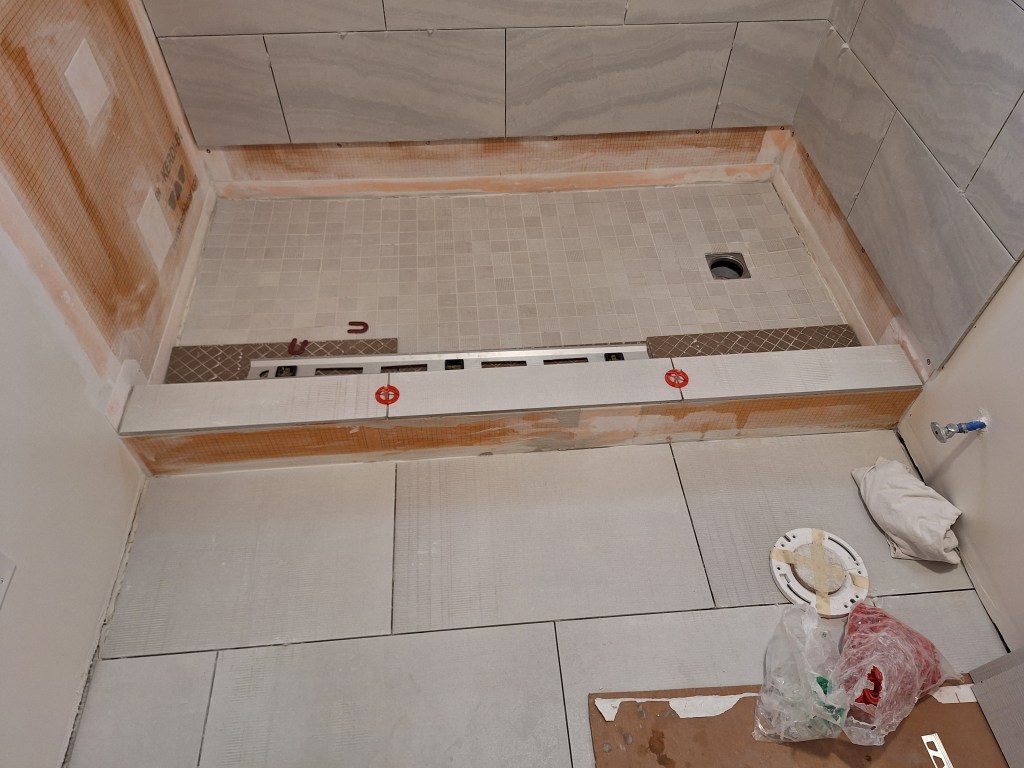
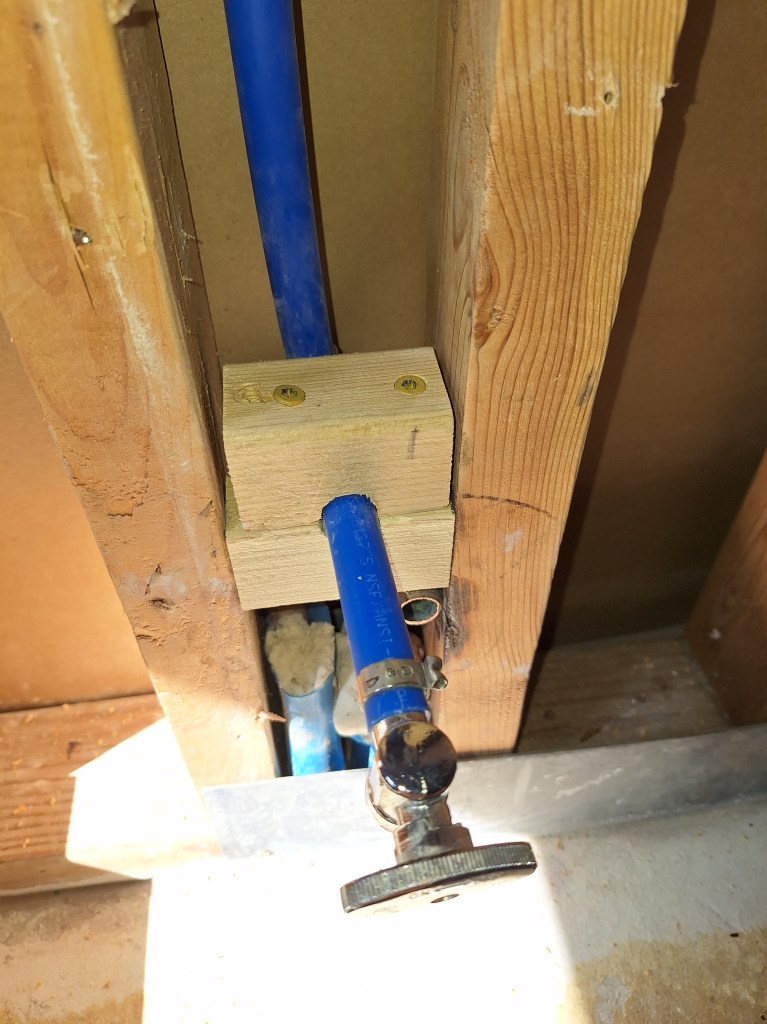
To fix this, I purchased an adapter to bring it out to the level of the tile. In the image below, you can see that it actually comes out just beyond the surface of the tile, but this is well within tolerance because the flange for the wand holder would cover it.

Adapter Added

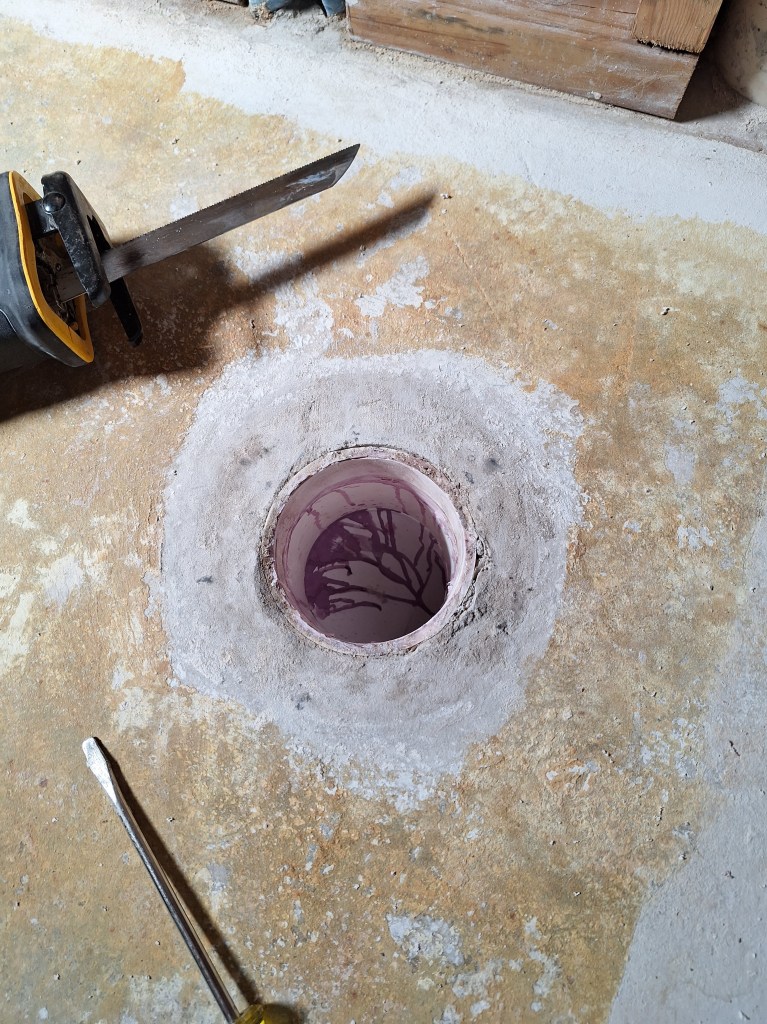
Unfortunately, the threads of the wand holder were too long and, when fully seated in the adapter, the holder extended too far to be covered by the flange.

Threads too Long

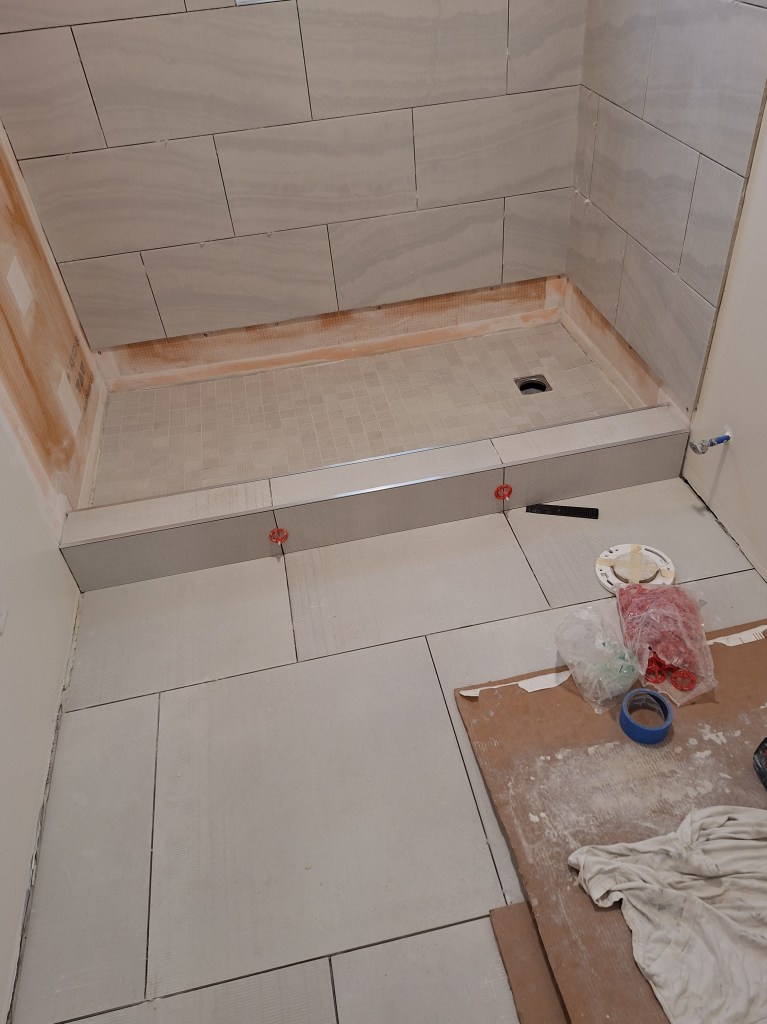
As it was, this was unusable and looked like I’d have to replace it. After some thinking, I decided to try cutting off some of the brass threads. Since I figured I was going to replace it, I might as well give it a shot. So I pulled out a hack saw and sawed off a section, careful to keep the threads in tact.

Cutting the Brass Threads
Section of Brass Threads Removed

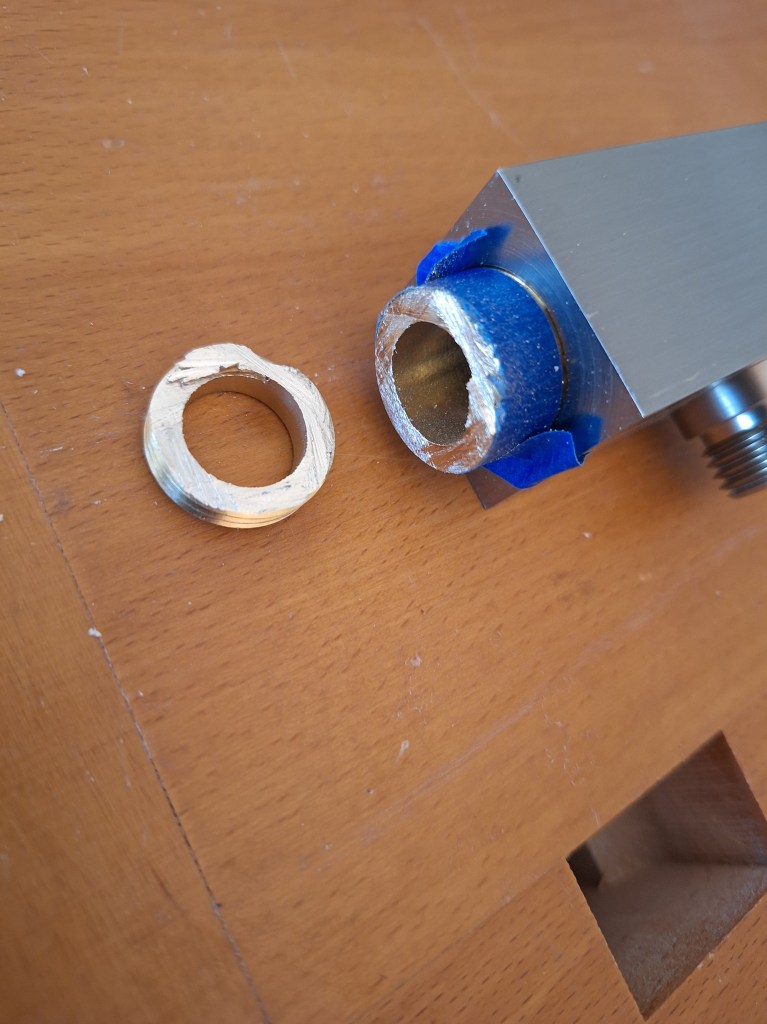
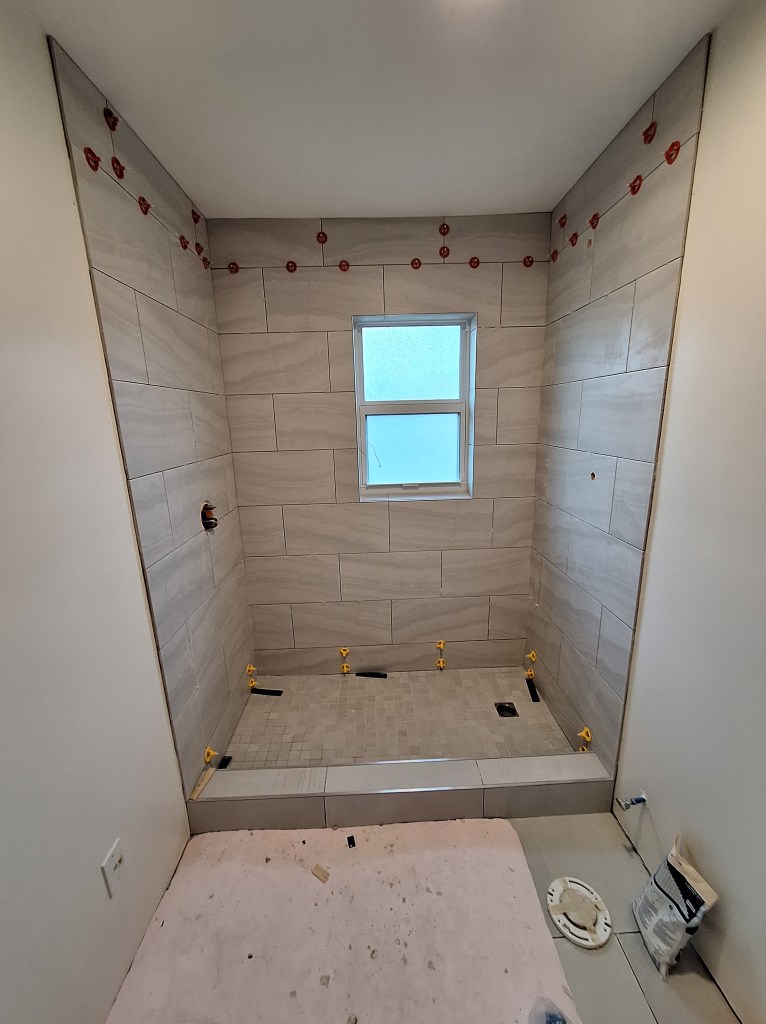
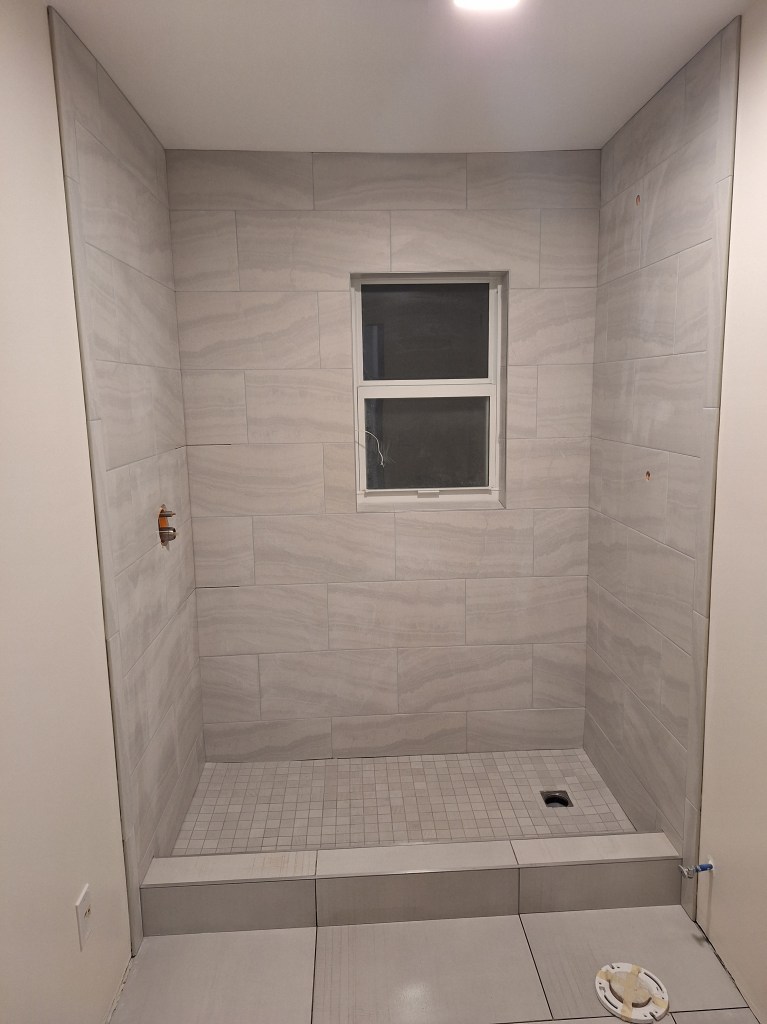
Although it looks a bit messy, I didn’t have to do any work with a file to clean it up. The threads engaged nicely with the threads in the wall, resulting in a nice fit. It protruded just a bit, but that was easily covered by the flange, as you can see in the image below.

Shower Wand Installed

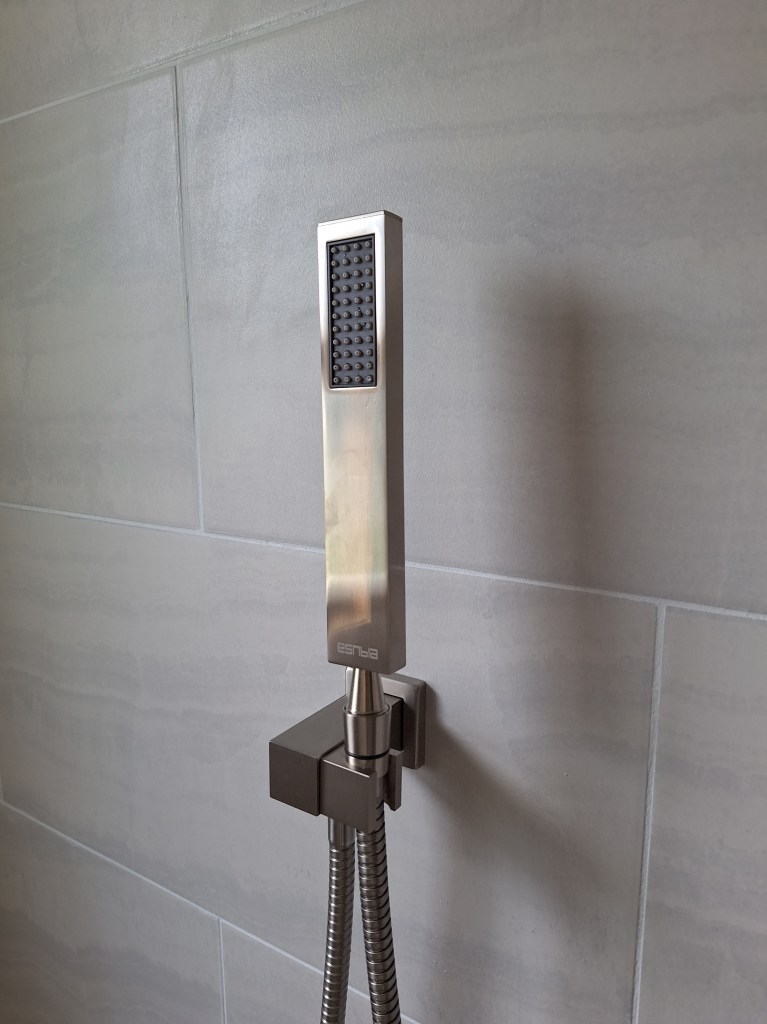
I was pretty happy about this. I thought this was going to be a major headache. To have it come together like that was very pleasing.

My cabinet handles arrived, so I got to work installing them. I installed all but the ones that will be going on the cabinet doors that I am having replaced. A few of the doors had defects. Given that there is a 5 year warranty, the company has been notified and they will eventually send me replacements. So in the images below where no handles are present, those are the doors that will be changed out once the new ones arrive.

Handles Installed
Handles Installed

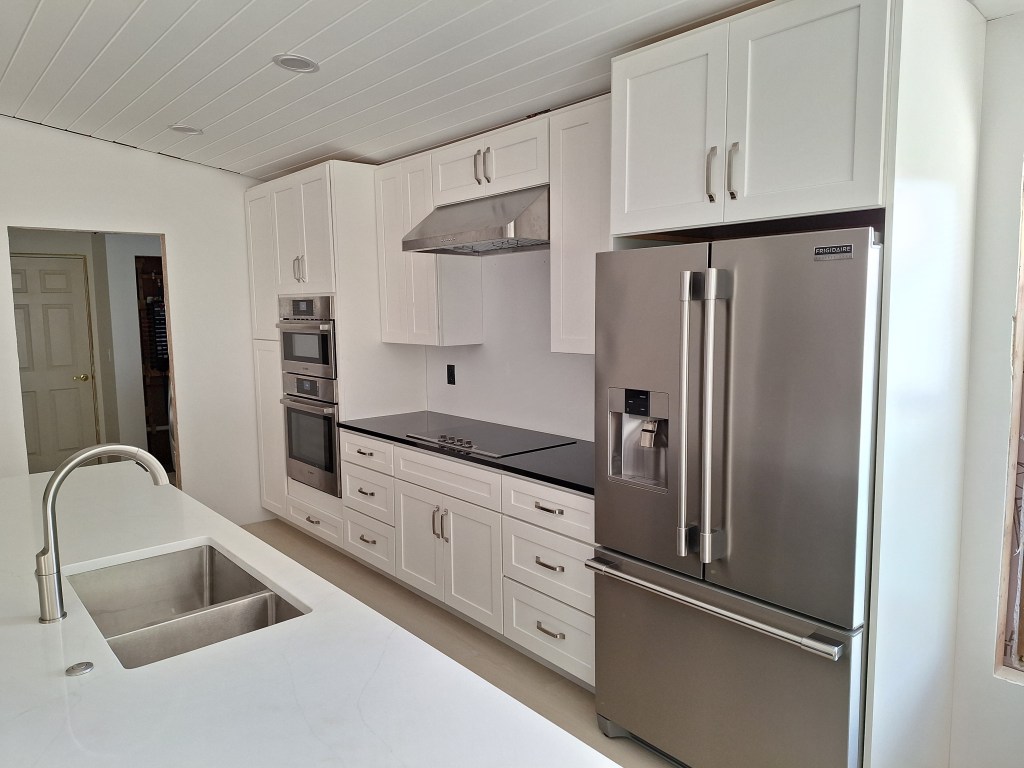
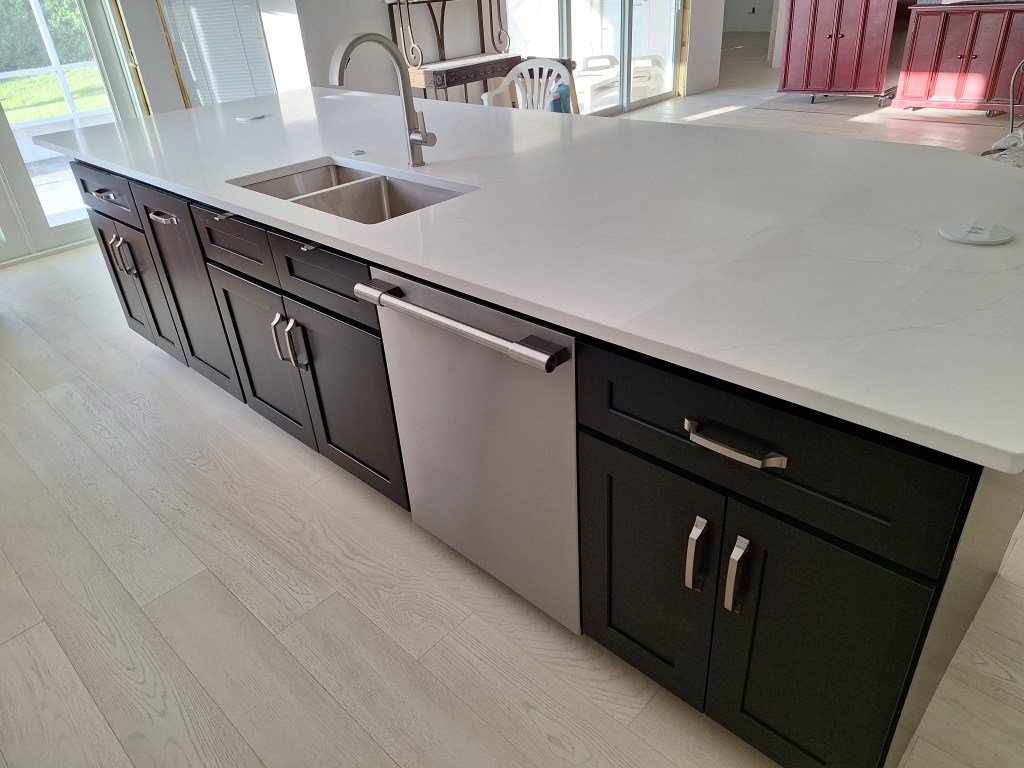
Note that on the other side of the island there are also cabinet doors, but they will not be getting handles because those cabinets will rarely be used and adding handles might present an obstruction for ones knees while sitting at the counter. They can be opened by pulling on the bottom edge of the door, when needed. Also, from the vantage point of the living room, I think it looks better without them.

My inspection resulted in the approval of the electrical and mechanical. The plumbing and final inspection had to wait because the inspector had trouble finding the stamp on the glass wall of the master shower that shows it is tempered glass. That was resolved the next day, so I scheduled another inspection, which resulted in the approval of what was remaining. So I am finally done with inspections, which is a really big deal. I am free to move in when I’m ready and can proceed with whatever project suits me without regard to permit expiration dates.

The lease on my apartment ends mid November, so I will use the time between now and then to work on anything I feel I’d like done before I move it. However, I am at the point now where I could move in because the remaining projects are ones I can and will do while living in the house.

The timing of this worked out well, as I am going on vacation for about ten days. So it’s a nice way to start that. When I return, I think I’m going to focus on the garage and setting up the workshop I need to address the upcoming project. That will be fun.

Guest Bathroom Tiling – January 2025

Before leaving on vacation in mid December of 2024, I took advantage of a few days I had available and set and grouted the mosaic tiles in the shower. I started by dry fitting them in order to determine the cuts needed to accommodate the drain opening.

Dry Fitting Mosaics around Drain

Then it was time to actually set the tiles, which is shown below.

Mosaic Tiles Set on Shower Floor

The next day I removed the spacers and cleaned out any excess thin-set between the joints before applying the grout. Here is the finished product.

Mosaic Tiles Grouted

With that done, I went on vacation for several weeks. After I returned, I covered the shower floor with cardboard to protect it as I tackled the shower walls. I started by setting the two small horizontal pieces on the bottom part of the window frame (the stool). I then began tiling the window wall of the guest shower, thinking I could put the trim piece in and work toward the floor. That was a mistake, as the mortar was not strong enough to prevent the tiles from sliding down due to gravity (duh! In retrospect). So I pulled off the trim, along with the two tiles I had already set on the wall, and cleaned them up. I also wiped up the thin-set I had applied to the wall, then put a ledger board in place using a strip of leftover Kerdi board. I did my best to make sure it was placed at a height where a full tile would meet up with the trim piece, once I got up to the bottom of the window. I started setting the tiles and, fortunately, my calculations worked out and the tiles met up nicely with the trim piece. I tiled up to the bottom of the window before finishing for the day.

Back Wall Tiled up to Bottom of Window.
Window Stool and Trim Piece

The next day I added the remaining pieces around the window frame. This turned out to be far more fiddly than I was expecting and was all I accomplished that afternoon, which was just as well, as I preferred to have them set up before I started on the remainder of the back wall.

Tiles around Window Frame

After that, I set the tiles on the remainder of the back wall, excluding the top and bottom rows, which will need to be scribed. I will leave all the scribing work until the end.

Back Wall Tiles Set
Closeup of Trim Work around Window.

I made one small mistake when setting the tiles around the window. If you look closely at the grout line at the top of the window frame you’ll notice that it doesn’t line up exactly with the grout line of the tile on the wall. It’s close, but not quite right. When cutting that tile, I was focused on aligning the trim and everything else except that part. It’s a shame because I could have easily gotten it right. It was just an oversight. Fortunately it wasn’t far off and is in a location where it is unlikely to be noticed, so I am not sweating it.

I worked on the shower head wall next. This was relatively simple compared to the back wall.

Shower Head Wall Tiles Set

This wall required that I cut two round holes to accommodate the shower arm and wand. When I cut the hole for the shower arm in the master shower, I did it freehand, which resulted in the drill bit wandering somewhat, leaving a scar that was covered by the escutcheon plate. To prevent this from happening, I cut a hole in a piece of wood into which the 1-14″ diamond cutting bit would fit snugly. I set the wooden “guide” on top of the tile and fed the drill bit into it. It worked very well, keeping the drill bit in position throughout the cut. Consequently, both holes were flawless. The only thing left was to ensure they were positioned correctly, which, after careful measuring, they were.

Another little thing I had to contend with when setting the tiles on this wall was where to end them. They are supposed to extend from the back wall to the outside edge of the curb where bull-nose tile will provide a nice clean transition to the painted wall. However, I had not yet tiled the curb, so the outside edge had to be estimated. I did this by using a scrap piece of the tile I will use on the curb and a 1/8″ spacer to account for the thin-set. I then used my laser level to shine a light up the wall from where I estimated the outside edge of the curb will be and marked it with pen. It would have been safer to tile the curb first, but I wanted to work my way from the back of the bathroom to the door so that I was not carting and potentially spilling thin-set over my newly placed tile. Perhaps I should have set the floor tile and curb first, then covered them to protect them from spills.

After writing that last sentence, I stopped work on the shower walls and decided to set the floor tiles and curb. Although I had already tiled the shower head wall, estimating where to end, I thought it best to not try the same thing on the valve wall. If my estimate was off on the shower head wall, any misalignment would not be very visible because it would be behind the toilet. On the valve wall, it would be completely exposed, so I didn’t want to risk it. So I got to work on the floor.

I started by cutting and dry fitting the pieces.

Floor Tiles Dry Fit

I then set them.

Floor Tiles Set

After the floor tiles were ready to walk on, I started on the curb, setting the horizontal pieces first, so that I had a target to aim for when setting the vertical pieces and the trim.

Curb Started
Curb Tiles Set

With that done, I was pleased to discover that the wall tiles for the shower head wall lined up nicely with the outside of the curb, so my estimate was correct. I then started setting the tile for the valve wall, where I could directly reference the outside of the tiled curb to determine where to stop.

Valve Wall Tile Set

This went well, except for the opening around the valve. I really messed that up, as you can see below.

Botched Valve Opening Cuts

That is embarrassingly ugly. The reason it is so bad, is because I marked the three tiles separately. I started with the tile on the lower right, which is acceptable. The next one was the tile on the lower left, which is really bad. Finally, I marked out the opening on the tile above, which was also really bad. These cuts were made freehand using an angle grinder, which I was able to manage quite well. The problem was that my markings were off. In retrospect this could have been avoided if I had laid all three tiles on the floor with the appropriate spacing in between, then marked the opening all at once, giving myself about half an inch of play to account for any small measuring errors. So this was just a really bad job. Fortunately it will be covered by the escutcheon plate, so it will not be seen. But one day, if someone removes that plate, they’ll be in for a surprise.

Here is an overview of the state of things after the valve wall was set.

Shower walls after Valve Wall Set

The next step was to set the top and bottom row of wall tiles, which had to be individually cut to fit against the ceiling and floor, respectively.

Tiles Set at Top and Bottom of Shower Walls

You’ll notice that I ran out of the red tile levelers after setting the top row. You would normally just purchase new bases and reuse the red caps, but the bases were not available. I tried to get bases from a different manufacturer, but they did not fit the caps I had. Reluctantly, I opted to purchase a new set of cap and bases from the different manufacturer. What I discovered after using the new ones was how much better they were. The original levelers (red ones) frequently did not break off cleanly, leaving me with the non-trivial task of having to cut out the parts of the plastic base that remained between the tiles. The new levelers (yellow caps) all broke off cleanly, leaving me with no additional work once they were removed. I wish I’d known this long ago and saved myself a lot of work.

After the top and bottom row tiles were set, I added the bull-nose tiles to finish the tile setting for this room.

Bull-nose tile Set

Next up was grouting. To prepare for that, I had to remove the remnants of the leveling clips I mentioned a moment ago and vacuum out any other debris that might prevent the grout from getting between the tile. Once that was done, I grouted the shower wall tiles first, leaving clear the two areas where the corner shelves would be placed (between the valve wall and the back wall).

Shower Walls Grouted

After the grout had dried on the wall tiles, I grouted the large format bathroom floor tiles and the curb.

Bathroom Floor Grouted

With this done, all the messy work was complete. I still had to caulk the edges and corners in the shower, but this would not involve mixing and carrying thin-set or anything messy like that. Consequently, I decided to halt work on this bathroom for now and turn my attention to getting the house ready for the wood flooring installation, which is more pressing, as I’ll describe in the next post. I can return to this bathroom anytime, now that the remaining work will not risk damaging the wood floors.

Guest Bathroom – October 2024

Having made the master bathroom functional, it was time to get started on the guest bathroom. This was the last room in the house that had been untouched since the demolition long ago. I left this room until last because it was where the only working toilet and sink resided. Now that the toilet in the master bathroom is functional, the one in the guest bathroom was no longer required. Similarly, with a working utility sink in the garage, I had an alternative to the one I had temporarily installed in the guest bathroom. Still, I wasn’t planning to remove either of these appliances until absolutely necessary.

The first thing I did after cleaning out the space, was to relocate the shower supply lines. I put them in place back when I was running the PEX throughout the house, and simply placed them on the wall where the original pipes had been. You can see this on the left side of the image below.

Shower Pipes Original Location

This bathroom originally had a bathtub/shower setup, so it made sense for the valve to be on that side of the wall. However, I no longer wanted a bathtub. All I wanted was a walk-in shower, with a curb. This meant that it made more sense to locate the valve, and therefore the supply lines, to the opposite wall, where you could set the temperature without having to be in the shower. To accommodate that, I pulled down some of the ceiling.

Making Room to Reroute the Shower Supply Lines.

As you can see, there is a lot of spray foam up there, leaving little room to maneuver the PEX pipes. Opening up this area made this much easier, and I didn’t have to climb up into the attic to do it. In the image above, you can see the two supply lines dangling down from the ceiling on the left, which is the south wall. They will be fed down through the top plate of that wall once the framing work is done and I know where I will be placing the valve. But before that, I placed some foam board insulation against the exposed concrete blocks.

Foam board Added

Next, I removed the toilet in order to get greater access to the shower area. It was a bit sad to remove the toilet because it worked flawlessly for so long. It had been my only working toilet since I started this renovation and it always just worked. I never even had to change the flapper.

Original Toilet Removed

With the toilet no longer in place I removed the last of the drywall and tile that that surrounded it.

Tile and Drywall Removed

The original toilet flange held up well. It was set in place more than twenty years ago. It will be replaced.

Original Toilet Flange

I removed the toilet flange using a pull saw. This worked extremely well, leaving the flange barrel flush with the floor. I stuffed a towel down the drain to prevent any debris from falling in.

Cutting Off the Flange
Flange Cut Off

The barrel of the flange was removed by using my reciprocating saw to make vertical cuts, being careful not to cut into the drain to which it was glued, then chipping it out using a screwdriver. This was much easier than I expected. The pieces broke away easily.

Removing Flange Barrel
Flange Barrel Removed

With the toilet removed, I had room to install the shower curb.

Shower Curb Installed

This being a much smaller bathroom than the master bathroom, a curb makes sense here to contain the water. In anticipation of the glass wall and door that will enclose the shower, I added additional framing on either end of the curb.

Curb and additional Framing – South Wall
Curb and additional Framing – North Wall

The curb is made from pressure treated lumber. Since it will be covered in a water proofing material, only the wood touching the concrete floor needed to be pressure treated, but I chose to make the entire thing from the same material. To the right in the shot above, you can also see that I temporarily covered the toilet drain with a flange and plug to make sure nothing falls into it. This flange will not be the one I use in the end, because it is too small, but it serves as a protective cover for now.

Next, I installed the shower valve.

Shower Valve Installed

As you can see, in order to position the valve centrally on that wall, I had to cut a notch in the center stud to make room for it. I also added another stud along the outside wall in order to provide more area to attach the waterproofing board (Kerdi Board).

I brought the hot and cold supply lines down through the top plate, but it was extremely tight, especially for the cold line (blue). The two lines that leave the valve and travel overhead to the opposite wall would have to be done in a more round about way.

Supply Lines to the Valve
Supply Lines from Valve to Shower Head and Hand Held Wand

Given the tight spacing, I had no choice but to run the two traveler pipes to the valve as shown below.

Supply Lines Connected to Valve

I also made a change to how I brought down the two travelers to the drop ear elbows.

Supply Lines Connected to Drop Ear Elbows

If you look a couple of pics up, you’ll notice that I originally ran the two lines down the preexisting holes in the top plate. After deciding where to place the blocking for the shower head and hand held wand, I moved them to more directly align.

With the supply lines in position, I started looking at the drain situation. Since there was a tub/shower in place before, the drain needed to be replaced with one suitable for the shower, which meant pulling out the existing 1-1/2″ drain and installing a 2″ drain, as required by code.

Existing Drain for Shower/Tub

Below you can see how the fitting I just removed has an inlet for the drain and another for the overflow drain of the tub. The remaining stub goes down about 12″ to the bottom of the p-trap.

Tub Drain After Removal

Below I show the new arrangement that will tie into the remaining stub.

Drain Fittings Dry Fit

As you can see, it sits way too high. This is made even more clear when the drain itself is added.

Drain Dry Fit

Even after the shower pan is added, I would still have to lower the stub by close to 8″ to accommodate this, which meant cutting out the concrete at the bottom of the box. It also appeared that once the drain flange was added and this whole assembly was lowered, it would come into contact with the front of the box. So the front edge of the box would have to be chipped a way a bit to make room for it.

I began by using my angle grinder to score a series of lines as deep as it would manage. After that, I used my small jackhammer, and the pieces broke away quite easily.

Cutting Away the Concrete

I continued in this way until I had cleared away everything around the existing 1-1/2″ riser pipe.

Concrete around Pipe Removed

Next I removed the dirt from around the pipe until I reached where it connected to the p-trap. I wanted to go as low as possible and still have something to connect to. Once the dirt was removed, I placed the dry fitted assembly roughly in position to determine if I needed to expand the front edge to accommodate the drain flange. As expected, I did have to expand it, so I chipped away only enough to make room for the flange.

Making room for the Drain Flange

After that, I used my inside pipe cutter to remove all but an inch or two of pipe above the p-trap fitting then added a long sweep 90 degree fitting.

First 90 degree Fitting Installed

Then the remaining pipes could be added, which included a short 1-1/2″ connector to a reducer bushing that would fit into another long sweep 90, but this time with a diameter of 2″, as required.

Transition from 1-1/2″ to 2″.
Drain Pipes in Position

I kept the 2″ riser long so it can be cut to final height after the shower pan is in place, just like I did in the master shower. Once given the okay from the inspector, this area will be ready for a concrete pour to lock it in place.

Reluctantly, I removed the utility sink. I had intended to keep it in place as long as possible, but now I was ready to check the walls for flatness and add shims where needed, and the utility sink was in the way. Also, I was ready to schedule a plumbing rough-in inspection, so I needed it out of the way so the inspector could see the drain situation behind the sink. Here are a couple of shots after I removed the sink.

Utility Sink Removed

With the area cleared, I began securing the supply lines. I used plastic clips to secure them to the studs.

Vanity Supply Lines Secured

Where they emerge from the wall cavity I added a 90 degree PEX fitting (hidden behind the wooden clamps) and secured them with homemade clamps. These worked very well and allowed me to position them between the studs where I want.

Homemade Clamps for Vanity Supply Lines

Due to the limited space between the studs where the toilet supply line ran, I could not use the plastic clips to secure the PEX pipe, so I made my own, as you can see below.

Homemade Clamps for Toilet Supply Line
Toilet Supply Line Emerging from between Studs

With that done, the inspector came by and approved my work, meaning I was now free to cover it all up. For the ceiling and walls, this would mean putting up drywall. For the shower, this would mean Kerdi board. It also meant I could fill in the shower drain pipes with concrete. In preparation for that I added back the dirt I removed and added some TapCon screws to serve as mini rebar (as suggested by the inspector).

Drain Pipes ready for Concrete

Since the area around the drain pipes is quite small, no rebar is really needed, but adding a few screws only took a few minutes, so why not? Later in the process I poured concrete to cover part of the opening. I left the area around the riser pipe open as the under side of the drain will need that space.

Concrete Poured

Before putting up drywall, I also wanted to add additional blocking where I thought it might be helpful. I added another stud to the outside of the shower curb to serve as a nailer.

Nailer added to North Wall outside of Curb
Nailer added to South Wall outside of Curb

These nailers were added because this will be the junction between the Kerdi board and the drywall, so I needed something for the edge of the adjoining drywall sheet to screw into. I also added an additional stud to the inside corner between the entrance wall and the vanity wall (shown below), which is angled at about 45 degrees. Originally there was nothing there for the drywall to attach to, which is probably fine given that it would receive no stress, but since the walls were open, I decided to add it to make the inside corner more secure. Notice how I had to notch it in order to make room for the Ethernet conduit.

Additional Stud added in Corner

I decided I would replace the original vent fan with a new one that would also have a light. This meant I would have to replace the wiring to the fan from a 14/2 gauge to a 14/3 so that the vent and the light can be controlled by separate switches. As a result, I decided to pull down the remainder of the ceiling. You can actually see evidence of this in a couple of the shots above. With the ceiling opened up, I was able to create a custom opening for the new fan/light, as shown below.

Framing for new Vent Fan

One of the nice things about doing it yourself is that you have the ability to customize and even change your mind. Although this bathroom has a window in the shower area, I thought it would be a good idea to introduce a fan with a light so that you are not depending solely on the vanity light at night time.

Vent fan Installed

Since I didn’t have quite enough 14/3 wire to reach the fan housing, I had to splice two separate lengths together, which required a junction box.

Junction Box to extend wire to Fan housing.
Vent Fan Wiring Complete

With no switches in place, I tested the fan and light by temporarily connecting the neutral and ground wires and then manually bringing the hot wire in contact with the wire to the fan and then to the wire for the light.

One of the lessons I learned from doing the master bathroom was the importance of having flat walls. The walls in the master shower were flat, but the wall behind the vanity was not, so I had a lot of “mud framing” to do to get it close to flat. This could have been avoided if I had paid more attention to the flatness before the drywall went up. So this time I paid close attention to make sure all the studs were aligned, and planed down those that stuck out and added shims to those that were recessed. It’s a nuisance, but well worth it when it comes time to finishing the walls. I also added blocking at the bottom of the walls where baseboard with be added.

Blocking and Shimming South Wall

The shims are thin strips of cardboard layered on top of each other. Using this material made it easy to fine tune. Also, notice that I added blocking for the other side of the wall too, which is the guest bedroom. That wall will have baseboard, so this will make it easier to attach. Unfortunately, I didn’t think of this on any other walls I did, so I’ll have to do it the usual way by searching for studs when nailing the baseboard.

Blocking and Shimming North Wall

Since there will be very little baseboard along the wall where the vanity will be, I only added blocking for the cabinet to attach to. I did add a piece of blocking for the wall outside the entrance to the bathroom to make attaching the baseboard there a bit easier.

With the blocking and shimming done, I was ready to hang drywall. But first, I had to go get it. And to do that, I used my fancy new rail system I created for the top of my car. Below you see seven 4×8 sheets of blue drywall. The color blue indicates it is water resistant, which is appropriate for a bathroom.

Drywall Successfully Transported using homemade Rail System

I began hanging the drywall on the ceiling, nearest the outside wall. Since I had already installed the shower curb, it got in the way of my lift, so I could not position it directly under the location I desired. So I added a temporary cleat to the wall above the window, about an inch below the ceiling, and moved the lift as close as I could. I then lifted the sheet almost to the ceiling before sliding it over and onto the cleat, which you can see below.

Hanging the first Ceiling Board

Once supported by the cleat, I raised it all the way and started securing it with screws. If you look really closely, you can also see that I applied construction adhesive to the joists. I do this with all my drywall to help ensure it does not come loose in an effort to avoid “screw pops”. Here it is after securing it.

First Ceiling Board in Place

The second board was a bit easier, as I was able to position the lift exactly where I wanted it. The final piece was small enough that I did not need the lift.

Ceiling Hung – View from Entrance
Ceiling Hung – View from Window

Before hanging the drywall on the walls, I added sound insulation, as usual. It’s amazing the difference it makes, especially in such a small space. After adding the sound insulation, the room just feels solid.

Sound Insulation Added – View from Entrance
Sound Insulation – View from Window

And here it is covered with drywall.

Drywall Hung – View from Window
Drywall Hung – View from Entrance

When cutting out the holes for the water supply lines and the drain, something happened that really annoyed me. I hung the top sheet first; the one that touches the ceiling. That went well. The sheet below it is the one where I had four round holes to cut in order to make room for three water supply lines and one drain. I was carefully measuring their locations, referencing them from the edge of the drywall that touches the curb and the lower edge of the top sheet I’d just hung. My measurements were aimed to locate the center point of the cut (I used a drill and a hole saw to make the cuts). I cut the three supply line holes first, then switched to a slightly larger hole saw for the drain. After making that cut I pushed the sheet against the wall and everything fit perfectly except the hole for the drain. Then I realized that after being so careful with the other ones, I made a silly mistake when measuring for the drain. Instead of measuring down from the top sheet to the center of the drain, I measured to the top of it. So that is why you see a sizable gap above the drain. The other holes will be covered by flanges, but I’ll need to do some repair work on the hole around the drain. Even if I could find a large enough flange to cover it, I will still want to improve the situation.

I scheduled a drywall inspection, which is required before I start taping. While waiting for that, I started work on the shower area. I was about to start putting up the Kerdi board on the exterior wall when I realized that the thickness of the Kerdi board (1/2″) plus the thickness of the furring strips (3/4″) attached to the concrete block wall was less than the length of the screws (1-5/8″). I needed at least another 3/8″ to avoid hitting the concrete block. This was not a problem in the master bathroom because all the walls surrounding the shower were interior walls, meaning there was 3-1/2″ of stud to drill into. Rather than add to the thickness of the furring strips, I decided to use the extra drywall I had, which was 1/2″ thick, and attach it to the furring strips. It came out like this:

Drywall added to Build Out exterior Wall.

This worked really well and I loved that I was able to make use of the extra drywall. Since this would all be hidden behind the Kerdi board, there was no need to tape it. All the lines you see drawn on the drywall are there to identify where the underlying furring strips were located. This would be needed when attaching the Kerdi board, which you can see below.

Kerdi Board Hung on top of Drywall

One of the consequences of having to build out the exterior wall, was that I was reducing the space within the shower. It was already a bit tight, and I didn’t like that I was making it tighter, even if only by 1/2″. So I started entertaining moving the curb over one stud. Recall that I added an extra stud on the outside of the curb to serve as a nailer for the drywall. I could shift the curb to align with this stud and gain an extra 1-1/2″. But it was not as simple as that because I also had to take into account the distance between the toilet and the curb. The curb was initially located 15″ from the center of the toilet flange which, from what I read online, was what you want in order to provide enough elbow room. Moving the curb out by 1-1/2″ would reduce that space. However, what is more important is the distance from the center of the flange to the glass wall that will sit on the curb; the thing that will impact your elbow. The glass wall will sit in the middle of the curb, which means I’ll get back to the 15″ I wanted. So I was comfortable pushing the curb out to widen the shower space.

While thinking this through, I did a bit more research on the Schluter curb product. The Kerdi curb is something you attach to the floor using thin-set mortar and is covered with a waterproof membrane, just like Kerdi board. It is strong and can support a glass wall/door. The benefit of switching to this, is that it doesn’t need to be screwed down to the concrete floor, giving me more flexibility when positioning it. So I can keep the area open until I absolutely have to put it in place. One less thing to step over. Below you can see the remainder of the Kerdi board in place and the curb removed.

Kerdi Board Installation Complete

Next, I prefilled the drywall, then taped.

Prefill and Taping Complete

I also added Kerdi band to the seems and to cover the screws in the shower.

Drywall Taped and Kerdi band added in Shower

I left the screws around the window and near the floor uncovered because they will be addressed when I add the shower pan and waterproof around the window. Next will come the cover coats to the drywall. I don’t plan to do anything on the floor (i.e., shower pan) until the walls and ceiling are at least primed. Since this is the last day of October, I’ll close the post here and continue in the next post.